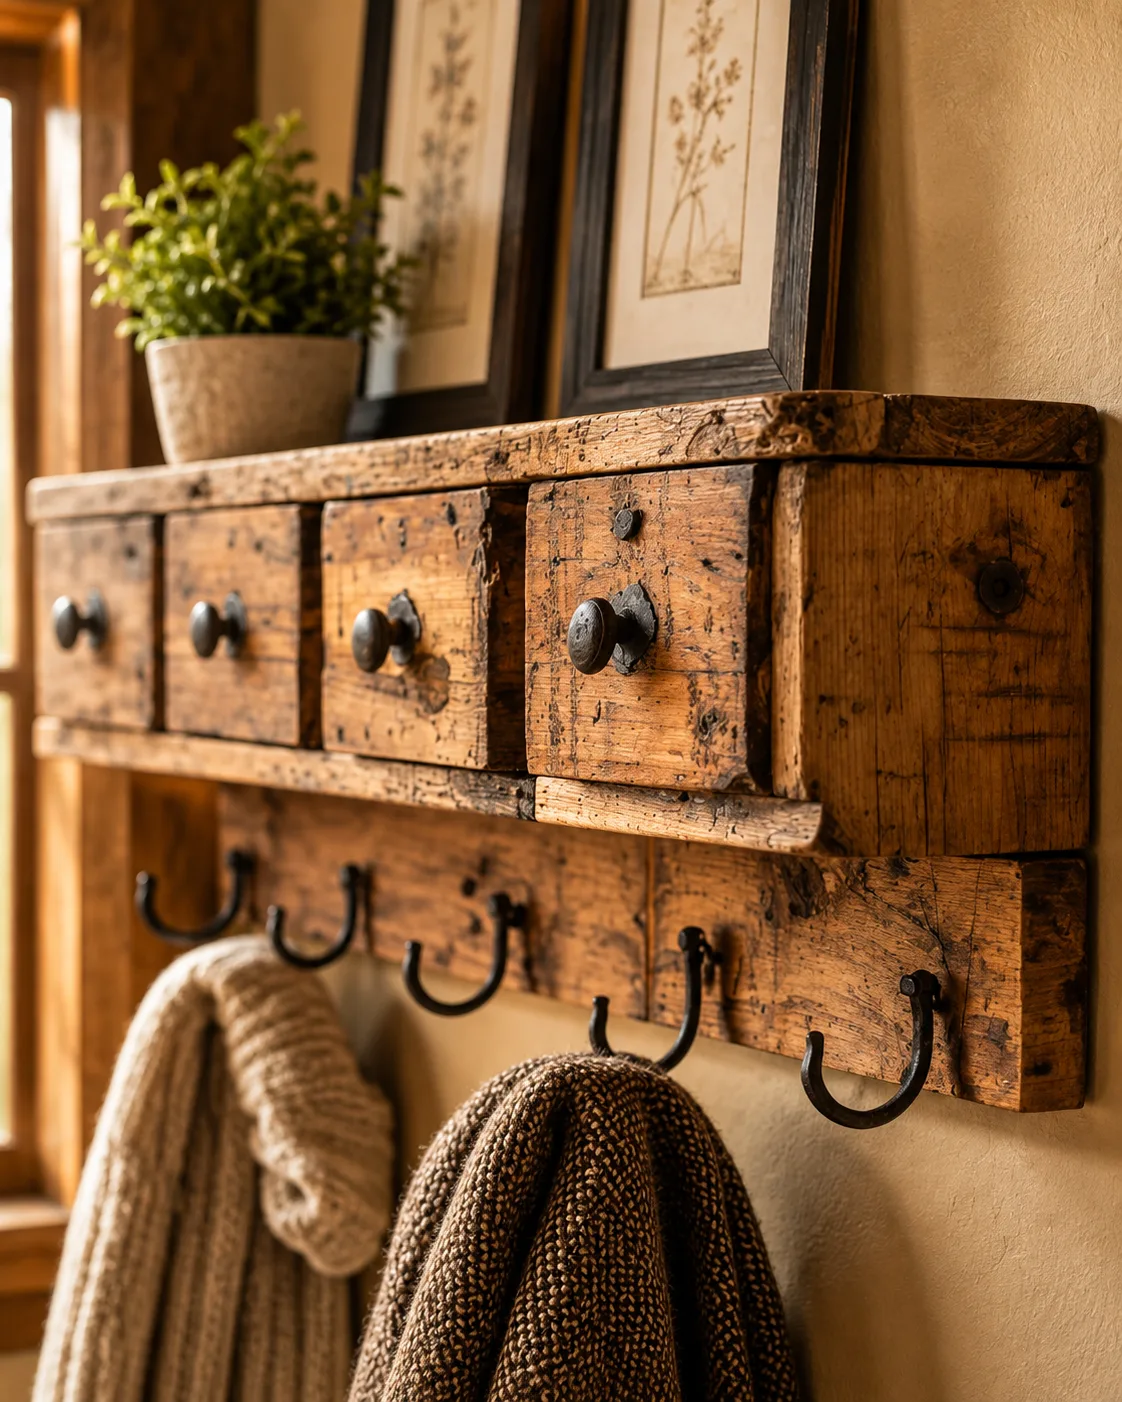
You know those old dresser drawers that somehow end up sitting in the garage long after the actual dresser is gone?
Maybe the drawer is broken.
Maybe the cabinet fell apart years ago.
But that pretty wooden drawer front still looks too good to throw away.
Keep it.
Because an old drawer front can become one of the easiest pieces of wall storage in your home.
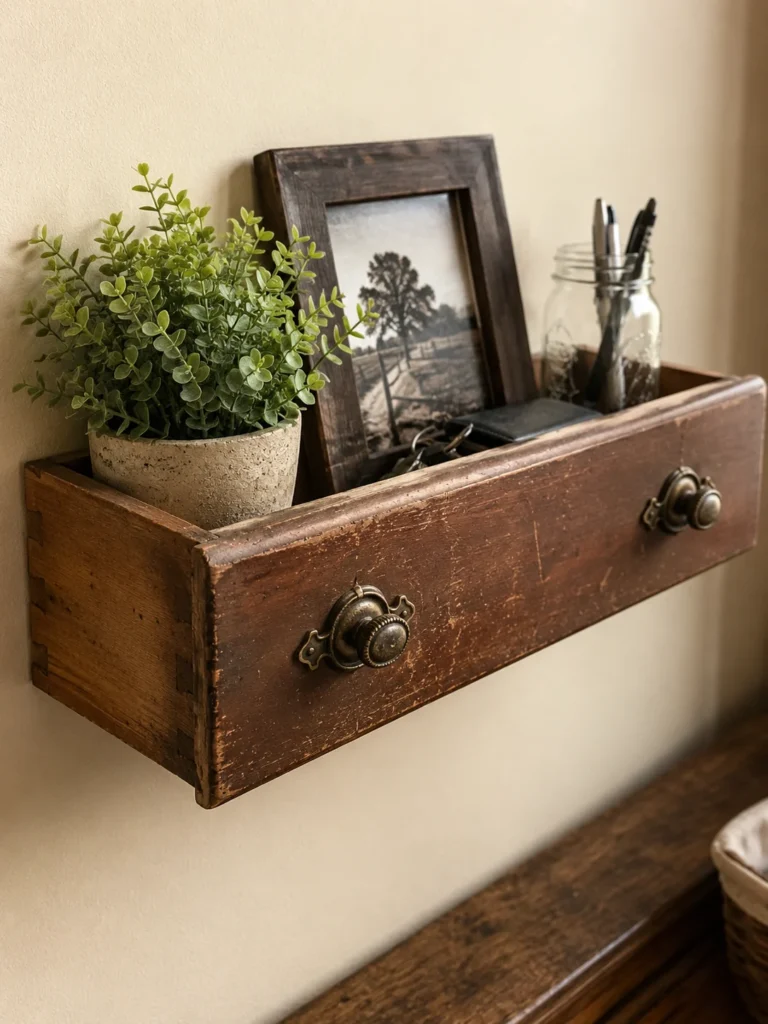
This DIY drawer front wall hooks project turns discarded furniture pieces sideways, mounts them securely to the wall, and adds hooks for coats, bags, towels, keys, hats, or jewelry.
And the finished piece can look surprisingly polished.
Leave the wood aged and imperfect for rustic charm. Paint it creamy white for farmhouse style. Go black for a modern entryway. Use several mismatched drawer fronts together if you want something playful and collected.
Best of all, you don’t need to rebuild furniture.
You’re using the prettiest part that survived.
Here’s how I’d make it from start to finish.
Why Old Drawer Fronts Make Great Wall Hooks
Drawer fronts already have several things going for them.
They’re usually made from reasonably sturdy material.
They have finished edges.
Many have decorative molding or carved details.
And they’re already shaped like small wall plaques.
Turn one sideways or horizontally, add a few hooks, and suddenly you’ve got a useful wall organizer.
It’s kind of funny.
Yesterday it held socks.
Today it’s holding your purse.
That’s a pretty solid career change.
Where to Find Old Drawer Fronts
Start at home.
Before buying anything, check the garage, basement, attic, or shed for furniture pieces you’ve already saved.
You can also look at:
- Thrift stores
- Flea markets
- Yard sales
- Estate sales
- Architectural salvage shops
- Furniture repair shops
- Curbside furniture where local rules allow salvage
Damaged dressers can sometimes be especially useful.
The cabinet itself may be beyond repair while the drawer fronts remain beautiful.
Just don’t take pieces from property that isn’t yours without permission.
Free furniture is great.
Accidental theft?
Less charming.
What Kind of Drawer Front Works Best?
Look for a piece that’s structurally sound.
It shouldn’t be cracked through the middle.
It shouldn’t feel crumbly or rotten.
The area where you’ll attach hooks needs enough solid material to hold screws properly.
Solid wood is particularly nice for this project.
Quality plywood can work too.
Some engineered furniture pieces may require different hardware or may not hold heavy loads well.
If you’re uncertain about the material, keep the finished organizer for lightweight items.
Keys?
Sure.
A 35-pound backpack stuffed with textbooks?
Maybe not.
Materials You’ll Need
For one drawer-front wall organizer, gather:
- 1 old drawer front
- 2 to 4 wall hooks
- Screws suited to the hooks
- Appropriate wall screws and anchors
- Drill
- Drill bits
- Screwdriver
- Measuring tape
- Pencil
- Level
- Medium-grit sandpaper
- Fine-grit sandpaper
- Cleaning cloths
- Paint or wood stain, optional
- Paintbrush or foam brush, optional
- Protective finish, optional
- Wood filler, optional
- Safety glasses
- Dust mask appropriate for sanding work
- Stud finder, depending on mounting method
The exact mounting hardware depends on your wall, drawer-front weight, and what you plan to hang from the hooks.
That’s one area where guessing isn’t worth it.
Step 1: Remove the Old Drawer Hardware
Take off any knobs, pulls, screws, or hardware you don’t plan to keep.
You may discover holes where the old drawer pull was attached.
Don’t automatically fill them.
Sometimes those original holes add character.
You could even reuse them as part of the new design.
If you prefer a smooth surface, fill unwanted holes with wood filler suited to the material.
Let it dry according to the product directions before sanding.
Should You Keep the Original Drawer Pull?
You absolutely can.
This can make the finished piece more interesting.
Imagine two coat hooks with an old brass drawer pull in the middle.
That original pull might hold a scarf, necklace, lightweight bag, or decorative tassel.
Vintage hardware can also give the piece a little history.
If the pull is loose, sharp, badly corroded, or unsuitable for hanging items, remove it.
But if it’s gorgeous?
I’d try pretty hard to keep it.
Old hardware has personality.
Step 2: Clean the Drawer Front
Old furniture can collect years of grime.
Dust.
Wax.
Grease.
Furniture polish.
Mystery garage residue.
Before sanding or painting, clean the surface using a method suitable for the material and existing finish.
Don’t saturate old wood with water.
Use a lightly damp cloth when appropriate and let the piece dry completely.
If the drawer front has heavy grease or residue, you may need additional surface preparation before painting.
A clean surface makes the later steps much easier.
Be Careful With Very Old Painted Furniture
If you’re working with an older painted piece, don’t immediately start aggressive dry sanding.
Older paint can contain lead.
Homes and furniture from earlier decades deserve extra caution.
If you suspect lead paint, use appropriate testing and follow current local safety guidance for dealing with lead-painted surfaces.
Don’t create clouds of unknown dust inside your house.
A cute coat rack isn’t worth turning the kitchen into a hazardous renovation zone.
When the finish is uncertain, caution wins.
Step 3: Sand the Surface
If you’re working with safe-to-sand material, start with medium-grit sandpaper to smooth rough areas.
Then move to finer grit for a softer finish.
You don’t necessarily need to strip every trace of the original finish.
For a rustic project, I actually like leaving some age visible.
Concentrate on:
Splinters.
Rough edges.
Flaking finish.
Sharp corners.
Uneven filler.
Once sanding is complete, remove all dust.
Run your hand gently over the surface.
If it feels comfortable to touch, you’re ready for the next step.
Keep the Old Finish for a Rustic Look
Sometimes refinishing ruins the best part.
If the drawer front has beautiful worn paint, natural scratches, or aged wood, consider leaving it alone.
You can clean the surface, smooth dangerous rough spots, and preserve its existing character.
That worn appearance works especially well in:
Farmhouse interiors.
Cottages.
Mudrooms.
Rustic entryways.
Vintage-inspired bathrooms.
Nobody needs to know the scratches came from 30 years of somebody slamming a sock drawer shut.
We can call it patina.
Sounds much fancier.
Paint It for a Fresh Look
If the original finish isn’t working for your space, paint changes everything.
Popular colors include:
Cream.
Warm white.
Sage green.
Navy.
Black.
Dusty blue.
Charcoal.
Muted terracotta.
Choose a paint system suited to the drawer material and intended room.
Some surfaces may need primer first.
Follow your paint manufacturer’s preparation and drying directions.
Several thin coats usually give a nicer result than one giant heavy coat.
Let the surface dry fully before adding hardware.
Make a Farmhouse White Version
Creamy white paint looks especially good on drawer fronts with decorative molding.
Paint the piece.
Let it dry.
Then lightly distress selected raised edges if that’s the look you want and the underlying material is safe to work with.
Add matte black hooks.
That combination—soft white wood and dark hardware—fits beautifully in farmhouse-style spaces.
Hang it beside a woven basket or simple mirror.
Done.
You don’t need a wooden sign telling everyone to “Gather.”
The drawer front is doing plenty already.
Try a Modern Black Version
For a cleaner look, paint the drawer front black.
Choose simple hooks in black, brass, or brushed metal.
Skip distressing.
Keep the hardware evenly spaced.
This works particularly well with plain drawer fronts that don’t have ornate carving.
Mount several identical black pieces in a row and you’ve got a wall organizer that barely looks upcycled.
It’s a nice reminder that reused furniture doesn’t have to look rustic.
Try a Bold Color
Want something happier?
Paint it.
Mustard yellow.
Deep green.
Dusty pink.
Turquoise.
Brick red.
A small wall organizer gives you a chance to use a stronger color without committing to an entire wall.
This can be especially fun in a mudroom, craft room, kid’s room, or colorful entryway.
And if you hate the color later?
It’s one drawer front.
Paint it again.
No emotional crisis required.
Step 4: Decide Which Direction Looks Best
The original drawer front may have been horizontal.
That doesn’t mean it has to stay that way.
Turn it sideways.
Turn it vertically.
Flip it around.
Look at the molding.
See where hooks fit naturally.
Some narrow drawer fronts look fantastic mounted vertically with hooks running downward.
Wide pieces usually work well horizontally.
Don’t let the object’s original orientation boss you around.
It’s not a drawer anymore.
It has lost voting rights.
Step 5: Plan Your Hook Placement
Lay the drawer front on a flat surface.
Place the hooks where you think they should go.
Don’t drill yet.
Measure.
For a long drawer front, three evenly spaced hooks often look balanced.
A smaller front may only need two.
Leave enough space between hooks for the items they’ll hold.
Three coat hooks packed two inches apart won’t be very useful once jackets start overlapping.
Function first.
Pretty right behind it.
How to Space Three Hooks Evenly
Here’s a simple approach.
Measure the usable width of the drawer front.
Mark the center.
Place your middle hook there.
Then measure equal distances to the left and right for the remaining hooks.
Keep the outer hooks away from fragile edges.
You don’t want screws sitting so close to the edge that the wood splits.
Once you’re happy with the marks, step back and look.
Measuring gets you close.
Your eyes catch weird visual spacing.
Both matter.
Use Different Hooks for a Collected Look
Matching hooks aren’t required.
A group of vintage brass hooks can look fantastic.
So can mismatched metal pieces in similar tones.
You could combine:
Antique brass.
Dark bronze.
Black iron-style hooks.
Porcelain knobs.
Wooden pegs.
Just keep the hardware strong enough for its intended job.
Mismatched doesn’t mean random junk barely attached to wood.
We still want coats staying off the floor.
Step 6: Drill Pilot Holes
Once the hook positions are marked, drill pilot holes where appropriate for your hardware and wood.
Pilot holes can reduce the chance of splitting and make screw installation easier.
Choose a drill bit sized properly for the screws you’re using.
Don’t drill deeper than necessary.
If your drawer front is thin, pay close attention to screw length.
Nothing ruins the moment like admiring your new hook and discovering the screw came straight through the front.
Measure twice.
Then maybe measure once more because vintage furniture likes surprises.
Step 7: Attach the Hooks
Position each hook over its pilot holes.
Drive the screws in securely without over-tightening.
Over-tightening can strip holes, crack old wood, or damage hardware.
Check each hook by hand.
Does it move?
Does it rotate?
If so, correct the problem before mounting the organizer.
Once the drawer front is on the wall, repairs become more annoying.
This is the perfect time to catch loose hardware.
Step 8: Decide How the Drawer Front Will Mount to the Wall
This is the safety part.
The mounting method needs to match:
The wall construction.
The weight of the drawer front.
The weight of the items you’ll hang.
For heavier loads, fastening into wall studs is often preferable when the layout allows it.
For other situations, use wall anchors rated for the wall type and expected load.
Drywall, plaster, masonry, and wood walls can require different hardware.
Follow the anchor manufacturer’s instructions.
And remember that the rated load of one piece of hardware doesn’t automatically become the rating of your entire homemade organizer.
The weakest connection still matters.
Don’t Guess About Wall Anchors
That random plastic anchor left over from something you assembled five years ago?
Maybe don’t build your coat-storage plan around it.
Use mounting hardware suited to your actual wall.
If you’re hanging heavy coats, backpacks, bags, or multiple items, choose stronger mounting points.
If you’re uncertain, ask a qualified hardware professional or installer.
The whole point of wall hooks is keeping belongings off the floor.
Having the entire drawer front rip out of the wall at 2 a.m. sort of defeats the concept.
Step 9: Use a Level
Hold the drawer front against the wall.
Use a level.
Then use it again after you mark the mounting points.
A slightly crooked hook board becomes strangely obvious once coats start hanging from it.
Ask another person to hold the piece if that makes marking easier.
Don’t try balancing a level, pencil, drill, drawer front, and your entire self-confidence at the same time.
DIY doesn’t award bonus points for refusing assistance.
Step 10: Mount the Drawer Front Securely
Drill the required wall holes according to the mounting hardware instructions.
Install appropriate anchors if needed.
Position the drawer front.
Drive the mounting screws securely.
Then test the organizer gradually.
Don’t immediately hang every winter coat you own.
Start with light pressure.
Check for movement.
Add moderate weight.
Watch the mounting points.
If the board shifts, screws loosen, or wall anchors move, stop and correct the installation.
A homemade hook rail should feel boringly solid.
That’s exactly what you want.
Hide Mounting Screws for a Cleaner Finish
Visible screws are perfectly fine for rustic designs.
But if you want a cleaner look, there are ways to make mounting hardware less noticeable.
You might choose screws whose heads match the hook finish.
Black screws with black hooks almost disappear.
Brass-toned screws can blend with warm hardware.
Depending on the construction, concealed mounting hardware may also be possible.
Just don’t sacrifice strength for appearance.
I’d rather see two screw heads than watch my handbags collapse onto the floor.
Where to Use Drawer Front Wall Hooks
This project works in almost every room.
In the entryway, use it for coats, bags, hats, and keys.
In a mudroom, hang jackets, dog leashes, umbrellas, or reusable shopping bags.
In the bathroom, use hooks for hand towels or lightweight robes.
In the bedroom, hang jewelry, scarves, hats, or tomorrow’s outfit.
In the kitchen, a lightweight version could hold aprons or oven mitts when safely positioned away from heat.
In the craft room, use one for scissors, ribbons, or small supply bags.
Once you start seeing drawer fronts as wall organizers, broken dressers become dangerously interesting.
Make an Entryway Coat Rack
This may be the most practical version.
Choose a long drawer front.
Add three or four sturdy hooks.
Mount it near the door at a comfortable height.
Below it, place a small shoe basket or bench.
Now you’ve created a mini drop zone from one piece of furniture scrap.
If household members constantly toss jackets over chairs, this gives them an easier target.
Will they actually use it?
That’s between you and your family.
I can only build the hook.
Make a Key Organizer
A small drawer front makes an adorable key station.
Use several small hooks rather than large coat hooks.
Mount it near the entryway.
You can even add tiny labels for:
HOME
CAR
GARAGE
MAILBOX
Or assign hooks to family members.
Add a narrow decorative ledge nearby for sunglasses.
Suddenly the morning “WHERE ARE MY KEYS?” routine becomes slightly less dramatic.
No promises about your phone.
Make a Bathroom Towel Holder
An old drawer front can look gorgeous in a bathroom.
Paint it to coordinate with the vanity.
Add hooks for hand towels.
Vintage brass hardware pairs beautifully with warm wood.
Black hooks fit modern bathrooms.
White porcelain knobs can give you cottage charm.
Keep the piece away from areas where it will be constantly soaked unless the materials and finish are suited to the environment.
Bathroom humidity is one thing.
Direct shower spray is another.
Make a Jewelry Organizer
You don’t even need traditional hooks.
Use small knobs and miniature hooks across a decorative drawer front.
Necklaces can hang from knobs.
Bracelets can hang from hooks.
Small trays or nearby dishes can hold earrings.
An ornate vintage drawer front can become wall art and jewelry storage at the same time.
And since necklaces are no longer tangled in one impossible knot inside a drawer, you’ve already improved your morning.
Seriously, how do necklaces tie themselves together while nobody is touching them?
Science owes me an answer.
Make a Dog-Leash Station
This is a great little entryway project.
Use a sturdy drawer front.
Add hooks for:
Leashes.
Harnesses.
Collars.
Waste-bag holders.
A small label with the dog’s name can make it extra cute.
Mount it close to the door where you actually need those things.
If you’re always looking for the leash while your dog is spinning in circles because WALK WALK WALK, you’ll understand why placement matters.
Make Individual Hooks for Family Members
Instead of one large drawer front, use several smaller ones.
Mount them in a row.
Give each family member one.
Add a name or initial if you like.
Now everybody has a personal hook area.
This works beautifully in a mudroom.
Mismatched drawer fronts can actually make the arrangement more interesting, especially if they’re painted in coordinated colors.
Same style?
Nice.
Different styles with one shared color?
Even better.
Create a Gallery Wall With Drawer Fronts
Here’s where furniture scraps start becoming decorative.
Collect several old drawer fronts in different shapes.
Paint or stain them in related finishes.
Add hooks to some.
Leave others decorative.
Arrange the group like a gallery wall.
You could combine them with:
Mirrors.
Small framed art.
Family photos.
Vintage keys.
A little wall planter.
The drawer fronts add depth that ordinary picture frames don’t have.
Just keep the arrangement balanced.
We want “creative collected wall.”
Not “dresser explosion.”
Mix Painted and Natural Wood Pieces
If you have several salvaged fronts, don’t feel pressured to finish them all the same way.
Try:
One natural oak piece.
One creamy white.
One muted sage.
One dark stained piece.
Use matching black hooks across all of them.
That repeated hardware ties the collection together.
This technique works especially well in eclectic, cottage, and rustic interiors.
A shared detail can make mismatched pieces look intentional.
Keep Original Knob Holes as Part of the Design
Those old hardware holes can become useful design features.
Thread a ribbon through them.
Add decorative screws.
Install new knobs.
Run leather loops through them.
Or simply leave them visible if they add character.
A few signs of the drawer front’s previous life make the project more interesting.
You’re not trying to trick people into believing this came from a factory.
The history is the fun part.
Add Labels Above the Hooks
Labels can make a family organizer more practical.
Use small painted sections, metal label holders, or removable tags.
Possible labels include:
COATS
KEYS
DOG
BAGS
HATS
GUEST
You could also use names.
Keep labels simple and readable.
If every hook needs a four-sentence explanation, we’ve gone too far.
Add a Small Shelf
If your drawer front is strong enough and you’re comfortable with basic woodworking, you could attach a narrow shelf above or below it.
That creates space for keys, sunglasses, small decorative items, or mail.
Keep the shelf shallow so it doesn’t become a head-bumping hazard.
And remember that adding a shelf increases load on the wall mounting.
Mounting strength needs to match the finished project.
A planter full of wet soil can weigh considerably more than a decorative candle.
Plan accordingly.
Turn It Into a Coffee Mug Rack
A long drawer front with sturdy hooks can become a mug rack when appropriately mounted.
This works especially well on a kitchen wall away from cooking splatter and heat.
Use hooks shaped to hold mug handles securely.
Keep spacing wide enough so neighboring mugs don’t bang against one another.
A rustic wood drawer front with white mugs?
Cute.
A navy drawer front with mismatched colorful mugs?
Also cute.
Apparently old drawers are now running the coffee station.
I’m fine with this.
Use It for Aprons
A narrow old drawer front makes an easy apron hanger.
Mount it near the pantry or another convenient kitchen location away from the stove.
Two or three hooks are enough.
Add a little painted word like “APRONS” if that’s your style.
Or don’t.
We can probably identify aprons without signage.
I believe in us.
Try Leather Loops Instead of Metal Hooks
For a softer modern style, use properly secured leather loops.
This works especially well with light wood.
Fold suitable leather strips into loops and fasten them with appropriate hardware.
They can hold scarves, lightweight towels, or other small items.
Make sure your fastening method matches the expected load.
A decorative leather loop for a hand towel is one thing.
Using the same little loop for a heavy school backpack is another.
Preserve Vintage Details
Some drawer fronts have amazing details:
Carved edges.
Decorative trim.
Old keyholes.
Inlaid wood.
Aged paint.
Hand-cut joinery.
Don’t automatically cover all of that with a thick coat of trendy paint.
Sometimes cleaning and a gentle finish are enough.
If the piece already has personality, let it keep some.
There’s something satisfying about giving old workmanship a new purpose rather than hiding it completely.
How to Distress a Painted Drawer Front
For a worn farmhouse effect, paint the piece first.
After the coating has fully dried and the material is safe to sand, lightly rub selected raised areas.
Focus on places where natural wear might occur:
Edges.
Corners.
Molding.
Around old hardware locations.
Don’t sand every inch equally.
Artificial distressing looks more believable when it’s irregular.
Stop before the piece looks like it survived a bar fight.
A little age goes a long way.
How to Make It Look More Expensive
My biggest tip?
Use good hardware.
A salvaged piece of wood with beautiful hooks can look much more polished than a perfectly painted board with cheap-looking hardware.
Also pay attention to:
Spacing.
Straight installation.
Clean screw placement.
Finish quality.
Proportion.
You don’t need elaborate decoration.
A beautifully shaped vintage drawer front, three brass hooks, and clean wall placement can be enough.
Simple details can make a scrap piece look intentional.
Budget Tips
This project can cost very little if you already have furniture scraps.
Reuse original hardware when appropriate.
Check thrift shops for hooks.
Buy multipacks rather than individual decorative hooks if the price is lower.
Use leftover paint.
Look through your garage for usable mounting hardware—after confirming it’s appropriate for the job.
Combine scraps from several projects.
And remember:
You don’t need to refinish every inch just because you’re doing a DIY.
Sometimes “clean it and put hooks on it” is the entire project.
That’s a beautiful thing.
Common Mistakes to Avoid
Using a Weak Drawer Front
Don’t mount heavy hooks to damaged or crumbling material.
Ignoring Old Paint Safety
Use caution with unknown older painted finishes.
Skipping Measurements
Random hook spacing looks random.
Measure first.
Using Screws That Are Too Long
Check the drawer-front thickness before drilling.
Mounting With Weak Wall Hardware
Match wall fasteners to your wall type and expected load.
Hanging Heavy Items Immediately
Test the installation gradually.
Placing Hooks Too Close Together
Leave practical room for whatever you’re hanging.
Overdecorating
Beautiful salvaged wood doesn’t need ten extra embellishments.
Ignoring Sharp Edges
Smooth splinters and cover hazardous hardware.
Mounting It Crooked
Use a level.
Yes, even if your eyeballing skills are legendary.
How to Clean Drawer Front Wall Hooks
Cleaning depends on the finish.
For painted pieces, use methods compatible with the paint.
For stained or sealed wood, follow the finish manufacturer’s recommendations.
Avoid soaking old wood.
Periodically check hooks and mounting screws for looseness.
This is especially important when the organizer gets daily use.
A five-second hardware check every once in a while is easier than repairing a wall after the whole thing comes down.
Frequently Asked Questions
What can I make from old drawer fronts?
Old drawer fronts can become wall hooks, coat racks, key holders, jewelry organizers, towel racks, mug racks, decorative wall art, or small entryway organizers.
How do you turn a drawer front into wall hooks?
Clean and prepare the drawer front, finish it if desired, mark hook locations, drill pilot holes, attach the hooks, then mount the finished piece securely to the wall with hardware suited to the wall and expected load.
Can I use the original drawer knob?
Yes. Original knobs and pulls can become part of the new design if they’re secure and suitable for the intended use.
Do I need to sand an old drawer front?
It depends on the condition and finish. Sanding can smooth rough areas and prepare safe surfaces for refinishing, but extra caution is needed with unknown older paint because it may contain lead.
What paint works for old drawer fronts?
Choose paint or a coating suited to the drawer material and existing finish. Some surfaces may require primer or additional preparation.
How many hooks should I add?
That depends on the drawer-front size. Two hooks work well on small pieces, while longer fronts may comfortably hold three or four with enough spacing.
How far apart should coat hooks be?
Leave enough room for the actual items you plan to hang. Bulky coats and bags need considerably more space than keys or jewelry.
Can I mount a drawer front directly into drywall?
The mounting method depends on weight and expected load. Use wall anchors rated for the particular wall type and load, or mount into studs where appropriate.
Can I use drawer fronts in a bathroom?
Yes, but consider humidity and water exposure when choosing wood finishes and hardware. Avoid locations exposed to regular soaking unless the materials are suited to it.
What style works best for upcycled drawer wall hooks?
Rustic, farmhouse, cottage, modern, industrial, vintage, and eclectic styles can all work. The paint, wood finish, and hook style determine much of the final look.
Can I use mismatched drawer fronts together?
Absolutely. Painting them in related colors or using matching hardware can tie different shapes and sizes together.
Can I mount drawer fronts vertically?
Yes. Narrow drawer fronts can look especially interesting mounted vertically with hooks arranged from top to bottom.
Final Thoughts
This DIY drawer front wall hooks project is exactly why I hesitate before throwing old furniture pieces away.
A broken dresser might be done being a dresser.
That doesn’t mean every beautiful piece of wood attached to it is finished.
Remove the drawer front.
Clean it.
Smooth it.
Keep the old finish or give it a new color.
Add a few good hooks.
Mount it securely.
And suddenly a piece that was headed for the trash has a completely new job in the entryway, bedroom, bathroom, mudroom, or kitchen.
That’s the kind of upcycling project I love.
You can still see what the piece used to be.
But now it’s useful again.
So, yeah… maybe don’t toss those old drawer fronts just yet.
Apparently they were waiting for wall space.