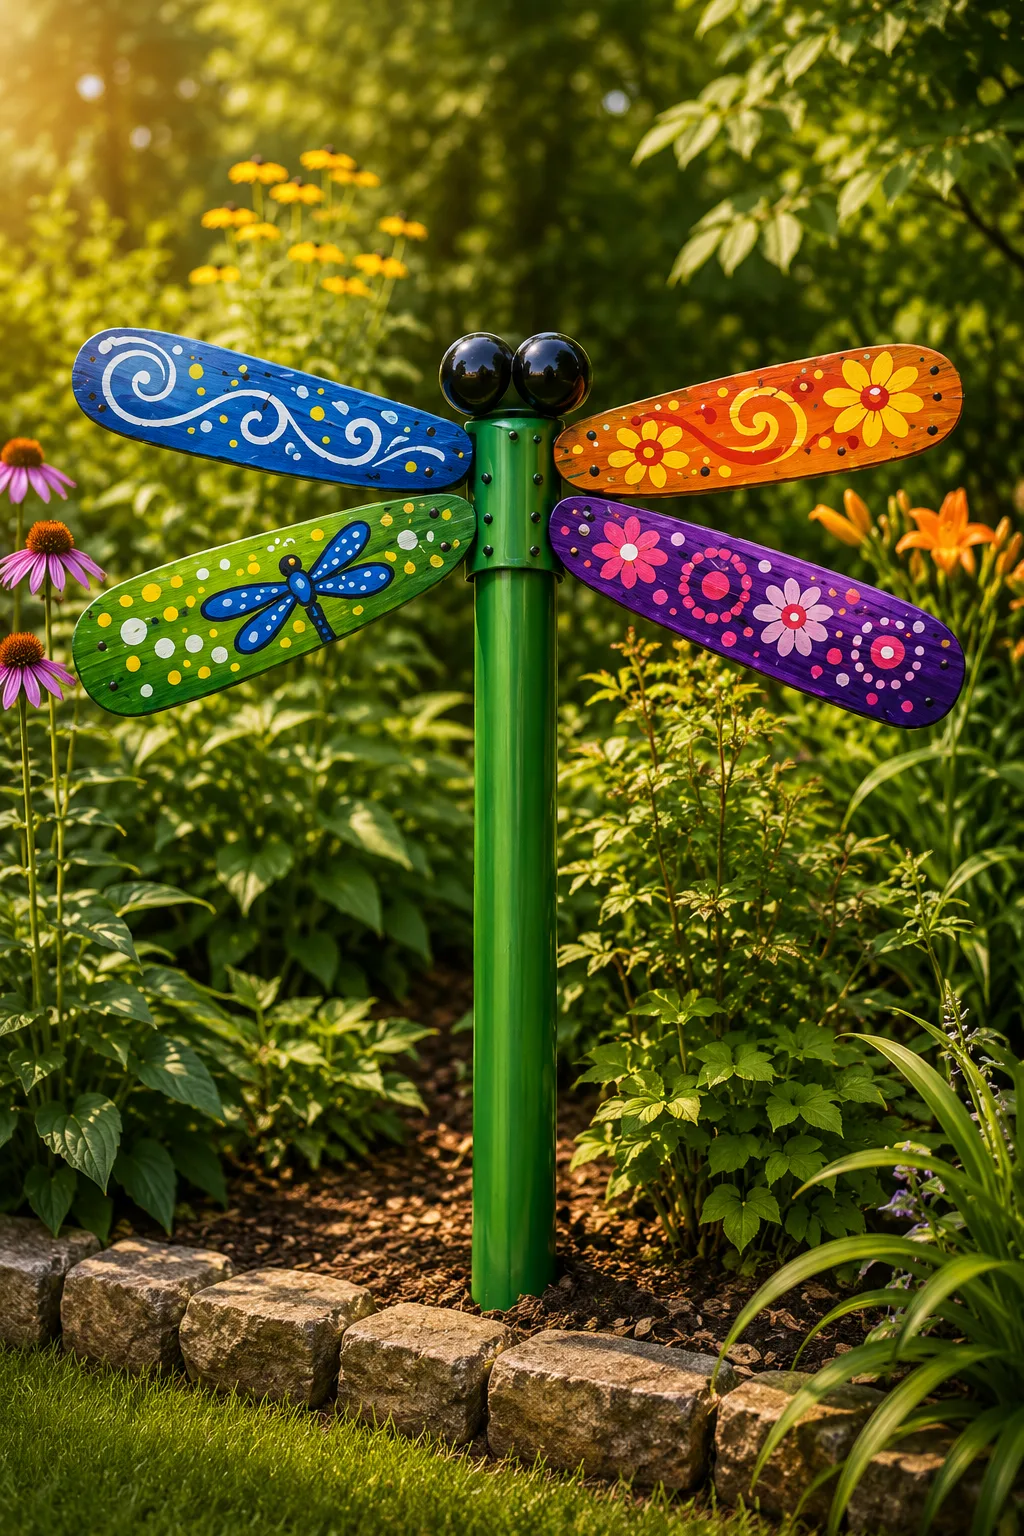
Okay, this is exactly the kind of upcycling project that makes me stop and look twice.
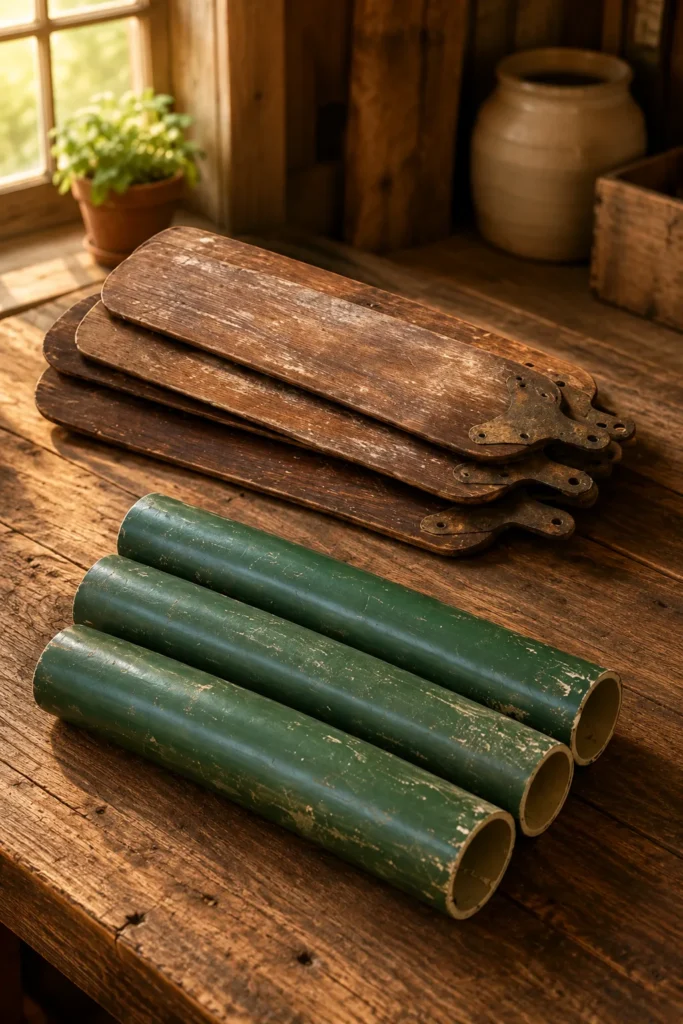
Four old wooden ceiling fan blades.
One thick green PVC pipe.
A little paint.
A few screws.
And somehow those random leftovers can turn into a giant flower for the front yard.
That’s the idea behind this DIY ceiling fan blade flower, and honestly, it’s such a fun way to reuse old fan parts that might otherwise end up in the trash.
The fan blades become oversized petals. The green pipe becomes the stem. Add a round center, some colorful paint, maybe a pair of leaves, and suddenly you’ve got a cheerful garden decoration that looks playful without requiring complicated woodworking.
It can work in a flower bed, beside a porch, near a fence, or as a bright little focal point in an otherwise plain part of the yard.
And yes, the bigger the blades, the more dramatic it gets.
Here’s how I’d make one from start to finish.
Why Ceiling Fan Blades Make Great Flower Petals
Ceiling fan blades already have the perfect basic shape for this project.
They’re long.
They’re slightly tapered.
They’re usually sturdy.
And many have rounded ends that look surprisingly petal-like once they’re painted.
That saves you a ton of cutting.
Instead of shaping four wooden petals from scratch, you’re starting with pieces that already look pretty close to what you need.
Then all you really have to do is prepare the surface, paint them, arrange them around a center, and attach everything securely.
That’s the beauty of upcycling.
Sometimes the old object has already done half the work for you.
What You’ll Need
For one large garden flower, gather:
- 4 old wooden ceiling fan blades
- 1 thick green PVC pipe for the stem
- 1 round wooden disc or other sturdy lightweight center piece
- Exterior paint
- Exterior primer if needed
- Paintbrushes or foam rollers
- Sandpaper
- Cleaning cloths
- Outdoor-rated screws
- Drill
- Drill bits
- Screwdriver
- Measuring tape
- Pencil
- Exterior construction adhesive, optional
- Metal or PVC mounting bracket, depending on your design
- Exterior clear coat, optional
- Decorative leaves, optional
- Safety glasses
- Gloves
- Ground stake or anchoring system
The exact hardware depends on the blade material, pipe size, and how you plan to secure the finished flower outdoors.
Start With Good Ceiling Fan Blades
Not every old fan blade is worth saving.
Look for pieces that are still structurally solid.
Avoid blades that are:
- Cracked
- Swollen from moisture
- Soft or rotten
- Badly delaminated
- Warped
- Split around old screw holes
Many fan blades are made from engineered wood rather than solid lumber.
That’s fine for a decorative project if the material is still in good condition.
But once particleboard or MDF has absorbed enough moisture to puff up and crumble?
It’s done.
No amount of cheerful yellow paint is bringing that back.
Remove Old Hardware
Take off brackets, screws, washers, or other fan hardware you don’t need.
Some metal brackets may actually be useful later, so don’t toss everything immediately.
Set aside anything that looks sturdy.
Old fan brackets can sometimes help create a mounting point behind the flower.
Fill unused holes if they interfere with your final design, or leave them if they’ll be hidden near the center.
Clean the Fan Blades
Old fan blades can be surprisingly gross.
Dust.
Grease.
Nicotine residue in older homes.
Kitchen grime.
Mystery attic dirt.
Clean the blades thoroughly before sanding or painting.
Use a method suitable for the surface.
Don’t soak engineered wood.
A lightly damp cloth is usually better than drenching it.
Let the blades dry completely.
Paint sticks much better to clean material than to 15 years of ceiling-fan dust.
Shocking, I know.
Sand the Surface
Light sanding helps smooth the surface and gives paint something better to grip.
Focus on:
- Glossy old finishes
- Rough edges
- Chipped areas
- Uneven filler
- Old adhesive
You don’t necessarily need to strip everything down to bare wood.
For most outdoor decorative projects, the goal is simply a clean, stable surface.
Wipe away all sanding dust before painting.
If you’re dealing with very old painted blades and you’re unsure about the coating, use appropriate caution before sanding.
Pick Your Flower Color
This is the fun part.
You can make the flower bright and playful or softer and more garden-like.
Classic options include:
Yellow: Sunflower or daisy vibe.
White: Giant daisy.
Pink: Cheerful cottage flower.
Purple: Bold garden accent.
Red: Poppy-style look.
Orange: Great for late summer and fall.
Blue: Whimsical and unexpected.
You could even paint each blade a different color for a rainbow flower.
Personally, I’d keep the petals all one color and let the center contrast.
That usually makes the flower shape easier to read from a distance.
Prime Before Painting
If the blades have a slick finish or porous engineered edges, primer can help.
Choose a primer suitable for the material and outdoor use.
Apply a thin, even coat.
Pay special attention to exposed edges.
Those edges often absorb moisture more readily than the flat surface.
Let the primer dry according to the product directions before painting.
This extra step isn’t glamorous, but it can help the finish hold up better outside.
Step 1: Paint the Fan Blades
Lay the blades flat on a protected surface.
Paint one side.
Let it dry.
Flip them.
Paint the other side.
Don’t forget the edges.
Outdoor decorations get seen from more angles than you expect.
Two or more light coats generally look better than one heavy coat.
Heavy paint can drip or stay tacky.
Thin coats are slower.
But prettier.
That’s the eternal craft trade-off.
Step 2: Paint the PVC Stem
If your PVC pipe isn’t already green, paint it.
PVC can be slick, so surface preparation matters.
Use primer and paint intended for plastic if needed.
Choose a strong garden green.
You could also use olive, sage, or dark green for a softer look.
Let the coating cure fully before handling.
A freshly painted stem covered in fingerprints is not the rustic detail we’re going for.
Step 3: Decide How Big the Flower Center Should Be
The center helps hide the blade mounting points and gives the whole flower a finished look.
You can use:
- Round wooden disc
- Exterior-grade plywood circle
- Plastic platter
- Metal lid
- Large wooden craft round
Choose something sturdy enough to hold the petal assembly.
For large fan blades, a center around 8 to 12 inches across can work nicely, depending on the scale.
Dry-fit the blades around it before attaching anything.
You want enough center to cover the inner ends without swallowing half the petals.
Step 4: Arrange the Four Petals
Place the round center face-down or face-up depending on your assembly method.
Position the fan blades around it like a plus sign.
One at 12 o’clock.
One at 3.
One at 6.
One at 9.
Then rotate them slightly if you want a softer flower shape.
Check the spacing.
All four petals should project outward evenly.
Stand back.
If one blade looks way longer because of placement, fix it now.
Once the screws go in, adjustments get more annoying.
Add More Than Four Blades if You Want
Four blades create a bold, graphic flower.
But you can absolutely use five or six.
Five gives a more natural flower shape.
Six creates a fuller daisy look.
If you have a whole pile of old fan blades, this can get really fun.
Just make sure the center and mounting method can handle the added weight.
More petals means more hardware and more wind resistance.
That last part matters outdoors.
Step 5: Mark the Screw Locations
Once the blades are positioned correctly, mark where each one will attach.
Avoid placing screws too close to the blade ends or edges.
That can cause splitting or breakout, especially with engineered wood.
If the blade already has old bracket holes in a good location, you may be able to reuse them.
That can save drilling.
But only if the holes are still solid.
A loose old hole isn’t a strong attachment point.
Step 6: Drill Pilot Holes
Pilot holes can help prevent cracking.
Use a bit slightly smaller than the screw shaft.
Drill straight.
Don’t go deeper than necessary.
If the fan blade material feels crumbly around the hole, stop.
That piece may not be suitable for outdoor mounting.
The finished flower will face wind.
You need solid connections.
Step 7: Screw the Blades to the Center
Use outdoor-rated screws.
Attach each petal securely.
Don’t over-tighten.
Over-tightening can crush engineered wood.
Check the front after every blade.
Keep the spacing even.
Once all four are attached, lift the flower carefully.
Does it feel solid?
Any wobbling?
Any movement?
Tighten or reinforce before moving on.
Use Washers for Extra Support
For some blades, washers under the screw heads can spread the load over a larger area.
That can be helpful with thin or engineered material.
Use hardware suited to your materials and outdoor exposure.
If you’re unsure, a hardware-store employee can help match screws and washers.
It’s worth getting this part right.
A giant flower petal flying across the yard in a storm is not charming.
Step 8: Attach the Flower to the PVC Stem
This is the trickiest part.
You need a strong connection between the flower head and the pipe.
Depending on your setup, you might use:
- Metal pipe straps
- U-bolts
- Exterior screws
- A mounting bracket
- A wooden backer block
- Heavy-duty exterior adhesive plus mechanical fasteners
I would not rely on glue alone.
Wind puts a surprising amount of force on a large flat decoration.
Mechanical fasteners matter.
The safest setup usually involves a sturdy back plate behind the flower and a bracket clamped securely around the PVC.
A Backer Board Can Make This Easier
Cut a small square or round piece of exterior-grade wood.
Attach it securely to the back of the flower center.
Then mount the backer to the PVC using strong brackets.
This gives you more material to screw into and spreads the load better than trying to drive random screws directly through the pipe.
Paint the backer green or brown so it blends in.
From the front, nobody will see it.
From the back, it’ll look far more solid.
Step 9: Add a Flower Center
Once the structure is secure, make the front center pretty.
For a sunflower look, use:
Dark brown.
Black.
Rust.
Textured brown.
For a daisy, use yellow.
For a pink flower, try orange or yellow.
Paint the center separately before attachment if possible.
You can also add texture with:
- Small wooden discs
- Pebble-like craft pieces
- Exterior-safe textured paint
- Rope
- Outdoor-safe faux seed details
Keep it simple.
The petals already create plenty of impact.
Make a Sunflower Version
This one is probably the easiest.
Paint the blades golden yellow.
Paint the round center dark brown.
Paint the PVC stem green.
Add two oversized green leaves.
Done.
From the street, it reads instantly as a sunflower.
This looks especially good near a fence or beside a mailbox.
Make a Giant Daisy
Paint the fan blades white.
Use a bright yellow center.
Keep the stem green.
Add two simple leaves.
This version looks clean and cheerful.
It also works beautifully against darker siding or a green hedge.
A white flower can brighten up a shady-looking corner without adding too much color.
Make a Whimsical Pink Flower
Paint the blades coral, pink, or magenta.
Use a yellow center.
Add lighter pink details around the blade edges if you want.
This is cute near a cottage-style porch or playhouse.
You can also make several flowers in different colors and create a whole oversized “garden.”
That could look ridiculously fun.
Make a Red Poppy-Style Flower
Use four blades painted deep red.
Paint the center black.
Keep the petals slightly irregular rather than perfectly symmetrical.
A dark green stem finishes the look.
This version feels more dramatic and works nicely in a modern landscape.
Add Wooden Leaves
Leaves make the project look much more finished.
Use leftover plywood, scrap wood, or even additional cut pieces from a damaged fan blade.
Draw a long leaf shape.
Cut it carefully.
Sand the edges.
Paint it green.
Then attach the leaves to the stem with exterior-rated hardware.
Angle one leaf upward and one downward for a more natural shape.
Use Fan Blades as Leaves Too
If you have extra blades, trim them into narrower leaf shapes.
This gives the whole project a funny little full-circle moment.
Fan blade petals.
Fan blade leaves.
Old ceiling fan living its best botanical life.
Just make sure the trimmed pieces are sealed well along any exposed edges.
Step 10: Protect the Paint
Outdoor decor takes a beating.
Sun.
Rain.
Humidity.
Dust.
Temperature changes.
A compatible exterior clear coat may help the finish last longer.
Choose one suited to the paint and material.
Apply according to directions.
Pay extra attention to blade edges and screw holes.
Those areas can be vulnerable to moisture.
Let everything cure fully before putting the flower outside.
How to Anchor the Stem in the Yard
Do not simply shove a hollow PVC pipe into soft soil and hope for the best.
A large flower head catches wind.
Use a strong ground anchor.
One option is driving a metal stake or rebar into the ground and sliding the PVC pipe over it.
Another is using a purpose-made garden post anchor.
The exact setup depends on flower size, soil, wind exposure, and local conditions.
Make the anchor deeper and stronger than you think you need.
A top-heavy decoration can lean quickly.
Concrete Can Work for a Permanent Display
If you want a more permanent installation, you can anchor the stem in concrete.
Set the supporting post according to proper outdoor installation methods.
Keep drainage and freeze conditions in mind.
PVC itself may not be the best structural post for every large project, so using a metal support inside or behind it can add strength.
For anything large, heavy, or exposed to strong wind, a more rigid post may be the safer choice.
Don’t Make the Flower Too Tall
Tall looks dramatic.
Tall also catches more wind.
For a front yard, somewhere around 4 to 6 feet may be plenty, depending on flower size.
A giant eight-foot flower can be fun, but it needs much stronger structure.
Scale the stem to the petal size.
A huge flower on a thin pipe will look wobbly and behave wobbly.
That’s not a design style.
That’s a warning.
Wind Is the Biggest Outdoor Concern
These fan blades are basically little wind catchers.
Which makes sense.
They used to be fan blades.
So yes, wind matters.
Strong wind can:
- Twist the flower head
- Loosen screws
- Bend the stem
- Pull the anchor
- Crack old blade material
Mount the flower securely.
Check hardware periodically.
If severe weather is expected and the piece is removable, consider bringing it in.
An upcycled yard flower should be cute.
Not airborne.
Don’t Mount It Where Someone Can Walk Into It
Keep the flower away from:
Walkways.
Driveways.
Play areas.
Sidewalk edges.
Mowing paths.
Choose a spot where the petals won’t hit someone at head height.
Large fan blades can have hard edges.
Round or smooth any sharp points.
Think about kids and pets too.
A giant flower beside a walkway looks fun until someone turns a corner and meets a plywood petal face-first.
Use Reflective Paint for a Mailbox-Area Version
If you place the flower near a driveway or mailbox, consider visibility.
Don’t block house numbers, signs, or sightlines.
Avoid placing decorations where they could interfere with traffic visibility.
A small amount of reflective-safe detailing may help the object remain visible at dusk, but don’t make it look like an official road marker.
Keep decorative pieces well inside your property and out of roadway clear zones.
Make a Whole Flower Garden
This is where the project gets really cute.
Make three flowers in different heights.
For example:
One yellow sunflower.
One white daisy.
One pink flower.
Use different blade sizes if you have them.
Group them in a bed with mulch or real plants.
The oversized scale creates a playful storybook look.
This can be especially fun near a garden shed or fence.
Add a Ladybug
Want one silly extra?
Paint a smooth rock like a ladybug and place it near the base.
That’s enough.
You do not need seven butterflies, a wooden bee, three gnomes, and a tiny “Welcome to Our Garden” sign fighting for space.
Let the giant flower be the star.
One little accent is cute.
Twenty becomes a yard sale.
Add House Numbers to the Stem
A wide PVC stem gives you vertical space.
You could add your house numbers if the flower sits near the front entry.
Use large, high-contrast numbers.
But don’t rely on this as the only required address display unless it meets local rules.
Decorative house numbers can supplement your regular address.
They shouldn’t create confusion.
Add Solar Lights Around the Base
Small solar landscape lights can make the flower look great at night.
Place them around the base rather than attaching random electrical products to the flower itself.
Outdoor lighting should be rated for exterior use.
Aim the light upward gently.
A soft glow can highlight the petals without turning the yard into a stadium.
Don’t Put Electrical Lights Inside PVC Unless They’re Made for It
Yes, people get creative.
No, I wouldn’t run random string lights through a pipe without checking whether the lights, wiring, connectors, and setup are intended for outdoor use.
Moisture can get inside hollow tubing.
Use lighting products the way they’re designed.
The giant flower is already fun.
It does not need questionable wiring to become interesting.
How to Make It Look More Expensive
The best trick is clean finishing.
Smooth edges.
Even paint.
Good hardware.
Balanced petal spacing.
A sturdy stem.
No visible glue globs.
A simple color palette.
That’s what makes the difference.
Upcycling doesn’t have to look like junk nailed together.
A little prep work can make old fan blades look like intentional outdoor art.
Rustic Version
For a rustic look, use muted colors.
Mustard petals.
Brown center.
Olive stem.
Lightly distressed edges.
Pair the flower with real ornamental grasses or a wooden fence.
This version feels less cartoonish and more folk-art inspired.
Farmhouse Version
Try white blades.
Black center.
Deep green stem.
Keep the shape clean.
Add one simple burlap-style ribbon near the base if you really want a soft farmhouse touch.
I’d skip extra writing.
A giant flower already says enough.
Modern Version
Paint the blades matte black or white.
Use a contrasting center.
Keep the stem charcoal or dark green.
No leaves.
No ribbon.
No extra decoration.
The simple graphic shape can work surprisingly well in a modern yard.
Especially against concrete, gravel, or clean landscaping.
Bright Summer Version
Go wild.
Yellow.
Orange.
Pink.
Turquoise.
Purple.
Paint each flower a different bold color.
This works especially well for a playful backyard or family garden.
And if your neighbors ask why your yard suddenly looks like a giant cartoon garden?
Because summer.
That’s enough explanation.
Fall Version
Use four fan blades painted burnt orange.
Paint the center deep brown.
Use olive leaves.
Add subtle rust details.
This turns the same basic design into a huge autumn flower.
You could even paint the petals mustard and call it a late-season sunflower.
Much easier than carving a 30-inch pumpkin out of plywood.
Christmas Version
Yes, you can reuse the structure seasonally.
Paint spare blades red and create a giant poinsettia-style flower.
Use a yellow or gold center.
Dark green stem.
Keep it sheltered if winter weather is harsh.
Seasonal fan blade flowers can become a whole thing if you let them.
And honestly, I kind of support it.
How to Store It
If the flower is removable, separate the head from the stem before storage.
Wrap the painted blades loosely.
Keep them dry.
Don’t stack heavy items on top.
Store the stem flat or upright where it won’t bend.
Check all hardware before reinstalling next season.
Outdoor screws can loosen over time.
A five-minute inspection is worth it.
Common Mistakes to Avoid
Using Water-Damaged Fan Blades
Swollen or crumbly material won’t hold up well outdoors.
Skipping Primer
Glossy fan blades may not hold paint well without proper prep.
Using Indoor Paint
Choose coatings suited to exterior conditions.
Relying Only on Glue
Use mechanical fasteners.
Making the Stem Too Weak
Big petals need strong support.
Ignoring Wind
Fan blades literally catch air.
Secure the project accordingly.
Screwing Too Close to the Edge
This can crack or split the blade.
Forgetting Exposed Edges
Seal cut or raw engineered-wood edges.
Placing It in a Walkway
Keep hard petals away from head and shoulder height in traffic areas.
Making the Flower Head Too Heavy
Use lightweight center materials when possible.
How Long Will It Last Outside?
That depends on:
Blade material.
Paint quality.
Sealing.
Rain exposure.
Sunlight.
Humidity.
Wind.
Winter conditions.
A well-prepared piece in a protected area can last much longer than untreated fan blades stuck directly into the yard.
Inspect it every season.
Touch up chipped paint.
Tighten screws.
Replace damaged pieces.
Upcycled decor still needs maintenance.
Frequently Asked Questions
How do you make a flower from ceiling fan blades?
Clean and prepare old fan blades, paint them as petals, arrange them around a round center, attach them securely with screws, then mount the flower head to a sturdy green stem.
How many fan blades do I need?
Four creates a simple graphic flower. Five or six can create a fuller look.
Can ceiling fan blades stay outside?
Some fan blades are made from engineered wood that can swell with moisture. Proper sealing and protected placement can help, but badly damaged blades shouldn’t be used.
What kind of paint should I use?
Use primer and paint suitable for the blade material and outdoor exposure.
Can I use PVC for the stem?
Yes, but the pipe should be thick enough and supported properly. Large flowers may need a metal stake or stronger internal support.
How do I attach the flower to the PVC pipe?
Use a sturdy backer board and mechanical brackets, straps, U-bolts, or another suitable mounting system. I wouldn’t depend on glue alone.
How do I stop the flower from blowing over?
Use a strong ground anchor or metal support and keep the stem proportionate to the flower head. Check the project after storms.
Can I make leaves from extra fan blades?
Yes. Cut smaller leaf shapes from spare suitable blades, smooth and seal the edges, paint them green, and attach them securely.
Can I use a metal lid for the flower center?
Potentially, yes, as long as it’s lightweight, smooth-edged, weather-suitable, and attached securely.
Can I make more than one flower?
Absolutely. A group of three flowers in different heights can create a cheerful oversized garden display.
Can this project stay outside all winter?
That depends on your climate and materials. Harsh freeze-thaw cycles, snow, and moisture can damage engineered wood and coatings, so seasonal storage may help.
Is this project safe around children?
Place it away from play areas and walkways, smooth all sharp edges, and mount it securely so it cannot tip or shed parts.
Final Thoughts
A DIY ceiling fan blade flower is one of those projects that proves old furniture and home-improvement scraps don’t always belong in the trash.
Those ceiling fan blades already have the perfect petal shape.
Paint them.
Arrange them around a round center.
Attach the flower securely to a green stem.
Anchor it properly.
And suddenly something that spent years spinning above the living room gets a second life in the front yard.
I’d keep the structure strong, the colors simple, and the mounting serious.
Because the fun part is making a giant flower.
The important part is making sure it stays a giant flower—and doesn’t become a giant flying fan blade the first windy afternoon.