Okay, I’ll admit it: pool noodles are one of those things I never expect to see outside a swimming pool.
Then somebody turns them into a garden project and suddenly I’m standing there thinking, “Wait… why is this actually gorgeous?”
That’s exactly how I feel about these DIY floating pond planter rings.
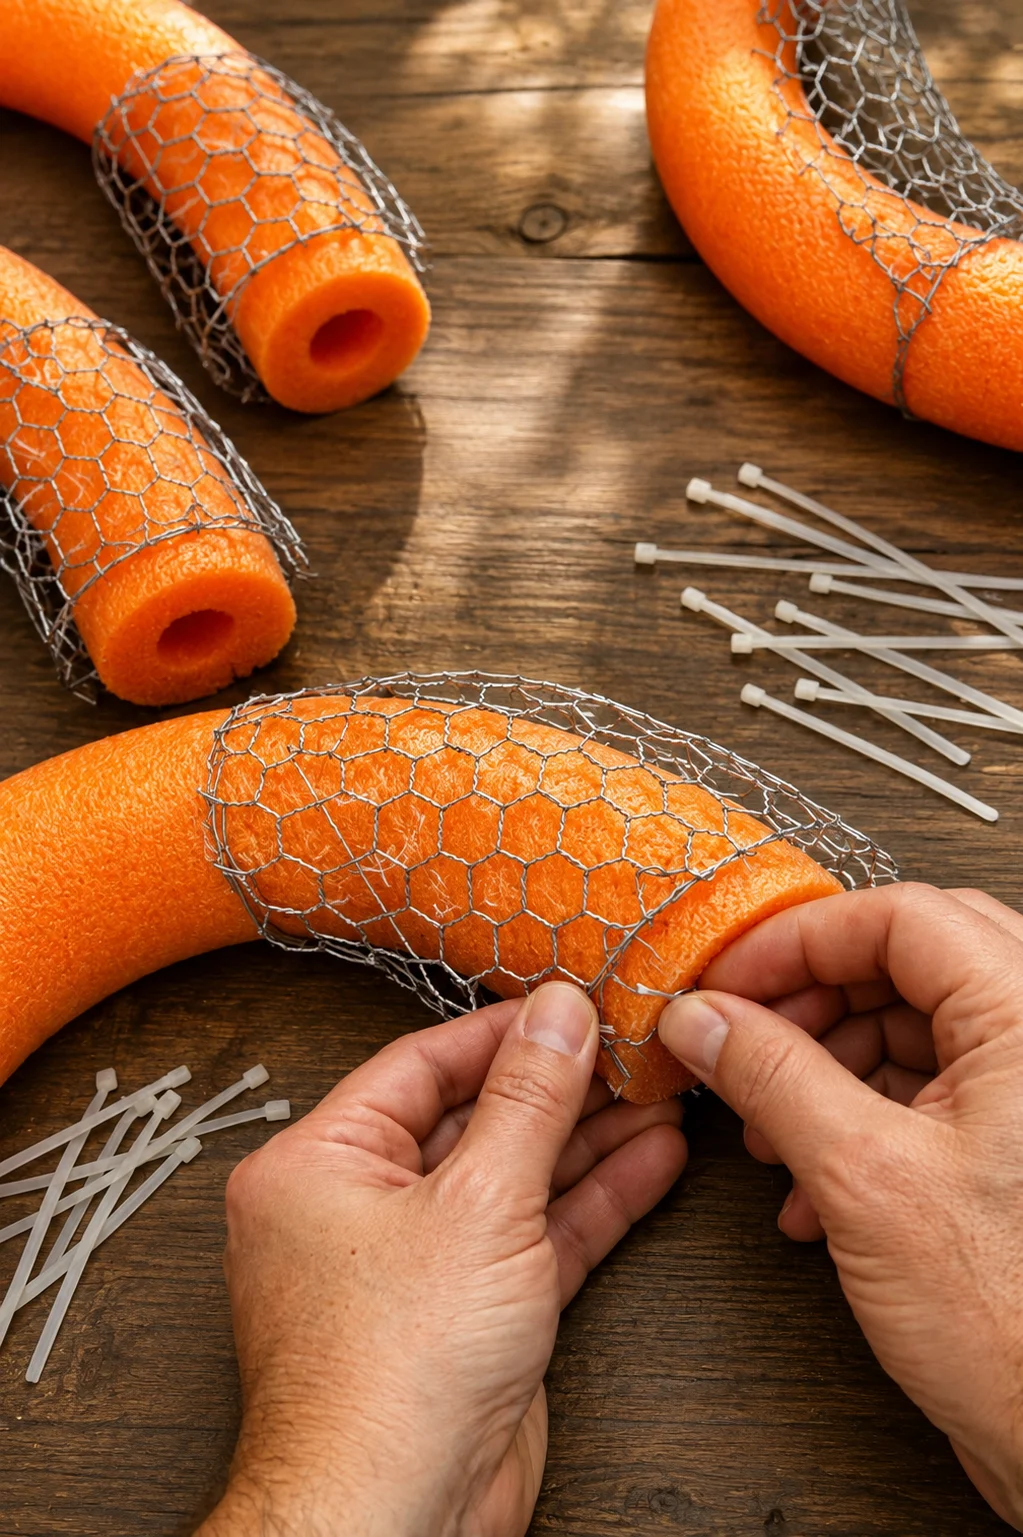
The basic idea is surprisingly simple. Pool noodles form lightweight floating rings. Chicken wire creates a mesh structure around them. Then aquatic plants sit inside the center and float across the surface of a backyard pond.
Once the plants fill out, the bright foam practically disappears behind leaves and flowers.
And wow—the finished look can be seriously pretty.
You get little floating islands of greenery without building a permanent pond structure or buying large decorative planters.
If you have a backyard pond, water garden, or another suitable contained water feature, this is one summer DIY I’d absolutely put on the weekend list.
Why Pool Noodles Work So Well for This Project
Pool noodles float.
Obviously, right?
But that simple feature makes them surprisingly useful for lightweight water-garden projects.
The foam provides buoyancy while remaining easy to cut and bend.
A full-length noodle can be shaped into a ring, while shorter pieces can create smaller floating planters.
You don’t need woodworking equipment.
You don’t need to build a complicated floating platform.
And you don’t need to haul a giant planter across the yard.
Basically, we’re asking a pool noodle to do what it already does best:
Float.
For once, a DIY material has one job and completely understands the assignment.
What the Chicken Wire Does
The pool noodle gives the planter buoyancy.
The chicken wire gives it structure.
Chicken wire can be shaped around the noodle ring to create a mesh support area for suitable aquatic plants.
Plant roots can sit within or pass through the open mesh depending on the plant and setup.
Meanwhile, the noodle keeps the structure at the water’s surface.
It’s a pretty clever pairing.
Soft floating foam outside.
Flexible metal mesh inside.
Plants in the middle.
After the foliage grows around the ring, much of the construction can become far less noticeable.
That’s when the project starts looking less like pool equipment and more like an intentional water-garden feature.
What You’ll Need
The supply list is pretty short.
You’ll need:
- Foam pool noodles
- Galvanized chicken wire or another mesh suitable for the project
- UV-resistant plastic zip ties suitable for outdoor use
- Heavy-duty scissors or a suitable cutting tool for the foam
- Wire cutters
- Protective work gloves
- Pliers
- Measuring tape
- Suitable aquatic or pond-edge plants
- Containers or planting media if required by your chosen plants
- Optional decorative materials suitable for pond use
Before adding anything to a pond, consider whether the material is appropriate for the water feature, especially if fish, frogs, pets, or other wildlife use it.
Pretty is nice.
Pretty and sensible is better.
First, Decide How Large You Want the Floating Planters
Before cutting anything, think about scale.
A small pond probably doesn’t need a floating ring the size of a kiddie pool.
Likewise, a tiny ring may disappear visually in a large water garden.
I like the idea of making several different sizes.
A larger ring can become the main feature.
Two or three smaller rings can float nearby.
That creates a natural-looking cluster instead of one lonely circle drifting around like it missed the garden meeting.
Test the size by bending the noodle into a loose circle before cutting.
Once the proportions look right, mark your cut.
Step 1: Cut the Pool Noodle
Measure the amount of noodle needed for your chosen ring size.
Then cut the foam cleanly using an appropriate tool.
Keep the ends as straight as possible.
Straight ends make them easier to join.
If you’re making several rings, don’t automatically cut every piece exactly the same length.
Slightly different sizes can make the final arrangement look more interesting.
Large.
Medium.
Small.
Boom—you’ve already got a little floating garden composition.
Step 2: Bend the Noodle Into a Circle
Pool noodles are flexible, which makes forming the ring pretty easy.
Slowly bend the noodle until the two ends meet.
Don’t force an extremely tight curve.
If the ring is too small, the foam may resist the shape or put too much pressure on the connection point.
A relaxed circle is easier to work with.
Hold the ends together and check the overall shape.
It doesn’t need to look mathematically perfect.
Once plants start spilling over the edges, nobody is bringing out a geometry textbook.
Step 3: Secure the Ends
Join the noodle ends securely using a method appropriate for the foam and water conditions.
Heavy-duty outdoor zip ties can help hold the shape.
Depending on your design, you may use more than one tie around the connection.
Pull them snug enough to hold the noodle together without cutting deeply into the foam.
Then trim excess zip-tie tails carefully.
Check the connection by gently pulling the ring apart.
If it immediately opens?
Yeah, fix that now.
It’s considerably easier on the patio than when the whole thing is floating in the pond.
Step 4: Measure the Chicken Wire
Set the noodle ring on a flat work surface.
Now measure enough chicken wire to create the support structure you want.
The mesh can be formed across the center and secured around the ring.
Leave enough material around the edges for secure attachment.
Don’t cut it exactly to the final visible size.
Give yourself some working room.
Chicken wire is forgiving when you have extra material.
It’s considerably less forgiving when you’re two inches short.
Ask any crafter who’s ever stared at a roll of wire thinking, “You’ve got to be kidding me.”
Step 5: Put On Protective Gloves
This isn’t optional in my book.
Freshly cut chicken wire has sharp ends.
Those little metal points are sneaky.
Wear sturdy protective gloves while cutting, bending, and attaching the mesh.
Use wire cutters designed for the job.
After cutting, look around the work area for loose pieces of wire.
Pick them up before pets or kids wander through.
Also inspect the finished planter carefully.
You don’t want sharp exposed wire sticking outward from the ring.
The plants are supposed to be the dramatic part.
Not the tetanus conversation.
Step 6: Shape the Mesh Around the Ring
Place the chicken wire against the noodle ring and begin shaping it.
You want a stable mesh area that can support the plants without immediately collapsing.
Work slowly around the circle.
Fold the wire where necessary.
Keep the mesh reasonably even.
The exact shape depends on how you plan to position the plants.
You might create a shallow basket-like center.
Or you might form a flatter mesh platform for lightweight aquatic plants.
The important part is keeping the structure balanced.
If one side becomes dramatically heavier than the other, your cute floating planter may develop submarine ambitions.
Step 7: Attach the Chicken Wire With Zip Ties
Once you’re happy with the mesh position, secure it around the pool noodle ring.
Place outdoor-rated zip ties at regular intervals.
Don’t depend on one or two attachment points.
Several evenly spaced connections can help distribute the load.
Trim the excess tails.
Then check the underside and edges.
Fold or reposition any exposed sharp wire ends so they’re not sticking outward.
Take your time here.
The frame is the foundation for everything you’re adding later.
A five-minute shortcut at this stage can become a very annoying repair after the plants are installed.
Step 8: Test the Empty Ring Before Adding Plants
This is the step I’d absolutely do before decorating anything.
Put the empty ring into the pond or another suitable test area.
Watch it.
Does it float level?
Does the connection remain secure?
Does the chicken wire stay in position?
Does one section drag heavily in the water?
If something looks wrong, pull it back out and make adjustments.
Testing the empty frame is much easier than fishing plants, soil, and decorations out of the water later.
And yes, watching a bare pool noodle ring float around your beautiful pond looks a little ridiculous.
Give it a minute.
We’re getting there.
Step 9: Choose the Right Plants
Plant choice makes or breaks this project.
Use species suited to your climate, pond conditions, water depth, and planting method.
Depending on the design, you might consider suitable aquatic plants, marginal plants, or other species specifically intended for water-garden conditions.
Check mature size too.
That tiny plant at the garden center might not stay tiny.
Some aquatic plants spread aggressively.
Others may be restricted or invasive in certain regions.
Always check local guidance before introducing a new aquatic species outdoors.
This isn’t the place for an impulse plant purchase because the flower looked cute next to the cash register.
Don’t Put Regular Houseplants Into a Pond and Hope for the Best
I know.
That pothos looks gorgeous.
But not every plant belongs permanently in a water garden.
Plants have different requirements for root conditions, oxygen, nutrients, light, and water exposure.
Choose plants suitable for the specific setup you’re creating.
If the plant requires a container or aquatic planting medium, use an appropriate one.
Don’t simply dump ordinary potting soil into the chicken-wire frame.
Loose soil washing through the mesh and into the pond?
Not exactly the dreamy Pinterest ending.
Step 10: Add the Plants Gradually
Don’t load the entire planter at once.
Start with one or two plants.
Set the ring back into the water.
Check how it floats.
Then add more only if the structure remains stable.
Weight matters.
Wet growing media can weigh considerably more than it appears to when dry.
Plants grow too.
A lightweight ring in June may carry a lot more foliage later in the season.
Build with that future weight in mind.
Your floating garden should still be floating after the plants decide to have their summer growth spurt.
Keep the Weight Balanced
Think of the planter like a tiny boat.
Put all the weight on one side and, well, physics has opinions.
Arrange plants around the ring so the weight is reasonably balanced.
If you’re using several plants, space them evenly.
Check the planter after watering, heavy rain, or significant plant growth.
If one plant becomes much larger than the others, the ring may start leaning.
A quick trim or rearrangement can help restore balance.
No nautical engineering degree required.
Just don’t put the biggest plant in one corner and expect the noodle to figure it out emotionally.
Create a Trailing Plant Effect
One of the prettiest versions uses plants that gently spill toward the water.
Foliage can soften the outline of the pool noodle and hide parts of the frame.
The finished ring starts looking like a little floating garden island.
Choose suitable plants that can handle the conditions and won’t create an invasive problem.
Keep the design fairly loose.
You don’t need every inch packed with flowers.
A combination of upright growth and softer trailing foliage can look much more natural.
Make Several Rings Instead of One
This is where the project can get really impressive.
One floating planter is cute.
Three?
Now you’ve got a design.
Try one large ring with two smaller ones.
Or create three matching rings and place them across the pond.
You could also use different plant combinations in each one.
Maybe one is mostly green.
Another has colorful foliage.
The third carries flowers.
Repeated shapes can make the whole water garden feel connected without looking overly formal.
Try a Monochromatic Garden Look
Bright pool noodles are fun, but they don’t fit every garden.
If you want the structure to disappear visually, choose darker green or another subdued foam color when available.
Once the plants grow, the frame becomes even less obvious.
You can also select plants within one color family.
White flowers and green foliage can look clean and peaceful.
Purple flowers create a romantic look.
Pink can feel cottage-garden sweet.
Sometimes one strong color idea looks better than throwing every plant at the pond and hoping they become friends.
Try a Tropical Version
Want the pond to feel like vacation?
Go bold.
Use large-looking foliage where suitable.
Add bright flowers.
Mix lime green, deep green, pink, orange, or purple tones.
Keep the pool noodle color coordinated with the plants so any visible foam feels intentional.
The final effect can look playful and lush.
Add a patio chair nearby and suddenly you’re mentally on vacation.
Actual plane ticket?
Still not included.
Try a Cottage Garden Version
For a softer look, use gentle colors and airy foliage.
Think whites, pinks, soft purples, and lots of green.
Create smaller rings instead of one huge statement piece.
Let them sit naturally among existing pond plants.
This version works especially well around informal backyard ponds with rocks, grasses, and flowering borders.
The goal is to make the floating planters feel like they’ve always belonged there.
Even though, yes, underneath all that beauty is still a pool noodle.
DIY has secrets.
Could You Make an Oval Instead?
Absolutely.
A circle is easy, but it isn’t your only option.
Pool noodles can bend into softer oval shapes.
An oval can work nicely in a long, narrow pond.
You could also experiment with organic shapes, as long as the frame remains secure and balanced.
I wouldn’t get too ambitious with sharp corners.
Foam noodles naturally want to curve.
Work with the material instead of fighting it.
That’s usually where the prettiest DIY projects happen anyway.
Add Solar Lights Carefully
A few small outdoor solar lights near floating planters can create a beautiful evening effect.
You might place suitable pond-safe floating lights around the rings rather than attaching heavy equipment directly to them.
Keep electrical and battery-powered products appropriate for the environment.
Don’t improvise with indoor lighting near water.
Seriously.
The magical garden glow should come from lights designed for the job—not from questionable electrical decisions.
What About Decorative Stones?
Small decorative accents can look pretty, but weight becomes a concern quickly.
Stone is heavy.
Pool noodles have limited buoyancy.
Add too many rocks and your floating planter becomes a sinking planter.
If you want a stone-like appearance, lightweight decorative materials may be a better fit when they’re appropriate for the pond.
Whatever you add, test the ring after each change.
If the noodle starts sitting noticeably lower in the water, that’s your sign to stop decorating.
Sometimes less really is more.
Be Careful With Paint
You might be tempted to spray-paint the pool noodle or chicken wire.
Before doing that, think about where the finished project will live.
Products used around pond water should be selected with care, particularly when fish, amphibians, birds, pets, or wildlife may come into contact with the water.
Not every paint or coating belongs in an aquatic environment.
If you want a different color, buying a noodle in that color may be simpler.
Plus, that’s one less afternoon spent accidentally painting your driveway.
Ask me how these things happen.
What If You Have Fish?
If fish live in the pond, materials deserve extra attention.
Avoid adding random adhesives, coatings, paints, metals, planting media, or decorations without checking whether they’re appropriate for pond use.
Inspect the chicken wire for sharp exposed edges.
Make sure nothing can trap or injure fish.
Also consider whether galvanized wire is appropriate for your specific pond environment and livestock; when in doubt, choose a pond-safe mesh or consult a pond specialist.
A decorative project should never come before animal safety.
If you can’t confirm a material is suitable, don’t put it in the water.
What About Frogs and Other Wildlife?
Backyard ponds can become tiny ecosystems.
Frogs, insects, birds, and other animals may interact with whatever you place on the water.
That means loose plastic, sharp wire, small detachable decorations, and questionable chemicals aren’t great choices.
Secure every component.
Trim zip ties.
Fold sharp wire ends inward.
Check the planter periodically for damage.
Outdoor DIY isn’t finished the moment you take the pretty photo.
Mother Nature gets a vote afterward.
Avoid Blocking Too Much of the Pond Surface
Floating plants can look gorgeous, but don’t automatically cover the entire pond.
The amount of open water needed depends on the pond, plants, fish, filtration, oxygenation, climate, and other conditions.
Treat these rings as decorative accents rather than an excuse to completely blanket the surface.
Start small.
See how the pond responds.
Then make changes thoughtfully.
Your water feature already has its own little system going on.
The craft project is the guest.
Wind Can Move the Rings Around
These planters float.
Which means they can also move.
On a calm day, they may sit beautifully in place.
Then the wind arrives and suddenly all three rings are having a conference in one corner.
If movement becomes annoying, you may need an appropriate pond-safe anchoring method.
Keep any line or anchoring setup safe for fish and wildlife.
Don’t create loose loops or hazards in the water.
If your pond is in a very windy location, floating decor may need more management than it would in a sheltered garden.
Heavy Rain Changes Things Too
A summer storm can add water, debris, and weight to the planter.
After heavy rain, check your rings.
Look for sagging mesh.
Check zip ties.
Remove accumulated debris.
Make sure the plants haven’t shifted heavily to one side.
Inspect the noodle connection.
A two-minute check can prevent a small problem from becoming a floating mess.
And trust me, nobody wants to stand in the rain chasing a runaway planter with a broom.
Don’t Overload the Chicken Wire
Chicken wire is flexible.
That’s useful for shaping it.
But it also means the material can sag under weight.
Keep the planting area relatively lightweight.
If your setup needs to hold heavy pots or large quantities of growing media, this simple pool-noodle design may not be appropriate.
Build for the materials you’re actually using.
Don’t start with a cute floating ring and gradually turn it into a 40-pound botanical barge.
The noodle did not sign up for that.
Check Zip Ties During the Season
Sunlight, weather, and constant outdoor exposure can wear materials over time.
Use zip ties intended for outdoor use when possible.
Then inspect them periodically.
Look for brittleness, cracking, looseness, or movement.
Replace damaged ties before they fail.
Also check the noodle itself.
Foam can degrade after long exposure to sunlight and weather.
This isn’t necessarily a build-it-once-and-ignore-it-forever project.
A quick inspection every now and then is worth it.
Remove the Planters When the Season Ends
If your climate has cold winters, don’t automatically leave the rings floating all year.
Remove them when they’re no longer appropriate for the season.
Take out the plants according to their care needs.
Rinse the frame if suitable.
Let everything dry.
Inspect the wire and foam.
Then store reusable pieces somewhere protected from weather.
Next spring, check the frame again before returning it to the pond.
If the foam has become brittle or the wire is badly corroded, replace it.
Pool noodles are cheap.
A pond problem isn’t.
Common Mistakes to Avoid
This project is simple, but a few mistakes can cause trouble.
Don’t skip protective gloves when handling chicken wire.
Don’t leave sharp wire ends exposed.
Don’t overload the ring with heavy plants or stones.
Don’t assume every plant belongs in a pond.
Don’t introduce invasive aquatic species.
Don’t use random paints, adhesives, or coatings around pond water.
Don’t cover too much of the pond without considering its existing ecosystem.
Don’t ignore fish and wildlife safety.
Don’t make the ring so small that the noodle constantly fights its shape.
Don’t forget to test the empty frame first.
And definitely don’t finish the entire project before checking whether it actually floats.
That’s the DIY equivalent of baking a cake before checking whether the oven works.
Why I Like This Pool Noodle Garden Idea
It’s creative without being complicated.
That’s the sweet spot for me.
The pool noodle provides flotation.
The chicken wire provides a plant-supporting structure.
The greenery does the decorating.
Once everything fills out, an ordinary piece of swimming-pool foam becomes part of a floating garden feature.
There’s also plenty of room to make the idea your own.
Small rings.
Large rings.
Tropical plants.
Soft cottage colors.
One statement planter.
A whole cluster.
You can match the project to the pond instead of forcing the pond to match the project.
And that’s usually when homemade garden decor looks its best.
Frequently Asked Questions
How do you make DIY floating pond planter rings?
Form a pool noodle into a secure ring, attach suitable mesh such as chicken wire around or across the ring, test the frame for flotation and balance, and then add lightweight plants appropriate for your pond conditions.
Why use a pool noodle for a floating planter?
Foam pool noodles are lightweight, flexible, inexpensive, and naturally buoyant, which makes them useful as the floating base for a lightweight water-garden project.
What does the chicken wire do?
The mesh creates a support structure for plants while the pool noodle provides flotation. It can be shaped into a shallow basket or platform depending on the planting setup.
Is chicken wire safe for every pond?
Not necessarily. Pond conditions vary, and galvanized metal may not be appropriate for every aquatic setup or animal. Check material suitability for your pond, especially if fish or other aquatic animals are present. A pond-safe plastic mesh may be a better choice in some situations.
What plants can I use in a floating pond planter?
Choose plants specifically suited to your climate, water conditions, planting method, and pond. Check local guidance because some aquatic plants can become invasive or may be restricted.
Can I use regular potting soil?
Loose standard potting soil may wash through mesh and cloud the pond. Use planting methods and media suitable for your chosen aquatic plants and water feature.
How do I stop a floating planter from tipping?
Keep the weight low and balanced, avoid heavy decorations, distribute plants evenly, and test the ring after every major addition.
Can I add rocks to the floating planter?
Be careful. Rocks add weight quickly and may cause the ring to sit too low or sink. Lightweight decoration is generally more practical for this type of project.
Can I leave pool noodle planters outside all year?
That depends on climate, materials, plants, and pond conditions. Seasonal removal can protect the frame from harsh weather and gives you a chance to inspect damaged foam, mesh, and fasteners.
Can I make more than one floating planter?
Absolutely. Several rings in different sizes can create a beautiful clustered effect, provided they don’t interfere with the pond’s plants, wildlife, filtration, or necessary open water.
Final Thoughts
Who knew a couple of pool noodles could end up looking this good?
The charm of these DIY floating pond planter rings comes from how simple the basic structure is.
Make a ring from a pool noodle.
Add a carefully secured mesh support.
Test it in the water.
Add lightweight, suitable aquatic plants.
Then let the greenery become the star.
You can make one large floating planter or create several smaller rings that drift together across the pond.
Just remember that this is a water-garden project, not only a craft project.
Choose materials carefully.
Wear gloves around cut wire.
Remove sharp edges.
Keep the structure lightweight.
Check plant suitability.
Think about fish and wildlife.
And test, test, test before loading that ring with plants.
Once the foliage starts spilling across the edges, the humble pool noodle underneath becomes pretty easy to forget.
Which is honestly hilarious.
Yesterday: pool toy.
Today: floating garden.
Not bad for a piece of foam.