You know that funny little gap between spring and full-blown summer when your front porch suddenly looks… kinda boring?
The flowers are blooming, everybody’s digging out the patio chairs, and the neighborhood kids are already running around in flip-flops. Meanwhile, that plain spot beside the front door is practically begging for some color.
That’s where this DIY flip-flop welcome sign comes in.
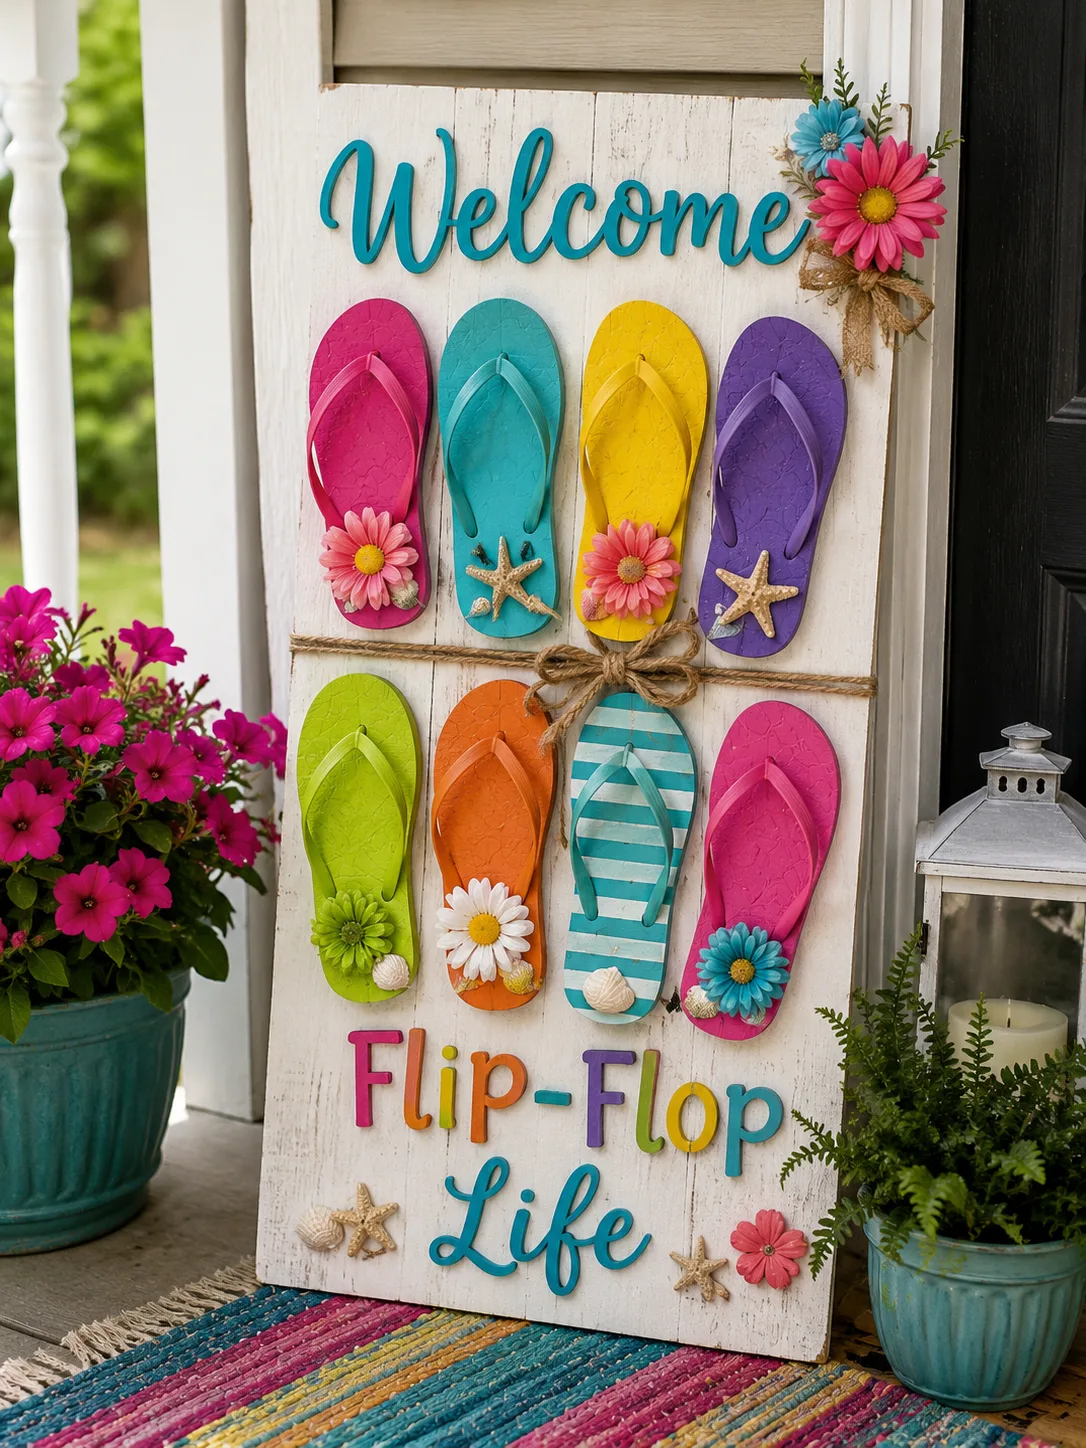
The idea is wonderfully simple: take an ordinary wooden board, add several colorful flip-flops, arrange them into a cheerful summer design, and finish the piece with flowers, ribbon, lettering, or beach-themed decorations.
Seriously, that’s it.
And the best part? The flip-flops don’t need to match.
Actually, mismatched colors make the finished porch decoration even more fun.
I love projects like this because they don’t require fancy woodworking equipment or a craft room that looks like it belongs on television. With an inexpensive board, budget flip-flops, strong adhesive, and a few decorations, you can make something that screams summer before guests even ring the doorbell.
Here’s how I’d make it.
Why Flip-Flops Make Such a Cute Summer Decoration
Flip-flops instantly feel like summer.
They remind me of beach trips, backyard cookouts, pool days, vacation rentals, sandy feet, and those scorching parking lots where everybody suddenly regrets taking their shoes off.
You know the feeling.
Their bright colors also make them perfect for casual porch decor.
Pink, turquoise, yellow, orange, lime green, purple—you can pretty much go wild.
Unlike formal seasonal decorations, this project is supposed to look playful.
A slightly crooked sandal?
Fine.
Two colors that technically shouldn’t work together?
Even better.
This is summer porch decor, not a board meeting.
What You’ll Need for a DIY Flip-Flop Welcome Sign
You don’t need a huge shopping list for this project.
Gather:
- A wooden board or reclaimed wood plank
- Several inexpensive flip-flops
- Strong adhesive suitable for the materials and intended location
- Outdoor-safe paint if you want to paint the board
- Paintbrush or foam brush
- Sandpaper
- Pencil
- Ruler or measuring tape
- Decorative artificial flowers
- Ribbon or raffia
- Wooden letters or paint for lettering
- Seashells or other summer decorations
- Suitable hanging hardware if hanging the sign
- Clear outdoor protective finish if appropriate for your materials
Choose decorations based on where the finished piece will sit.
A sign hanging inside a covered porch has different weather exposure from one sitting completely outdoors.
That’s important.
Rain has absolutely no respect for cute crafts.
Start With the Right Wooden Board
Your board becomes the background for the entire project, so choose something large enough to hold the flip-flops without looking crowded.
A long rectangular board works especially well.
You can use new craft wood, leftover lumber, or a reclaimed board that’s still structurally sound.
If you’re using old wood, inspect it carefully.
Avoid pieces with loose nails, severe cracks, rot, or sharp splinters.
Give the surface a light sanding where needed.
Then wipe away the dust.
I actually like a little character in the wood.
Tiny imperfections can make the sign feel more relaxed and beachy.
Decide Whether to Paint or Stain the Board
Here’s where the personality starts.
White creates a bright coastal look.
Turquoise feels beachy.
Navy gives the project a nautical feel.
Natural wood creates a rustic farmhouse-style background.
Pale blue looks soft and summery.
You could even paint the board coral, sunny yellow, or bright pink if subtle isn’t really your thing.
And honestly?
A sign covered in flip-flops isn’t exactly trying to whisper.
If you paint the board, let it dry fully according to the paint directions before attaching anything.
Choose Your Flip-Flops
Now for the fun part.
Budget flip-flops are perfect for this craft because you’re not wearing them.
Look for bright colors and interesting patterns.
You could choose one color family for a coordinated look or mix everything together.
For example, turquoise, aqua, white, and navy create a coastal theme.
Pink, orange, yellow, and lime green feel tropical.
Red, white, and blue work nicely for summer patriotic decor.
Pastels can create a softer beach-house style.
Or grab every cheerful color you can find.
That’s probably what I’d do.
Summer doesn’t exactly have a dress code.
Don’t Worry About Buying Expensive Sandals
This isn’t the project for premium footwear.
Simple inexpensive foam flip-flops can give you the playful look you want without turning a porch craft into a major expense.
Check discount stores, seasonal sections, clearance bins, or old unused pairs you already have.
Just make sure anything reused is clean and completely dry.
Nobody needs authentic beach sand permanently glued to the welcome sign.
Well… unless you’re really committed to the theme.
Arrange Everything Before You Glue
Please don’t skip this step.
Lay the board flat.
Place all your flip-flops on top.
Move them around.
Try different arrangements.
Stand back and look.
Then move them again.
You can place the sandals vertically, diagonally, in alternating directions, or in a slightly overlapping pattern.
Take a quick photo once you find an arrangement you love.
That way, if everything gets moved while you’re gluing, you have a reference.
This little trick has saved me from many “Wait, where was the purple one?” moments.
Try a Vertical Flip-Flop Pattern
A vertical arrangement works especially well on a tall porch sign.
Position the flip-flops from top to bottom.
Alternate their direction slightly so the design feels playful rather than rigid.
You can leave a space near the top or bottom for the word “WELCOME.”
Or place individual letters around the sandals.
For a narrow board leaning beside the front door, this layout can look really cute.
It also fills vertical space without requiring a huge amount of decoration.
Try a Flower-Shaped Arrangement
Want something more unexpected?
Arrange several flip-flops around a center point so they resemble flower petals.
Add an artificial flower, painted wooden circle, or decorative accent in the middle.
Suddenly the sandals become part of a giant summer flower.
This version works especially well on a square or wide rectangular board.
Bright yellow and orange sandals can create a sunny look.
Pink and purple feel playful.
Blue and turquoise can make the whole thing feel like a beach cottage project.
Add the Word “WELCOME”
A porch sign feels extra friendly with a simple message.
WELCOME is the obvious choice.
You can paint the letters by hand, use stencils, attach wooden letters, or choose another crafting method suitable for your materials.
Don’t worry if your hand-painted letters aren’t absolutely perfect.
Sometimes perfectly uniform lettering makes homemade decor feel less homemade.
I like a little personality.
You can also use phrases such as:
HELLO SUMMER
BEACH PLEASE
SUNSHINE
WELCOME FRIENDS
FLIP-FLOP SEASON
LIFE IS BETTER IN FLIP-FLOPS
BEACH HOUSE
SUMMER DAYS
Choose something short enough to remain easy to read from a few feet away.
Add Artificial Flowers for Extra Color
Artificial flowers look ridiculously cute with flip-flops.
Try attaching a small cluster near the sandal straps.
Think hibiscus-style blooms, daisies, sunflowers, tropical greenery, or bright summer flowers.
You don’t need to cover every inch.
A few accents are usually enough.
If the flip-flops already have bold patterns, keep the flowers relatively simple.
If the sandals are plain, that’s your chance to go bigger.
This is where the project starts looking less like “I glued shoes to wood” and more like intentional summer decor.
Though, technically, yes—you still glued shoes to wood.
Seashells Can Give It a Beachy Look
If you want coastal porch decor, add a few shells.
Small shells can fit nicely around the lettering or near the bottom of the board.
You might also add a small piece of decorative rope, faux starfish, or nautical accent.
Don’t overcrowd the design.
Flip-flops are already visually bold.
A handful of beach details can support the theme without making the board look like the entire souvenir shop moved onto your porch.
Ribbon Can Finish the Design
A colorful ribbon bow can soften the hard edges of the wooden board.
Place it near the top, around a hanging point, or near a cluster of flowers.
Burlap-style ribbon creates a rustic look.
Bright striped ribbon feels playful.
Raffia gives the project a casual tropical touch.
Red, white, and blue ribbon can turn the sign into Fourth of July porch decor.
Just remember that fabric decorations may fade or deteriorate faster outdoors.
A covered location will generally be kinder to them.
Now Attach the Flip-Flops
Once you’re completely happy with the layout, it’s time to attach everything.
Choose an adhesive that’s appropriate for both the board and the flip-flop material and suitable for the conditions where the sign will be displayed.
Read the adhesive label carefully.
Some glues bond well to wood but poorly to flexible foam or rubber-like materials.
Others may not tolerate outdoor heat or moisture.
Apply the adhesive according to its instructions.
Press each flip-flop into position.
Then allow the adhesive to cure for the full recommended time.
Don’t rush this part.
A sandal sliding down your sign six hours later is funny exactly once.
Is Hot Glue Good Enough?
Hot glue is convenient for many indoor crafts, but outdoor conditions can be tougher.
Heat, humidity, cold, and moisture may weaken certain craft adhesives.
If the sign will remain inside a protected enclosed area, your requirements may be different.
For a porch project exposed to changing temperatures, choose an adhesive specifically suited to your materials and conditions.
Check the product directions.
The strongest-looking glue gun in your craft drawer isn’t automatically the best outdoor option.
Think About Summer Heat
Here’s something people don’t always consider with outdoor crafts.
A porch can get hot.
Really hot.
Dark-colored surfaces in direct summer sun can become especially warm.
Foam sandals, adhesives, paint, plastic flowers, and other craft materials can respond differently to heat and sunlight.
For that reason, I’d place this project in a covered or partially protected porch area whenever possible.
That also helps preserve the colors.
Your neon-pink flip-flop deserves better than slowly turning sad beige by August.
Protect the Wooden Background
If the board will be exposed to outdoor humidity or occasional moisture, consider an appropriate protective finish for the wood.
Make sure any finish is compatible with your paint and other materials.
Apply it according to the product directions.
It may be easier to finish the wooden board before attaching the flip-flops.
That way, you aren’t trying to brush around sandal straps and flowers later.
Been there.
Tiny brush gymnastics are not my favorite.
Let Everything Cure Before Hanging
This is the hardest part for impatient crafters.
Wait.
Seriously.
If the adhesive says it needs a certain amount of curing time, give it that time.
Don’t finish the sign at noon and hang it in blazing afternoon heat at 12:15.
Lay it flat somewhere safe.
Keep kids and pets away from uncured adhesive.
Let everything set properly.
Then check each decoration before moving the board.
A little patience now can keep your project together later.
Turn It Into a Leaning Porch Sign
You don’t necessarily have to hang the project.
A tall board can simply lean beside the front door in a protected location.
I love this option because there’s no need to add wall hardware.
Pair it with a planter of bright flowers.
Add a cheerful doormat.
Maybe place a lantern nearby.
Boom.
Instant summer porch personality.
Just make sure the board is stable and won’t fall in wind or create a tripping hazard.
Cute decor shouldn’t attack the mail carrier.
Make a Smaller Door-Hanging Version
Don’t have room for a tall porch board?
Make the project smaller.
Use a compact wooden plaque and two or three miniature flip-flops.
Add flowers and a simple “HELLO SUMMER” message.
Attach appropriate hanging hardware.
This gives you the same cheerful theme without taking up floor space.
It’s also a fun option for apartments, small entryways, patios, or screened porches.
Make a Patriotic Flip-Flop Sign
This project can easily work for Memorial Day or the Fourth of July.
Use red, white, and blue flip-flops.
Paint the wooden background white or navy.
Add stars.
Tie on striped ribbon.
You could paint “WELCOME” in alternating patriotic colors.
The result feels festive without requiring another completely separate porch decoration.
And once July passes, swap a few removable accents if your construction allows it.
Summer still has plenty of life left.
Try a Coastal Farmhouse Version
If bright tropical colors aren’t your style, tone everything down.
Use white, navy, pale blue, and natural wood.
Add rope instead of colorful ribbon.
Choose white flowers or simple greenery.
Keep the lettering clean.
This gives the project a more relaxed coastal-house feeling.
You still get the flip-flop theme, but it doesn’t look like a rainbow exploded beside your front door.
Unless that’s exactly what you want.
In that case, carry on.
Make It With Kids
This can be a fun family craft when adults handle any steps involving strong adhesives, tools, or other materials that aren’t child-safe.
Let kids choose the flip-flop colors.
They can help arrange the design.
They can pick flowers.
They can suggest the wording.
And yes, they will probably choose the two colors you were absolutely certain shouldn’t go together.
Let them cook.
Kids have a weirdly good instinct for cheerful summer color.
Use Old Flip-Flops for a Recycled Version
Have unused flip-flops hiding in a closet?
They might work perfectly.
Clean them thoroughly.
Let them dry completely.
Check their condition.
Then work them into the design.
A little wear may actually add character to a casual beach-themed sign.
However, avoid badly degraded foam or damaged sandals that may crumble or separate.
Upcycling is fun.
Gluing something that’s actively falling apart?
Less fun.
Add Family Names
Want to make the sign feel more personal?
Add your family name.
For example:
WELCOME TO THE JOHNSONS
THE MILLER FAMILY
SMITH SUMMER HOUSE
WELCOME TO OUR HAPPY PLACE
You could even assign one flip-flop color to each family member.
That would make a cute family porch project, especially for a vacation home, lake house, camper, or beach cottage.
And yes, the dog can absolutely have a flip-flop color too.
I’m not here to judge.
Make a Poolside Version
This craft isn’t limited to the front porch.
A flip-flop sign fits beautifully near a covered pool area.
Try wording such as:
POOL TIME
SPLASH ZONE
FLIP-FLOPS WELCOME
NO BAD DAYS
SUNSHINE & SWIMMING
Keep the piece away from areas where it could become soaked or create a hazard.
A decorative sign beside a protected seating area?
Adorable.
Floating around in the pool?
Different project entirely.
Turn It Into Vacation-Home Decor
Nothing says vacation quite like flip-flops.
This project could work beautifully at a beach rental, lake cabin, RV site, screened porch, or summer cottage.
Choose colors that match the property.
Add the house name.
Include a beach-themed phrase.
Guests immediately get that relaxed “we’re on vacation now” feeling.
Which, frankly, is the whole point.
Nobody wants a beach house sign that feels like an office memo.
Don’t Make the Design Too Busy
This is probably my biggest decorating tip.
Stop before you think you’re finished.
Seriously.
Lay everything out.
Then remove one or two decorations.
Flip-flops already provide strong shapes and colors.
If you add huge flowers, eight shells, three bows, giant letters, rope, glitter, and seventeen starfish, the eye doesn’t know where to look.
Pick one main feature.
Let the other decorations support it.
Cute can become chaotic surprisingly fast.
My craft drawer has taught me this lesson repeatedly.
Pick Colors Before Shopping
If you tend to buy craft supplies like a kid in a candy store, choose a color palette first.
Three to five main colors usually give you plenty to work with.
For example:
Turquoise + coral + yellow + white
Navy + white + pale blue + natural wood
Pink + orange + lime + turquoise
Red + white + blue
Purple + pink + yellow
Having a plan makes it easier to resist buying every flower in the aisle.
Will I still look at every flower?
Obviously.
I’m only human.
Where Should You Display a Flip-Flop Porch Sign?
A covered front porch is probably my favorite spot.
It gives guests an immediate hit of summer color while offering the project some protection from direct weather.
Other possibilities include a screened porch, covered patio, sunroom, mudroom, entryway, pool house, beach cottage, lake house, or seasonal indoor display.
Consider wind, rain, direct sunlight, and heat when choosing the location.
Handmade decor generally lasts longer when it isn’t fighting Mother Nature every afternoon.
How to Store It After Summer
When fall rolls around and pumpkins start taking over every porch in America, don’t toss your flip-flop sign.
Clean away loose dirt.
Make sure the piece is completely dry.
Wrap it loosely or place it in a suitable storage container.
Store it somewhere dry where decorations won’t get crushed.
Next summer, pull it out and inspect the adhesive and hanging hardware before displaying it again.
One afternoon of crafting could give you several summers of cheerful porch decor.
That’s my kind of project.
Common Mistakes to Avoid
The project is easy, but a few mistakes can make it frustrating.
Don’t glue before planning the entire arrangement.
Don’t choose an adhesive without checking material compatibility.
Don’t hang the project before the adhesive has fully cured.
Don’t use damaged wood with sharp edges or loose hardware.
Don’t overcrowd the design.
Don’t assume indoor craft materials will survive constant rain and direct sun.
Don’t use weak hanging hardware on a heavy board.
And please don’t balance a giant wooden sign somewhere it can fall onto somebody.
Basically, cute first—but safety right beside it.
Why This DIY Works So Well for Summer
I think the charm comes from how familiar the materials feel.
Everybody recognizes flip-flops.
They’re casual.
They’re colorful.
They’re inexpensive.
And they immediately bring summer to mind.
Put several of them on a painted wooden board and suddenly an ordinary sandal becomes a decorative shape.
Add flowers and a friendly message, and you’ve got something that feels happy without trying too hard.
That’s exactly what I want from summer decor.
Nothing serious.
Nothing fussy.
Just color, sunshine, and something that makes me smile when I walk through the door.
Frequently Asked Questions
How do you make a DIY flip-flop welcome sign?
Arrange colorful flip-flops on a wooden board, mark their positions, attach them with an adhesive suitable for your materials and display conditions, and add lettering, flowers, ribbon, or beach-themed decorations.
What kind of wood works for a flip-flop porch sign?
A smooth craft board, solid wood plank, or structurally sound reclaimed board can work. Choose a size that comfortably holds your design.
What colors work best for summer porch decor?
Turquoise, coral, yellow, pink, orange, lime green, white, and blue all create cheerful summer combinations. Coastal designs often use navy, aqua, white, and natural wood.
Can I use old flip-flops?
Yes, if they’re clean, dry, and still in good condition. Avoid badly degraded or crumbling materials.
Can a flip-flop sign stay outside?
That depends on the wood, paint, adhesive, decorations, and amount of weather exposure. A protected porch location can help reduce exposure to rain and direct sunlight.
Can I use hot glue for an outdoor porch sign?
Hot glue may not be suitable for every outdoor condition or material. Choose an adhesive based on the surfaces being bonded and the temperatures and moisture the project may face.
What can I write on a summer porch sign?
WELCOME, HELLO SUMMER, FLIP-FLOP SEASON, BEACH HOUSE, SUNSHINE, and WELCOME FRIENDS are easy options.
Can kids help make this craft?
Kids can help choose colors, arrange sandals, and plan decorations. Adults should handle tools, strong adhesives, and any steps that require additional safety precautions.
How can I make the sign look more beachy?
Use aqua and blue colors, natural rope, seashell accents, pale wood, and simple coastal lettering.
How do I keep my summer porch sign from looking cluttered?
Choose a limited color palette and one main decorative theme. Arrange everything before attaching it, then remove unnecessary accents until the design feels balanced.
Final Thoughts
I have a soft spot for DIY projects that take something totally ordinary and turn it into something ridiculously cheerful.
And a DIY flip-flop welcome sign absolutely fits that description.
A few inexpensive sandals.
A wooden board.
Some paint.
A couple of flowers.
A friendly message.
That’s really all you need to create a front porch decoration that feels like summer walked up to your house and decided to stay awhile.
Keep the sandals colorful.
Arrange everything before gluing.
Choose materials that suit where you’ll display the sign.
Give the adhesive enough time to cure.
Then place your finished creation somewhere protected and enjoy it all summer.
And if somebody asks why there are six flip-flops glued to a board beside your front door?
Just tell them it’s summer.
Honestly, that’s explanation enough.