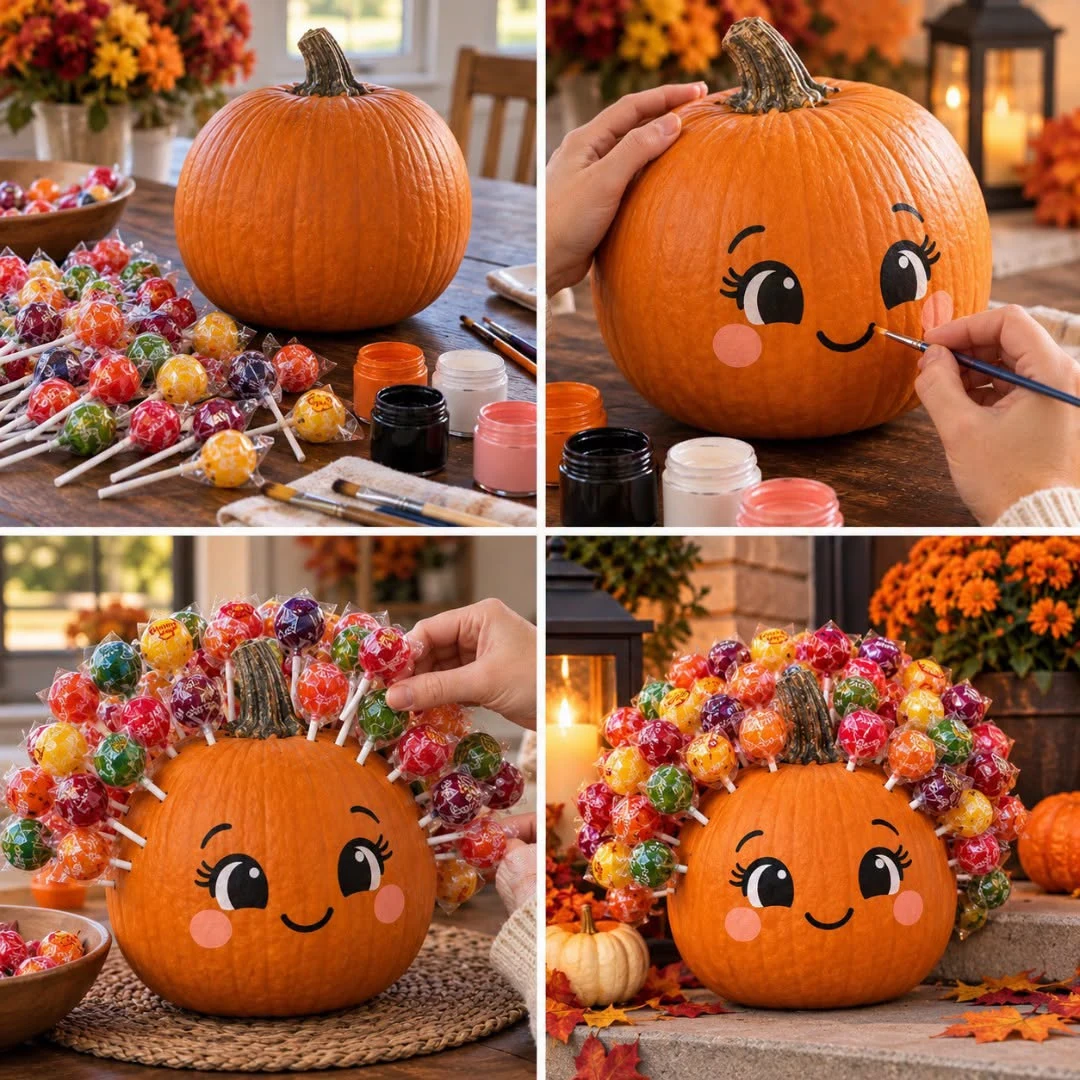
Want a Halloween pumpkin that looks playful without carving a single opening? Give it a cheerful painted face and a colorful crown of wrapped lollipops. The candy becomes a bold, curly-looking “hairstyle” around the stem, while the pumpkin stays intact. This is a fun afternoon craft for a porch, party table, or fall festival display.
What You’ll Need
- One medium pumpkin with a sturdy stem and a clean, dry surface
- Individually wrapped lollipops in several colors, enough to make a full crown
- Black, white and pink acrylic craft paint or paint pens
- Small paintbrushes and a pencil for sketching
- A wooden skewer or awl for pilot holes, used by an adult
- Paper towels and a battery-operated LED candle for the display, if desired
How to Add Candy Hair to Your Pumpkin
1. Clean and dry the pumpkin
Wipe away dust and moisture, then let the pumpkin dry completely. Paint adheres best to a dry surface. Choose the smoothest side for the face and turn the stem toward the center of your future candy hairstyle.
2. Paint a friendly face
Lightly sketch two large eyes, curved brows, a small smile and round cheeks. Paint the eyes black, add white highlights and pink cheeks, then let each layer dry before adding details. A paint pen is handy for the eyelashes and smile. Keep the face low enough to leave space for the candy above it.
3. Make the candy crown
Plan a semicircle of lollipops around the stem, then build outward toward both sides. An adult can make shallow pilot holes in the pumpkin with a skewer or awl. Press only the sticks into the holes, leaving every candy wrapper intact. Alternate colors and heights so the crown looks full and lively. If a stick feels loose, make a fresh hole nearby rather than forcing it deeper.
4. Fill gaps and display
Step back and look at the shape. Add a few more lollipops where the pumpkin shows through, then set it on a stable surface. A battery-operated LED candle nearby gives the display a warm glow without bringing a flame close to the wrappers.
Tips and Variations
- Choose your colors: Use one color family for a coordinated look or mix bright shades for a playful hairstyle.
- Change the expression: Try sleepy eyes, freckles or a surprised mouth. Draw the design in pencil first so changes are easy.
- Make the crown removable: Place a ring of floral foam around the stem and insert the sticks into the foam instead of the pumpkin. Secure the foam before displaying.
- Keep it looking fresh: Display the pumpkin in a cool, dry place and bring it inside during rain.
Safety and Candy Notes
Have an adult handle the skewer or awl, and keep sharp tools away from children. Do not place a real candle near candy wrappers. Keep the decoration away from heat, pets and very young children. If you plan to share the sweets later, use fresh, fully sealed wrappers and check that they stayed clean and undamaged; discard any candy with a torn wrapper.
Quick Project Card
Project: No-carve candy-hair pumpkin
Time: About 30–45 minutes, plus paint drying time
Best for: Halloween parties, porch decorations and fall festivals
Key steps: Clean, paint, make pilot holes, insert wrapped lollipops and display.