You know those old household items sitting in the garage that nobody wants to throw away, but nobody really knows what to do with either? Well, an old ironing board might be the last thing you would picture as cute front porch decor.
And yet, here we are.
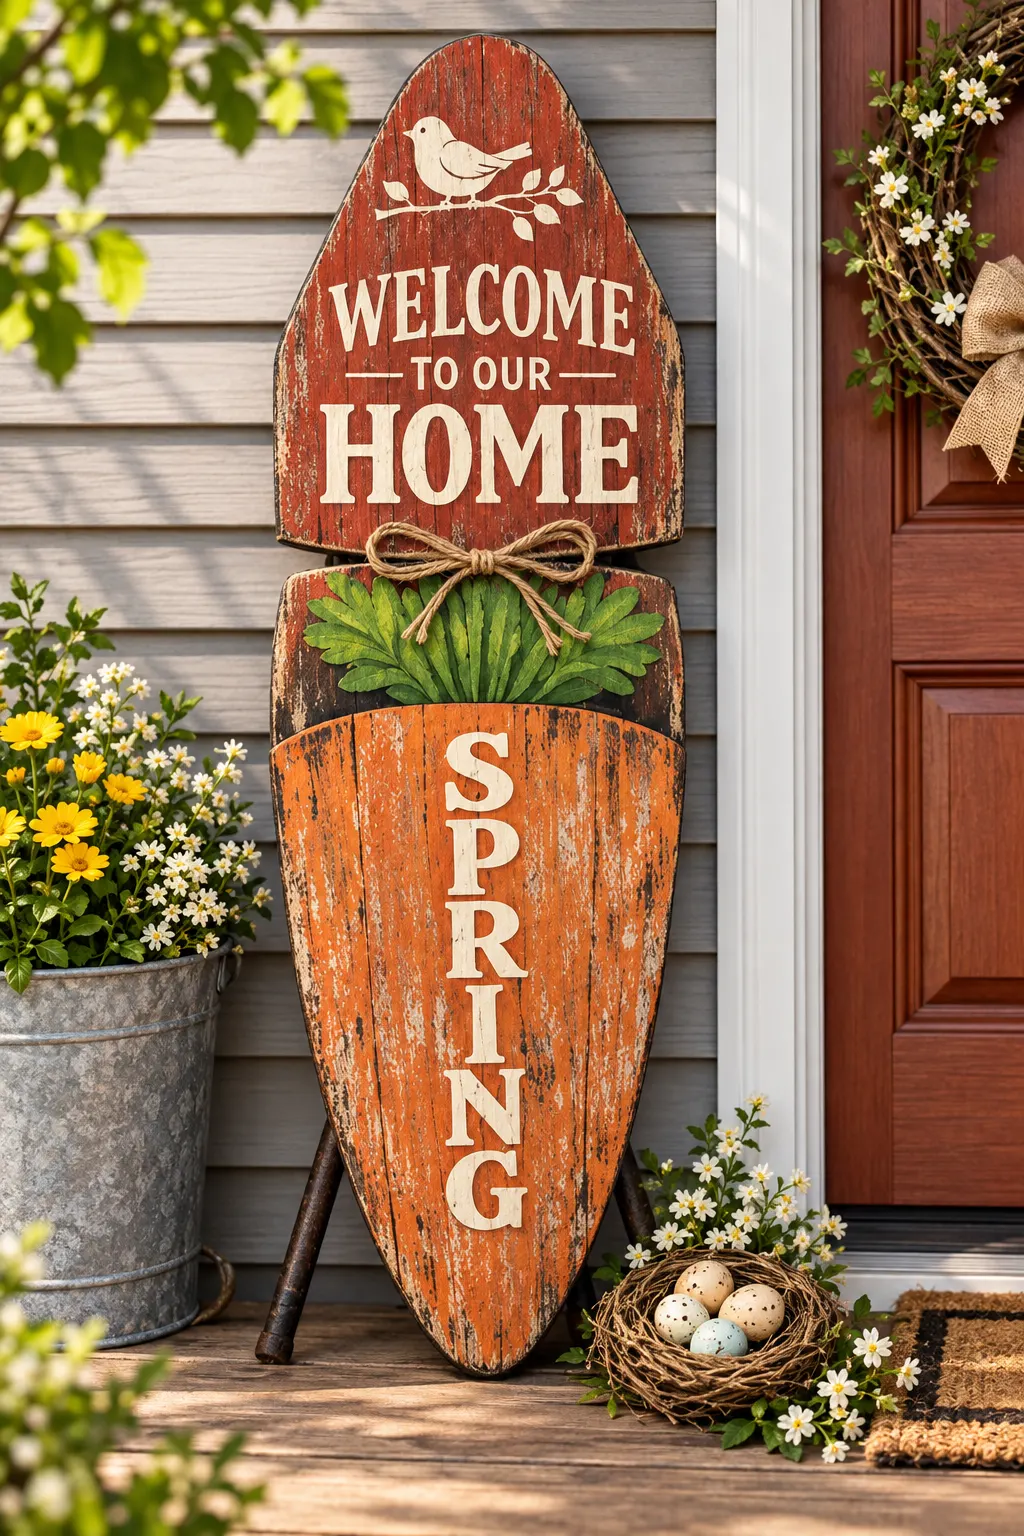
This DIY porch sign from an old ironing board turns a worn-out household item into a fun piece of front door decor. Instead of sending the board to the trash, you can cut it into two sections, paint it in colors you love, add a welcoming message, and place it near your entryway.
Honestly, the finished project has that quirky, handmade charm that makes people stop and look twice.
It can fit a farmhouse porch, a country-style entry, a colorful cottage, or even a cleaner modern space depending on the paint colors you choose.
And, yep, the ironing board shape is exactly what makes this project so memorable.
Why an Old Ironing Board Makes Such a Cute Porch Sign
Most porch signs start with a basic wooden plank. There is nothing wrong with that, of course, but using an old ironing board gives the project way more personality.
The long shape already works well for vertical porch decor. After the board is cut into two pieces, you can turn each half into its own decorative sign.
One side could say “Welcome,” while the other could feature your family name, a seasonal message, flowers, stripes, or simple painted patterns.
You also get the satisfaction of reusing something that might otherwise end up in a landfill.
And let’s face it, there is something pretty fun about telling guests, “Yep, that used to be my ironing board.”
DIY Porch Sign From an Old Ironing Board
This project does not require a giant craft room or a pile of expensive supplies. Most of the materials are easy to find at a hardware or craft store, and you may already have several of them at home.
The biggest job is preparing and cutting the board safely. After that, the project becomes mostly sanding, painting, decorating, and sealing.
Materials You Will Need
Gather these supplies before you start:
- One old ironing board
- Medium-grit sandpaper
- Outdoor acrylic paint in two or more colors
- Paintbrushes or small foam rollers
- Painter’s tape
- Clear outdoor sealant
- A suitable saw
- Work gloves
- Protective eyewear
- Dust mask
- Stencils, optional
- Lettering paint, optional
- Measuring tape
- Pencil
If your ironing board has folding legs attached, you may also need a screwdriver or wrench to remove the hardware before cutting.
Step 1: Remove Fabric, Padding, and Hardware
Start with the plain ironing board surface.
If the board still has its fabric cover, foam padding, clips, or attached accessories, remove them first. You want a clean base before sanding or painting.
Next, check underneath the board.
Many traditional ironing boards have folding metal legs attached with screws, brackets, or rivets. Remove as much hardware as possible so the board can sit flat while you work.
Keep any interesting pieces you like. Sometimes old brackets or handles can become part of the final rustic look.
Still, loose or sharp pieces should come off.
Step 2: Clean the Ironing Board
Old ironing boards tend to collect dust, rust, lint, and who-knows-what from years of storage.
Give the board a good cleaning before sanding.
Wipe away loose dirt with a dry cloth first. Then clean the surface with mild soap and water if needed. Let it dry completely before moving on.
This little step matters because paint sticks better to a clean surface.
And trust me, painting over garage dust is not the kind of shortcut that saves time later.
Step 3: Sand the Surface
Now grab your medium-grit sandpaper.
Sand the entire surface to remove loose paint, rough areas, light rust, and flaky finishes. You do not necessarily need to strip every inch down to bare material.
The goal is simply to create a clean, slightly rough surface that accepts paint well.
Pay special attention to rusty edges.
Wear gloves, eye protection, and a mask while sanding, especially if the ironing board is old and you do not know what type of finish was previously used.
After sanding, wipe away the dust with a clean cloth.
Step 4: Mark the Ironing Board Before Cutting
Measure the ironing board and mark the point where you want to divide it.
You can cut it into two equal sections, but they do not have to be perfectly even.
In fact, one longer piece and one shorter piece can look really cute when displayed together.
Use a pencil or marker to draw a clear cutting line.
Before cutting, check the underside again for hidden brackets, screws, or other metal pieces near your cutting point.
If the board is made from metal, use a cutting tool that is designed for that material. If you are not comfortable cutting metal, ask someone experienced with power tools to handle this part.
Safety beats cute porch decor every single time.
Step 5: Cut the Ironing Board Into Two Parts
Secure the ironing board firmly before making the cut.
Wear protective eyewear, gloves, and other suitable safety gear.
Then cut carefully along your marked line using a tool made for the board’s material.
Do not rush this part.
After cutting, the new edges may be sharp, especially on a metal ironing board. Sand or file those edges until they feel smooth and safe to handle.
You can also cover exposed edges with trim or another decorative material if that works better for your design.
Step 6: Plan Your Porch Sign Design
Now comes the fun part.
Lay both ironing board pieces on your work surface and decide how you want them to look.
You could paint them in matching colors or give each piece its own personality.
Popular porch sign color ideas include:
- Cream and black
- Sage green and white
- Navy and white
- Terracotta and beige
- Soft gray and charcoal
- Red and cream
- Pastel blue and white
- Black and natural wood tones
For a classic farmhouse porch, warm white, black, muted green, and weathered gray work beautifully.
For something cheerful, go bold with coral, turquoise, yellow, or deep blue.
And for fall? Rust orange and creamy beige look downright cozy.
Step 7: Add Painter’s Tape
Painter’s tape makes it easy to create crisp lines, stripes, blocks, borders, or geometric patterns.
Place the tape across the board wherever you want different paint sections.
You could make wide horizontal stripes, a narrow border around the edges, or even a simple two-tone design.
Press the tape firmly along the edges so paint does not seep underneath.
Do not overthink the pattern.
Sometimes the simplest design looks best, especially if you plan to add large lettering later.
Step 8: Paint Each Ironing Board Section
Apply your first coat of outdoor acrylic paint.
A paintbrush works well for smaller surfaces, while a foam roller can make larger sections quicker and smoother.
Let the first coat dry before adding another.
Most old ironing boards will need at least two coats for solid color coverage, particularly if the original surface is dark or heavily marked.
Paint slowly around holes and textured areas.
Those little details can take extra time, but they also give the finished piece character.
After the final coat dries, carefully remove the painter’s tape.
Step 9: Add a Welcome Message
A porch sign becomes even more charming once you add words.
You can paint lettering freehand, use reusable stencils, attach wooden letters, or apply outdoor-rated vinyl.
Simple phrases often work best.
Try wording such as:
- Welcome
- Hello
- Home Sweet Home
- Come On In
- Hey Y’all
- Welcome Friends
- Our Happy Place
- Home
- Bless This Home
You could also add your last name or house number.
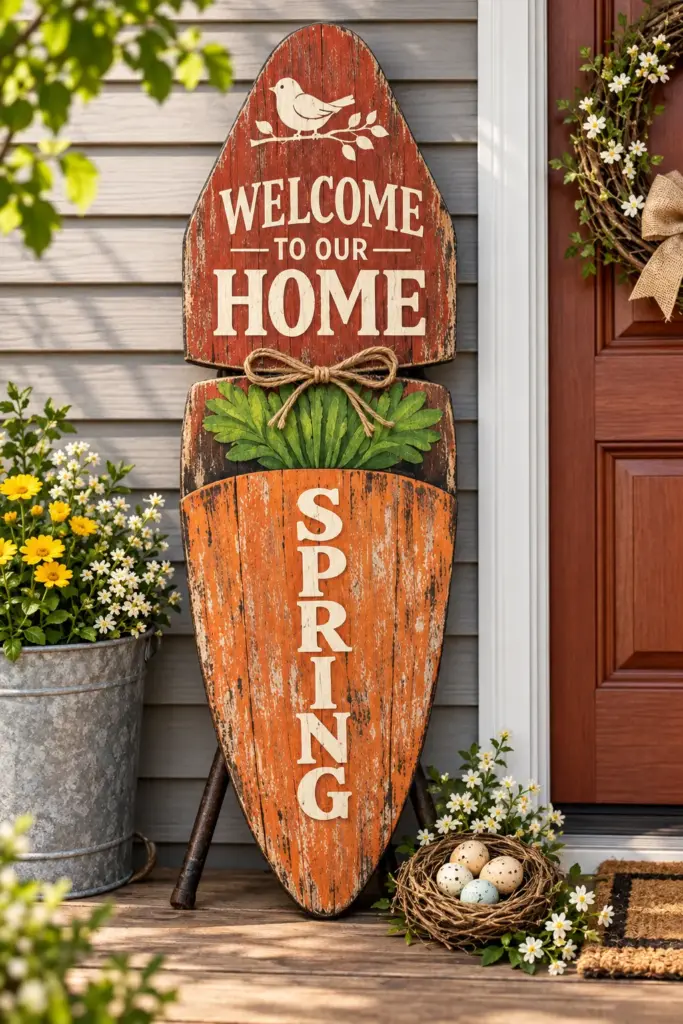
For seasonal porch decor, swap the general greeting for something like “Hello Fall,” “Merry Christmas,” “Happy Spring,” or “Welcome Summer.”
One ironing board half can stay out all year, while the second can change with the season.
Pretty clever, right?
Step 10: Add Decorative Details
Once your lettering is finished, add any extra details you want.
Painted flowers can soften the industrial look of a metal ironing board.
Small vines, leaves, dots, stars, pumpkins, snowflakes, or simple line art can also look great.
If farmhouse style is your thing, try painting a buffalo check pattern near the bottom.
For a cottage-style porch, add small wildflowers around the lettering.
And if you like minimalist decor, skip the extra decorations completely. A solid background with clean white lettering can look gorgeous all by itself.
Step 11: Apply an Outdoor Sealant
After the paint and decorations are fully dry, coat the finished sign with a clear outdoor sealant.
This protective layer helps the paint hold up better against moisture, sunlight, dust, and normal outdoor conditions.
Apply the product according to its label directions.
Pay attention to the freshly cut edges too.
Let the sealant dry fully before moving the sign outside.
Yes, waiting is the boring part. But waking up to fingerprints or smudged lettering because you moved it too soon? Way worse.
How to Display Your Finished Ironing Board Porch Sign
Once everything is dry, place your new DIY porch sign near the front door.
You can lean the pieces against a wall, attach suitable supports, or mount them securely depending on their size and weight.
If your porch gets strong wind, do not simply lean lightweight pieces against the house.
Secure them properly so they do not tip over.
For a cozy farmhouse arrangement, place the sign beside a wooden bench or wicker chair.
Then add a galvanized bucket filled with seasonal flowers.
In summer, try bright geraniums or petunias.
In fall, pair the sign with pumpkins, mums, and a plaid outdoor pillow.
During winter, evergreen branches, lanterns, and pinecones look beautiful beside a painted ironing board sign.
Rustic Ironing Board Porch Sign Idea
A distressed finish works especially well on vintage ironing boards.
Start with a dark base coat, such as charcoal or brown.
After it dries, paint a lighter color over the top.
Then lightly sand the corners, edges, and a few raised areas so some of the darker paint shows through.
The result has that weathered farmhouse appearance without needing decades of actual porch life.
Keep the sanding random rather than perfectly symmetrical.
A little imperfection makes the piece feel more natural.
Modern Ironing Board Porch Sign Idea
Not into rustic decor? No problem.
An old ironing board can look surprisingly modern with the right color palette.
Paint it matte black, warm white, deep navy, or soft gray.
Then add simple block lettering in one contrasting color.
Skip floral designs and distressed edges.
Pair the sign with black metal planters, simple outdoor furniture, and clean greenery such as boxwood or ornamental grass.
Suddenly that old ironing board looks less “grandma’s laundry room” and more modern front porch statement.
Funny how paint can do that.
Colorful Cottage Porch Sign Idea
If your home has a cottage feel, this project is practically begging for color.
Try pale blue, butter yellow, blush pink, mint green, or lavender.
Then paint small flowers around the edges.
You can also add a cheerful “Welcome” message in white or cream.
Set the finished sign beside terracotta pots overflowing with flowers, and you have a front entrance that feels friendly before anyone even knocks.
Seasonal Ironing Board Porch Decor
One of the best things about this upcycled porch sign is how easy it is to adapt for different seasons.
For spring, use pastel colors with flowers or small birds.
For summer, try red, white, and blue or bright citrus-inspired colors.
For fall, use orange, brown, mustard, cream, and deep green.
For winter, paint the board dark green, red, white, or navy and add snowflakes, pine branches, or a holiday greeting.
You could even paint one side for everyday decor and the opposite side for holidays.
Flip it around when the season changes and—boom—you’ve got a new porch look without storing another giant decoration.
Tips for Making This DIY Project Quicker
If you want to finish this project without turning your garage into a week-long craft zone, a little prep goes a long way.
Clean and sand the ironing board the day before you plan to paint.
Choose a simple two-color design instead of several small painted sections.
Use a foam roller for large areas.
Pick reusable letter stencils rather than painting lettering freehand.
You can also use quick-drying outdoor paint when the product is suitable for the board material.
Most importantly, give each layer enough drying time.
Trying to rush wet paint usually creates more work, not less.
What If the Ironing Board Has a Lot of Rust?
Light surface rust can often be sanded away before painting.
However, if the board has deep corrosion, holes, cracked metal, jagged edges, or weak structural areas, it may not be the best piece for this project.
A decorative sign should still be safe to handle and display.
If the surface is badly damaged, look for another ironing board at a thrift shop, flea market, yard sale, or local reuse center.
Older models often have interesting shapes and details that make them perfect for craft projects.
More Ways to Personalize the Sign
Your sign does not have to look like anyone else’s.
Add your house number near the top.
Paint your family name down the center.
Use stencils that match your favorite flowers.
Add small hooks near the bottom for lightweight seasonal decorations.
You could even create a reversible design.
For example, one side could say “Welcome,” while the back says “Happy Holidays.”
That gives you two porch decorations from one piece.
Not bad for something that was once used to press shirts.
Coordinate It With Your Porch Decor
For the best finished look, pull one or two colors from items already on your porch.
Look at your front door color, outdoor pillows, flowerpots, doormat, shutters, or seasonal wreath.
Then repeat one of those shades on the ironing board sign.
This creates a connected look without making everything match exactly.
For example, if you have a navy front door and cream planters, paint your sign cream with navy lettering.
If your porch has warm terracotta pots, try beige, sage green, or muted orange.
Small color connections make DIY decor feel intentional.
Why Upcycled Porch Decor Has So Much Charm
Brand-new decorations are easy to buy, but repurposed pieces tell a story.
An ironing board has an instantly recognizable shape, yet nobody expects to see one standing beside a front door as decor.
That surprise is part of the appeal.
It also gives older household items another purpose instead of tossing them out.
And honestly, some of my favorite DIY ideas start exactly like this: somebody looks at an ordinary object and thinks, “Wait a second… I could make something cute out of that.”
Sometimes it works.
Sometimes it turns into a garage disaster.
This one? Definitely worth trying.
Final Thoughts on This DIY Porch Sign From an Old Ironing Board
Turning an old ironing board into two painted porch signs is a fun way to add character to your front entrance without starting with expensive decor.
Clean the board, sand it, cut it safely, paint each section, add lettering, and finish everything with an outdoor sealant.
Then style the pieces with flowers, planters, lanterns, pumpkins, greenery, or whatever fits your home.
The result feels personal, playful, and just a little unexpected.
So before you toss that old ironing board sitting in the basement or garage, take another look at it.
With some paint and a creative afternoon, it might become the cutest thing sitting by your front door.