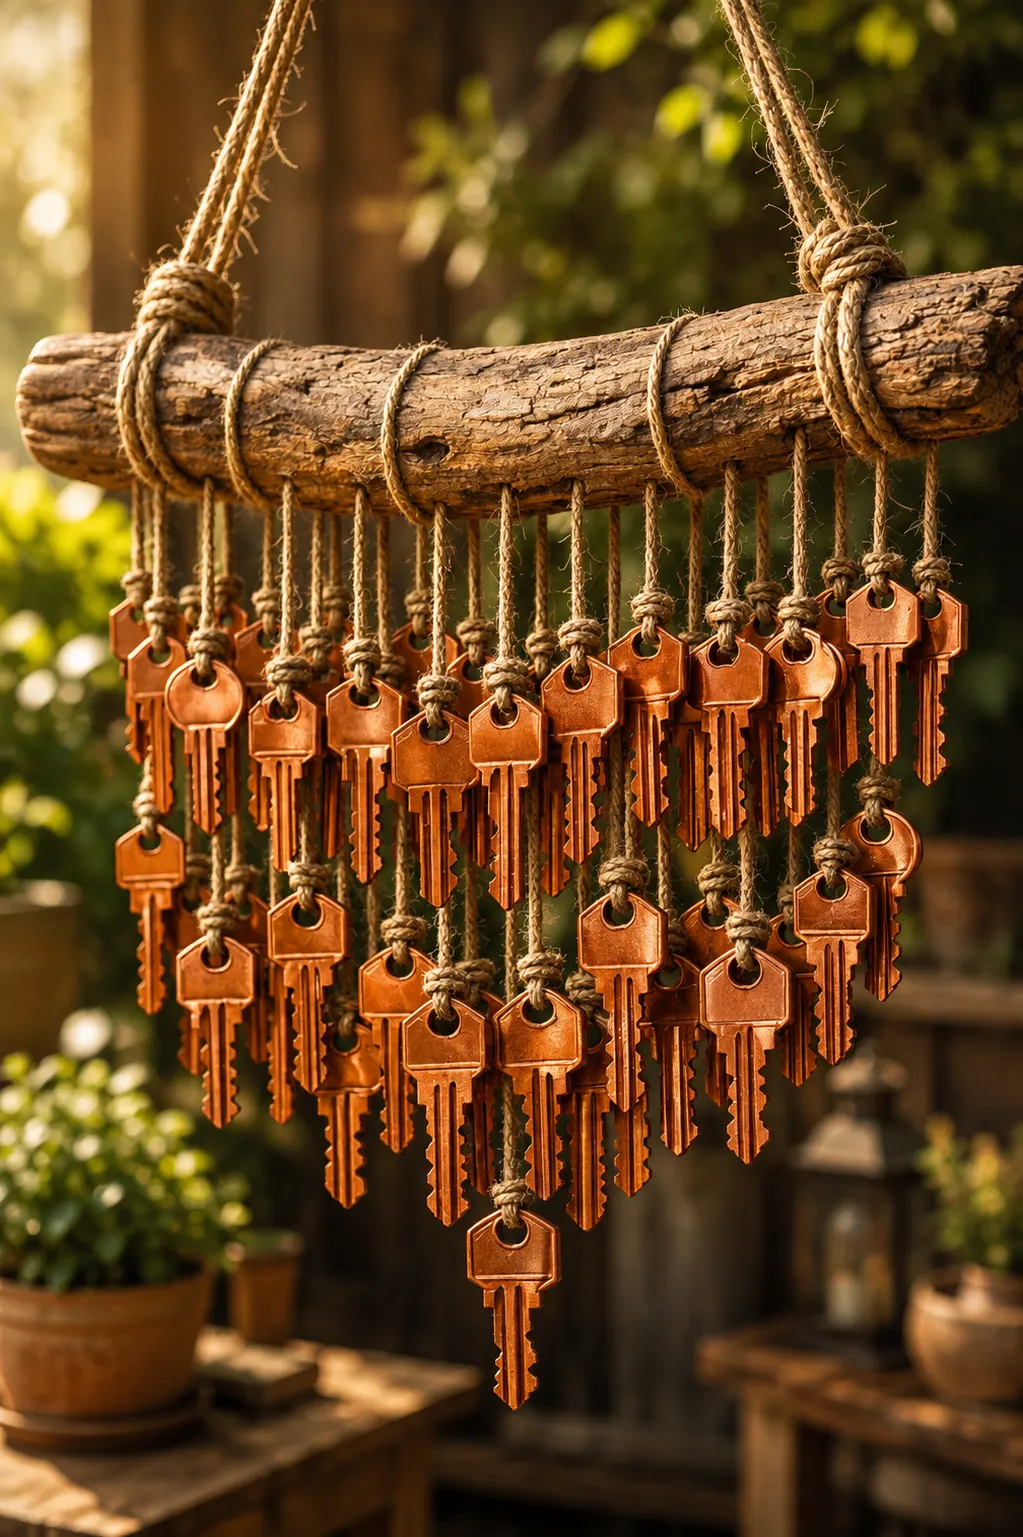
Okay, I have a drawer full of old keys that apparently belong to doors nobody remembers.
You know the collection.
One might belong to an old apartment.
Another could open a padlock that disappeared ten years ago.
Three look important, so naturally nobody dares throw them away.
And somehow the pile keeps growing.
That’s why this DIY old key wind chime immediately feels like one of those “why didn’t I think of that?” backyard projects.
Instead of leaving old metal keys buried in a junk drawer, you can give them a bright copper finish, hang them from a chunky wooden branch, and turn the whole collection into rustic outdoor decor.
The keys move in the breeze.
They catch the sunlight.
And when they touch, they create a soft metallic clinking sound.
Best of all, every key is slightly different, so the finished piece naturally has that collected-over-time look that’s hard to fake with brand-new craft supplies.
Here’s how I’d make a large version for a covered porch, pergola, patio, or garden.
Why Old Keys Make Such Good Wind Chimes
Keys already have almost everything you need for hanging decor.
They’re small.
They’re metal.
Most have a built-in hole.
They come in different shapes.
And when two metal keys tap together, they make a light ringing or clinking sound.
That makes them perfect for an upcycling project.
You don’t have to drill dozens of tiny objects.
You don’t have to manufacture separate pendants.
And because old keys often show scratches and wear, they already have character before the first coat of paint goes on.
Honestly, it’s like the junk drawer has been preparing for this project the whole time.
What You’ll Need
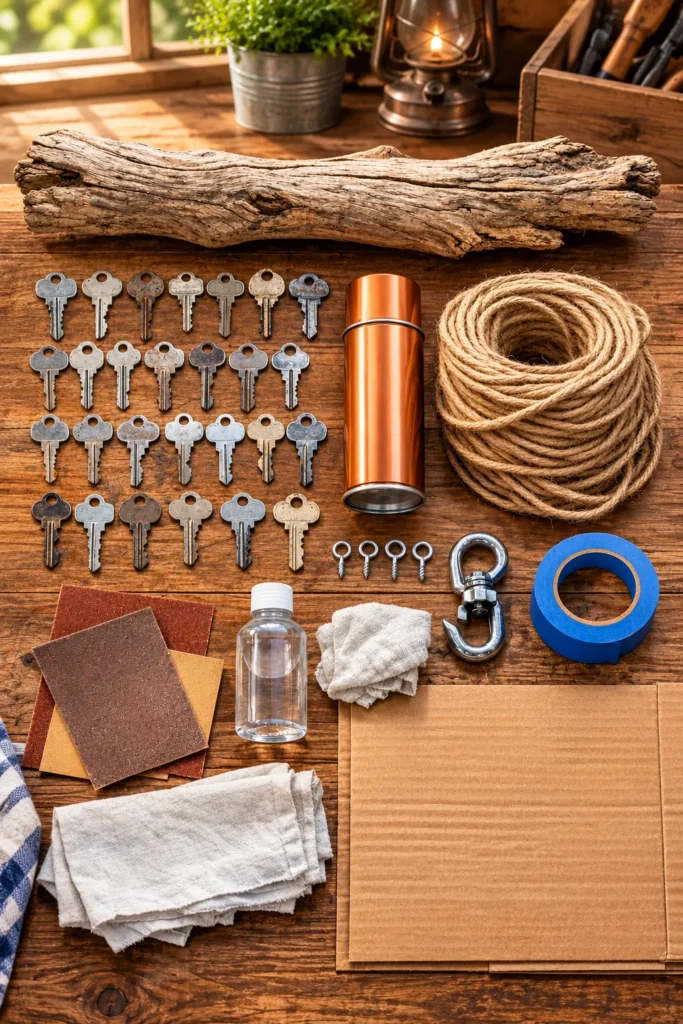
For one large DIY old key wind chime, gather:
- About 30 to 40 old metal keys
- One sturdy wooden branch or piece of driftwood
- Copper-colored paint suitable for metal
- Clear outdoor protective coating, optional
- Strong outdoor cord, waxed cord, or weather-resistant twine
- Two strong hanging cords
- Screw eyes or another suitable hanging attachment
- Outdoor-rated hanging hook
- Medium-grit sandpaper
- Fine-grit sandpaper
- Rubbing alcohol
- Clean cloths
- Painter’s tape
- Cardboard or drop cloth
- Scissors
- Pliers
- Drill with suitable drill bit
- Gloves
- Eye protection
If you only have 10 or 15 keys, don’t worry.
Make a smaller version.
There is no official Wind Chime Key Police counting them.
Start With Keys You Know You Don’t Need
This sounds obvious.
Still, check.
Do not spray-paint a key and permanently tie it into garden decor only to realize two days later that it opens the shed.
Go through the collection carefully.
Test uncertain keys.
Ask family members.
Put any potentially important key aside.
Use only keys that are genuinely retired.
If you’re still unsure what a key belongs to, keep it in the mystery drawer a little longer.
Some traditions are worth preserving.
Remove Labels and Plastic Covers
Some modern house keys have plastic caps.
Others may have old paper labels, stickers, tape, or key-ring tags attached.
Remove anything you don’t want in the finished wind chime.
For a consistent copper look, plain metal keys are easiest.
If a plastic-covered key is sentimental and you want to include it, consider leaving it unpainted and letting it become an accent.
Mixed details can actually make the finished piece feel more personal.
Choose a Good Wooden Branch
The branch matters almost as much as the keys.
Look for something thick enough to stay fairly rigid once dozens of keys are hanging from it.
A naturally weathered branch looks beautiful.
Driftwood works too.
You could also use a straight piece of reclaimed wood if that fits your style better.
For a larger piece, something around 30 to 40 inches long gives you plenty of hanging space.
Avoid wood that is:
- Rotten
- Soft
- Splitting badly
- Infested with insects
- Severely cracked
- So heavy that hanging becomes difficult
The branch should feel solid when you lift it.
Rustic is good.
Falling apart in your hands is not rustic.
That’s firewood.
Dry the Branch Before Crafting
If you collect a branch outdoors, make sure it’s clean and dry before bringing it into the project.
Brush away loose dirt.
Remove flaky bark if it’s already falling off.
Let damp wood dry fully in a suitable location.
You don’t want to tie dozens of carefully painted keys onto wet wood.
Moisture can affect finishes and cords, and nobody wants unexpected backyard bugs joining the craft session.
Step 1: Sand the Wood
Lightly sand rough areas.
You don’t need to turn a natural branch into polished furniture.
Keep some texture.
Focus on sharp splinters and places where cord will rub.
Smooth those spots enough that they won’t cut through your hanging lines over time.
Run your hand carefully along the branch afterward.
If a section feels dangerously sharp, sand it a little more.
That’s it.
The natural knots and imperfect shape are part of the charm.
Leave the Wood Natural or Finish It?
Both options work.
Natural wood gives you a rustic look.
A clear outdoor wood finish can help maintain the appearance longer in a protected outdoor area.
You can also stain the wood darker if you want more contrast with the copper keys.
For farmhouse decor, a weathered gray or natural brown looks great.
For modern decor, a black-painted wooden bar can look surprisingly sharp.
I personally love natural wood with copper.
It feels warm without looking too coordinated.
Step 2: Clean Every Key
This part is boring.
It’s also worth doing.
Old keys collect oil from hands, dust, grime, and whatever mysterious substance lives at the bottom of junk drawers.
Paint does better on clean metal.
Wipe each key thoroughly.
Rubbing alcohol can help remove surface oils when appropriate for the metal and coating you plan to use.
Let the keys dry completely.
And yes, cleaning 40 keys takes a minute.
Put on music.
This is a playlist step.
Step 3: Lightly Scuff Shiny Keys
If the keys are extremely smooth or shiny, lightly scuffing the surface can give paint a better surface to grip.
Use fine sandpaper.
You don’t need to grind away the metal finish.
A gentle scuff is enough.
Wipe away dust afterward.
Some metal paints may also call for primer.
Follow the instructions for the exact coating you choose.
Paint chemistry varies.
The can knows more about itself than I do.
Step 4: Set Up a Safe Painting Area
Use metal paint outdoors or in another properly ventilated location according to the product directions.
Protect the ground with cardboard or a drop cloth.
Keep away from flames and ignition sources.
Wear the protective gear required by the product.
Lay the keys out so they aren’t touching.
If they overlap, you’ll end up with weird bare patches.
You can also thread the keys loosely onto scrap wire and suspend them if that makes painting easier.
Just keep enough space between them for the coating to reach all sides.
Step 5: Paint the First Side Copper
Shake or prepare the paint according to the product directions.
Apply light coats.
Don’t try to create the final color with one giant blast.
Heavy paint can pool around the teeth and holes.
Several light passes usually create a cleaner result.
Cover the face of each key.
Let the coating dry for the recommended time.
Then inspect.
Add another light coat if needed.
At this point, your old house keys start looking weirdly fancy.
That’s when the project gets fun.
Step 6: Flip and Paint the Other Side
Once the first side is ready for handling according to the paint directions, turn the keys over.
Paint the backs.
Don’t forget the edges.
Keys twist and rotate once they’re hanging, so both sides will be visible.
A beautiful copper front and random silver back can still work, but if you want the full metallic look, coat everything evenly.
Let the paint dry fully before moving on.
Why Copper Looks So Good Outdoors
Copper color works beautifully against wood and greenery.
It catches warm sunlight.
It looks good with terracotta.
It pairs naturally with brown, green, black, and cream.
And it has enough contrast to make small keys visible from several feet away.
Bright copper feels polished.
A darker aged-copper look feels rustic.
You can choose whichever suits the yard.
I’m a sucker for warm copper beside green plants.
It just works.
Add a Clear Protective Coat
If your chosen paint system calls for an outdoor clear coat, apply one after the color has dried properly.
This can help protect the decorative finish from light moisture, scratches, and outdoor exposure.
Use products that are compatible with each other.
Don’t assume every clear spray works over every metallic paint.
Test one spare key if you’re uncertain.
Nothing is sadder than watching a gorgeous copper finish wrinkle because two coatings decided they hated each other.
Let the Keys Cure Fully
Dry and cured are not always the same thing.
A key may feel dry enough to touch while the coating underneath is still soft.
Give the finish the curing time listed by the manufacturer before tying and clanging the keys together.
Otherwise, they may stick, chip, or mark each other.
Patience now gives you a cleaner final project.
I know.
Waiting is the least fun craft supply.
Step 7: Choose Your Hanging Cord
Natural jute looks beautiful.
But if the piece will remain outside for a long season, weather-resistant synthetic cord may last longer.
Sun and moisture can weaken natural fibers over time.
Good options may include:
- Weather-resistant cord
- Waxed outdoor cord
- Strong nylon cord
- Suitable braided line
- Jute for protected displays
Choose something thin enough to fit through the key holes but strong enough to hold them securely.
Copper-painted keys aren’t very heavy individually.
Forty of them together?
Different story.
Step 8: Cut the Hanging Strands
You can cut every strand to the same length.
That creates a clean straight row.
Or vary the lengths for a more playful look.
For example:
Short.
Medium.
Long.
Medium.
Short.
Another option is completely irregular lengths.
I like variation because it lets the keys overlap slightly and move more freely.
Try lengths from roughly 7 to 12 inches for a medium-to-large project.
Lay the cords out before tying anything.
A little planning prevents knot chaos.
Step 9: Tie One Key to Each Cord
Thread the cord through the key hole.
Tie a strong knot.
A secure double knot works for many cord types, but use a knot suited to the specific material.
Pull firmly.
Then test.
Give the key a little tug.
If the knot slips now, it will definitely slip later in the wind.
Leave a short tail rather than cutting directly against the knot.
If the cord manufacturer allows sealed ends, follow its directions.
Mix Key Shapes
This is where the project gets personality.
Don’t organize all identical keys together.
Spread them around.
Mix long keys with short ones.
Wide heads with narrow heads.
Square styles with round ones.
If you have a couple of vintage-looking keys, place them where they’ll be visible.
The variety makes the finished wind chime more interesting.
Forty perfectly identical keys would still work.
Forty mismatched old keys tell a better story.
Step 10: Plan the Key Placement on the Branch
Lay the branch on your work table.
Position the hanging cords along it before tying.
Spread them fairly evenly.
You can leave larger gaps near knots or unusual branch shapes.
Don’t feel trapped by exact measurements.
A natural branch doesn’t demand perfect geometry.
What matters is visual balance.
Try to keep one side from becoming noticeably heavier.
Remember, the branch needs to hang reasonably level.
Make One Row or Two?
One row is easiest.
The keys hang cleanly and move freely.
Two staggered rows create a denser look and more opportunities for the metal pieces to touch.
For a thick branch, you can tie some cords slightly toward the front and others toward the back.
Keep enough separation that the cords don’t become constantly tangled.
There’s a sweet spot between gentle wind chime and copper spaghetti.
Aim for that.
Step 11: Tie the Keys Onto the Branch
Wrap the loose end of each cord around the branch.
Tie it securely.
Continue across the entire length.
Pause occasionally and lift the branch a little.
Make sure the cords hang where you expect.
Adjust before tightening everything permanently.
Once all the keys are attached, gently shake the branch.
Listen.
This is your first little preview.
And yes, after tying 40 pieces, hearing them actually clink is extremely satisfying.
How Much Should the Keys Touch?
That depends on the sound you want.
For more frequent sound, let neighboring keys overlap slightly.
For something quieter, give them more space.
Remember that wind strength changes everything.
A gentle breeze might barely move them.
A strong gust can make tightly packed keys much louder.
If your patio is close to a bedroom window or neighbor’s property, err on the quieter side.
Cute yard decor shouldn’t start a neighborhood feud.
Step 12: Install Strong Hanging Points
A large branch with dozens of metal keys needs reliable support.
Install strong attachment points near both ends of the branch.
Screw eyes can work when they’re properly sized and installed into solid wood.
Pre-drilling pilot holes can reduce splitting.
Don’t install them into rotten or badly cracked sections.
Place the hanging points far enough apart to keep the branch balanced.
For a very long or heavy branch, additional support may be appropriate.
Test the Hanging Hardware Before Going Outside
Attach the top cords.
Lift the wind chime a few inches above a soft surface.
Watch the branch.
Does it hang level?
Does one side drop?
Does a screw eye move?
Do knots slip?
Correct problems now.
Don’t test the full weight for the first time while standing on a ladder under the installation spot.
Ground-level mistakes are much friendlier.
Step 13: Choose the Right Outdoor Location
This wind chime looks fantastic under:
- Covered porches
- Pergolas
- Gazebos
- Strong tree branches
- Garden structures
- Patio beams
Choose a spot with enough airflow for gentle movement.
But avoid extremely exposed places that experience violent wind.
The branch should also have plenty of clearance from:
Windows.
Doors.
Walls.
People’s heads.
Outdoor fans.
Power lines.
Other hanging decor.
Forty metal keys swinging against a glass window?
Nope.
Let’s keep those two worlds apart.
Make Sure the Support Is Actually Strong
Don’t hang a heavy key decoration from a tiny decorative cup hook.
Use hardware rated appropriately for the finished weight and mounting material.
A porch ceiling, wood beam, tree branch, and pergola may each require different hanging methods.
If you’re uncertain about overhead mounting, ask someone qualified to help.
Outdoor decor becomes considerably less charming when it falls on somebody.
Never Use Keys That Still Identify Your Home
Here’s one practical detail I care about.
Don’t hang active house keys outside.
And don’t label old keys with current addresses.
If a key could still access a property, vehicle, gate, shed, or storage area, keep it secure.
Use genuinely retired keys.
Decorative copies and blank keys work too.
The project should look personal without giving away access to anything important.
Add Vintage Skeleton Keys
Want more character?
Mix a handful of decorative skeleton-style keys into the arrangement.
They create larger visual shapes between ordinary house keys.
You can paint them the same copper color or leave them dark for contrast.
A few oversized keys can act almost like focal points.
Don’t use valuable antiques without thinking first.
Some old keys are collectible.
Maybe check before covering Great-Grandma’s 1890 key in hardware-store spray paint.
Add Old Washers and Metal Rings
Keys aren’t your only option.
Old metal washers can add circular shapes.
Small metal rings work too.
You can also include retired cabinet keys or decorative metal charms.
Keep everything reasonably lightweight.
And avoid objects with sharp edges.
The piece should move freely without becoming a swinging collection of tiny knives.
Add Small Bells
If you want a brighter sound, include a few small outdoor-suitable metal bells.
Don’t put one on every strand.
A few are plenty.
The keys already make noise.
The bells simply add another tone.
Place them near the center where they’re more likely to move against neighboring pieces.
If the finished sound becomes too busy, remove a couple.
You’re building backyard ambiance.
Not the percussion section of a marching band.
Try an Aged Copper Finish
Bright copper isn’t your only choice.
For a darker look, start with copper and add subtle dark brown or black accents after the base coating has cured.
Use techniques and products compatible with the paint system.
Concentrate darker tones around recesses and key edges.
That gives the keys a weathered appearance without waiting decades for nature to handle it.
This finish works beautifully with dark wood.
Matte Black Version
For modern outdoor decor, paint all the keys matte black.
Keep the branch natural.
Use black cord.
This creates a simple graphic piece that works well near white siding, concrete patios, and modern planters.
You lose some metallic shimmer.
You gain a very clean silhouette.
I’d absolutely hang this version on a contemporary covered patio.
Silver Version
Silver gives the project a lighter feel.
It catches sunlight beautifully.
Pair silver keys with pale driftwood and gray cord for a coastal look.
This version works especially well around:
Blue cushions.
White planters.
Natural grasses.
Light wood.
It’s less rustic than copper but still playful.
Rainbow Key Wind Chime
Want something cheerful?
Paint groups of keys in different colors.
Red.
Orange.
Yellow.
Green.
Blue.
Purple.
Arrange them across the branch like a rainbow.
This version is fantastic for a colorful backyard, garden shed, or family craft project.
Keep the branch neutral so the keys get all the attention.
It’s basically a giant outdoor key necklace.
And honestly, I’m into it.
Patriotic Color Version
For summer holiday decor, you could create groups of red, white, and blue keys.
Keep the branch natural or paint it dark navy.
This can work as seasonal porch decor.
Just remember that heavily painted metal pieces may chip when they repeatedly hit each other.
A little wear can actually look nice.
If perfect paint matters to you, give the keys more space.
Farmhouse Version
For farmhouse style, keep the branch rough and natural.
Use antique copper or dark bronze keys.
Tie them with neutral cord.
Skip extra beads.
Skip colorful ribbon.
Let the simple materials do the work.
This version looks especially good beside:
Wooden rocking chairs.
Galvanized planters.
White siding.
Black porch lights.
Simple.
Warm.
No giant “WELCOME Y’ALL” board required.
Boho Version
Add wooden beads above several of the keys.
Use natural cord.
Mix copper, brass, and dark metal tones.
You can also add small pieces of driftwood between hanging strands.
Keep the spacing loose.
This gives the project a relaxed, collected feel.
A little asymmetry works nicely here.
Boho crafts don’t need to stand at attention.
Memorial Key Wind Chime
Old keys can carry memories.
Maybe you saved the key from a first apartment.
A grandparent’s old house.
A family cottage.
A childhood home.
If those keys no longer open anything important, you could use them in a smaller sentimental version.
Attach a small tag to the back of the branch with dates or place names.
Keep personal address information private if the piece hangs outside.
This can turn a simple craft into something surprisingly meaningful.
Make a Smaller Balcony Version
Forty keys can be a lot for an apartment balcony.
Make a mini version.
Use:
8 to 12 keys.
A 12- to 18-inch branch.
Shorter cords.
One solid hanging point if balanced correctly.
Keep sound in mind if neighbors live close by.
A quiet decorative piece may be more appropriate than something that jingles every time the air conditioner turns on.
Apartment harmony matters.
Make an Indoor Wall Hanging Instead
Love the look but not the noise?
Mount the branch indoors.
Keep the keys spaced so they don’t touch.
Now you’ve got metal wall decor rather than a wind chime.
This can look beautiful in:
Entryways.
Mudrooms.
Craft rooms.
Offices.
Covered sunrooms.
You can also hang family key tags or small decorative labels among the metal pieces.
Same basic craft.
No 2 a.m. jingling.
What About Rust?
Old keys may have different metal compositions and coatings.
Some can rust when exposed to moisture.
Paint and outdoor clear coatings may slow visible corrosion, but no decorative coating should be treated as permanent protection.
A covered outdoor location helps.
Inspect the keys periodically.
If rust becomes sharp or flaky, replace the damaged piece.
And remember that natural weathering can actually add character if the structure remains sound.
Natural Jute vs. Synthetic Cord
I love jute visually.
It looks fantastic with driftwood.
But natural fiber can weaken outdoors over time.
If the piece stays outside through rain, strong sun, and humidity, weather-resistant synthetic cord may be the more practical choice.
You can still choose a tan or brown synthetic cord for a natural appearance.
Check it every season.
A beautiful knot isn’t useful after the cord has become brittle.
Don’t Hang It Over Seating
This is one outdoor decorating habit I always think about.
Don’t hang heavy decor directly above chairs, dining tables, play areas, or places where people regularly sit.
Mount it nearby instead.
Then you can still see and hear it without wondering whether the branch will choose brunch as the moment to retire.
A slightly different hanging location can remove a lot of unnecessary risk.
Keep It Away From Children and Pets
Long dangling cords can be tempting.
So can shiny moving keys.
Hang the wind chime high enough that young children and pets can’t pull on it.
Don’t leave loose loops within reach.
Check for fallen keys after storms.
The project should stay decorative—not become a collection of small metal objects scattered around the yard.
Windy Yard? Shorten the Strands
If your yard gets strong regular wind, long cords may tangle.
Shorter strands can help.
You can also increase the spacing between keys.
Another option is moving the piece into a more sheltered spot.
A wind chime only needs enough breeze to move.
It does not need to survive hurricane auditions.
How to Reduce the Sound
Maybe you love the look but discover the finished chime is louder than expected.
Easy fixes:
Spread the keys farther apart.
Shorten certain cords.
Remove several keys.
Move the piece somewhere more protected.
You can also arrange the keys so only a few pairs overlap.
Test gradually.
The perfect wind chime sound is personal.
Some people love constant tinkling.
Others are ready to throw the thing into the woods after six minutes.
Know your household.
How to Increase the Sound
If it’s too quiet, bring neighboring keys slightly closer.
Stagger the hanging lengths.
Add a few larger keys or small bells.
Choose a slightly breezier location.
Don’t keep adding dozens of objects.
The keys need movement room.
Sometimes fewer well-positioned pieces make more sound than a dense cluster that can’t swing properly.
Protect Your Door and Siding
If you’re hanging this near the house, check how far the keys travel during strong wind.
They shouldn’t repeatedly strike siding, painted trim, windows, or doors.
Metal can scratch surfaces.
Hang the branch far enough away or shorten the cords.
Give everything room to move safely.
Your new backyard craft should not become a home-repair project.
How to Clean the Finished Wind Chime
Dust and pollen will eventually settle on it.
Use a soft dry cloth or brush.
For more cleaning, follow the care directions for the paint and clear coating you chose.
Avoid aggressive scrubbing.
Don’t leave painted keys soaking in cleaner.
Check the cord while you’re cleaning.
It’s the perfect time to catch weakening knots or fraying strands.
How to Store It for Winter
If you live somewhere with harsh winters, seasonal storage can help the project last longer.
Take the wind chime down.
Wipe it clean.
Let it dry fully.
Check knots and cords.
Wrap the branch loosely.
Store it somewhere dry.
Don’t toss it underneath heavy boxes.
Keys are tough.
Painted finishes are less enthusiastic about being crushed against one another for five months.
Refreshing It Next Spring
Spring cleanup is easy.
Check the hanging hardware.
Replace weak cord.
Touch up chipped keys.
Tighten screw eyes.
Check the branch for cracks or rot.
Then hang it again.
A few minutes of maintenance can give the project several seasons of use.
And because the keys already started life as old hardware, a little additional wear doesn’t exactly ruin the aesthetic.
Common Mistakes to Avoid
Painting Dirty Keys
Surface oil can interfere with paint adhesion.
Clean first.
Using Keys You Still Need
Check before crafting.
Seriously.
Applying One Heavy Paint Coat
Light coats usually give cleaner results.
Hanging Before the Paint Cures
Keys can stick together and chip.
Using Weak Indoor String Outside
Choose cord suitable for the location.
Ignoring Branch Weight
A thick branch plus 40 metal keys can become heavier than expected.
Using Weak Hanging Hardware
Choose mounting hardware suited to the full finished weight.
Hanging It Against a Window
Give moving metal plenty of clearance.
Putting It Directly Above Seating
Hang it nearby instead.
Forgetting About Neighbors
Wind chimes make sound.
Choose the location thoughtfully.
Leaving Knots Unchecked
Outdoor cord wears over time.
Inspect it regularly.
Why I Love This Old Key Craft
This project works because you don’t have to hide what the materials used to be.
The keys still look like keys.
The branch still looks like a branch.
That’s the whole point.
You simply take a collection of ordinary objects and arrange them in a way that gives them a completely different purpose.
And because every old key has a slightly different shape, the finished wind chime feels unique without requiring complicated decorative work.
Plus, clearing out the junk drawer while making backyard decor?
That’s two victories.
I’ll take it.
Frequently Asked Questions
How do you make a wind chime from old keys?
Clean old unused keys, paint them if desired, tie each key to a strong cord, attach the cords across a sturdy wooden branch, then install strong hanging points and mount the piece securely outdoors.
How many keys do I need?
A large wind chime may use around 30 to 40 keys, while a small version can look great with 8 to 15.
What paint should I use on metal keys?
Choose a coating made for metal and suitable for the intended indoor or outdoor location. Follow its surface-preparation and drying instructions.
Do I need to prime old keys?
That depends on the paint system and key surface. Some metal coatings recommend primer, especially on slick or difficult surfaces.
Can I use real house keys?
Use only retired keys that no longer provide access to anything important.
Can I use new blank keys?
Absolutely. Blank keys can give you a more uniform appearance if you don’t have enough old ones.
What wood works best?
A solid dry branch, driftwood piece, or reclaimed wooden bar can work. Avoid rotten, soft, or badly cracked wood.
What kind of string lasts outside?
Weather-resistant cord generally lasts longer outdoors than untreated natural twine, especially in wet or sunny locations.
How do I make the keys actually chime?
Hang neighboring keys close enough that they can lightly touch when the breeze moves them.
How can I make the wind chime quieter?
Increase the spacing between keys, shorten strands, or move the piece to a more sheltered location.
Can the wind chime stay outdoors year-round?
That depends on your climate and materials. Seasonal storage can protect painted metal, wood, and cord from harsh winter conditions.
Can I make the keys different colors?
Absolutely. Copper, bronze, black, silver, rainbow colors, or mixed metallic finishes can all create very different styles.
Final Thoughts
A DIY old key wind chime might be one of the most satisfying things you can make from a forgotten junk-drawer collection.
Clean the old keys.
Give them a warm copper finish.
Tie each one onto strong cord.
Arrange them across a chunky wooden branch.
Mount the branch securely.
Then let the breeze handle the rest.
The keys shimmer.
They move.
They gently tap together.
And suddenly those useless little pieces of metal have become actual backyard decor.
I especially love that you don’t need perfect matching materials.
Different key shapes make the piece better.
An imperfect branch makes it better.
Slightly different hanging lengths make it better.
This is one craft where the odd little leftovers are exactly what give the finished project personality.
So before you throw away that pile of mystery keys?
Maybe give them one last job.
Turns out they don’t need to open a door to be useful.