I’ll be honest: the first time I heard someone say they soaked pork chops in milk before frying, I gave it the same look I give some of those old church cookbook tips that sound a little too simple to work. But I had a family pack of bone-in pork chops on the counter, about 2 pounds total, and a couple of hungry people who love crispy skillet suppers, so I decided to try it myself. I let the chops sit in whole milk for 2 hours, then breaded and fried them the way I normally would.
What happened surprised me in a very practical, dinner-on-a-weeknight kind of way. The pork came out tender, juicy, and less prone to that dry, chewy texture pork chops can get when they cook just a minute too long. The coating also browned beautifully and held on well in the skillet. If you’re wondering whether a milk soak is worth the extra bowl and the extra time, I’ll walk you through exactly what I did, what changed, what didn’t, and how I’d do it again for my own family.
1. The pork chops I used
For this test, I used 4 bone-in pork chops that were right around 3/4 inch thick. Together they weighed just under 2 pounds. I prefer bone-in chops for frying because they tend to stay juicier than the very thin boneless ones, especially when I’m cooking for a mixed crowd and one person likes theirs just a touch more done.
If you use extra-thin pork chops, you may still get a nice result, but they cook so fast that it can be harder to notice the full benefit of the soak. In my kitchen, chops between 1/2 inch and 1 inch thick are the sweet spot for this method.
2. Why I tried milk in the first place
There’s a reason this old-fashioned trick has stuck around. Milk is mildly acidic, but gentler than something like buttermilk, vinegar, or lemon juice. That means it can help soften the surface of the meat without turning the texture mushy in a short soak. In plain terms, it gives the pork a little head start toward tenderness.
I also suspected milk might help tame that occasional strong “porky” flavor some package-store chops can have. In a small-town grocery run, you work with what’s available, and anything that makes an affordable family dinner taste a little sweeter and cleaner is worth trying in my book.
3. Exactly how I soaked them for 2 hours
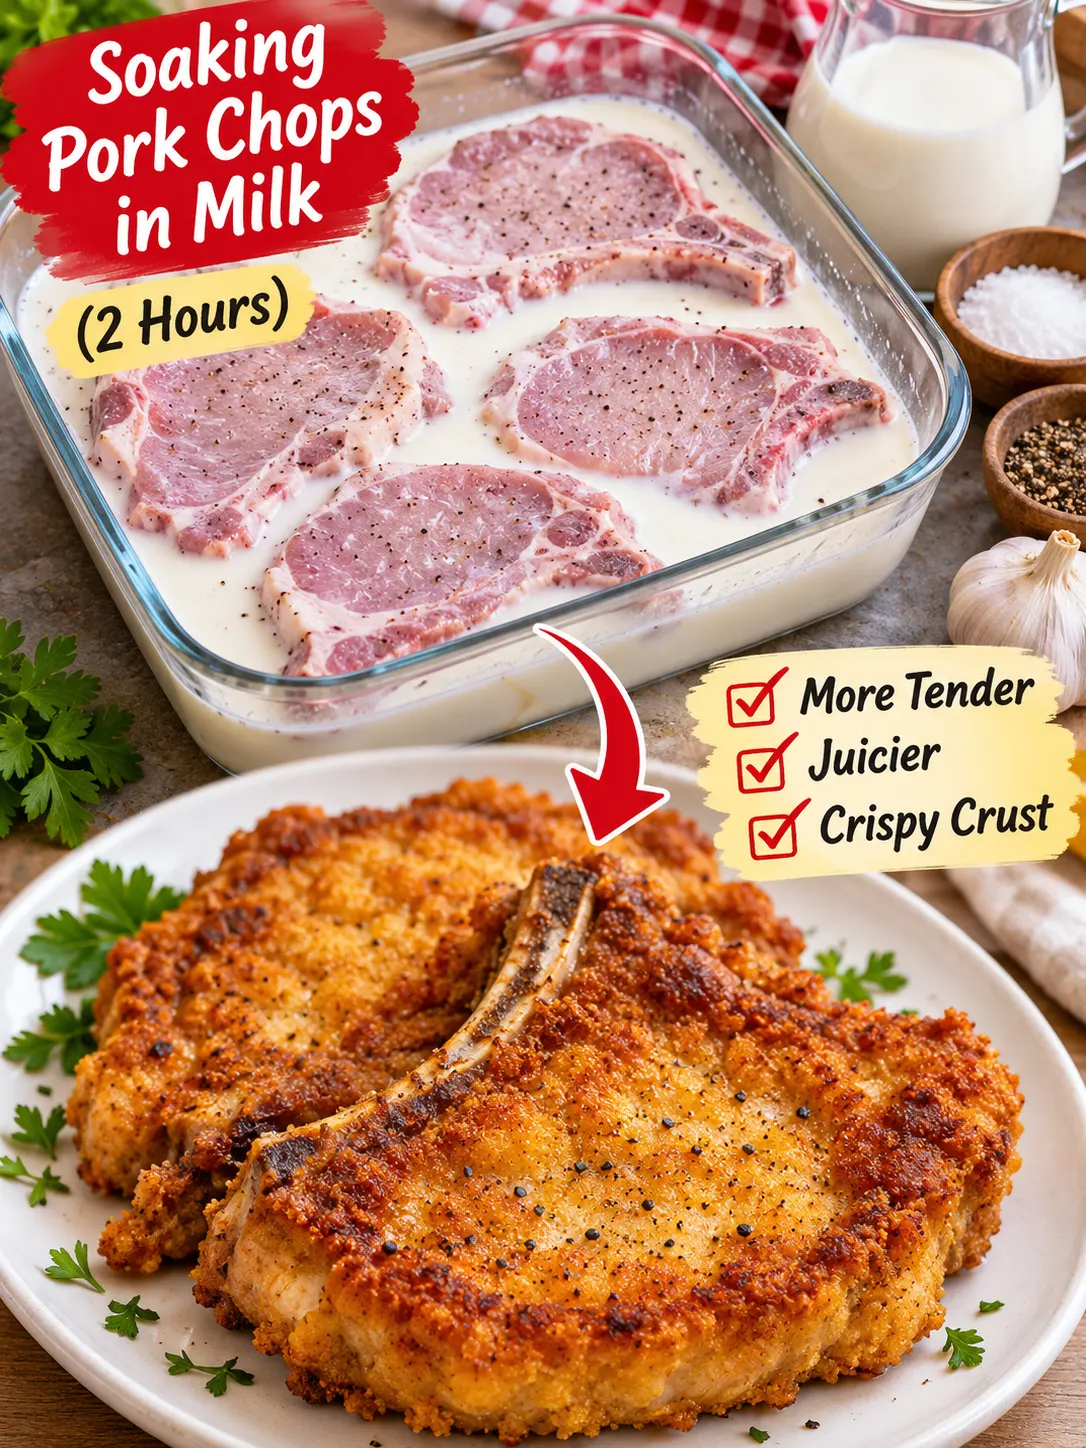
I placed the 4 raw pork chops in an 8-by-8-inch glass baking dish and poured in enough whole milk to mostly cover them, which took about 2 1/2 cups. I added 1 teaspoon kosher salt and 1/2 teaspoon black pepper to the milk, then turned the chops once so everything was evenly coated.
I covered the dish and refrigerated it for 2 hours. I did not leave it on the counter. Raw pork needs to stay cold, so if you try this, keep the soaking dish in the refrigerator the entire time. Halfway through, at about the 1-hour mark, I flipped the chops again just to make sure both sides had equal contact with the milk.
4. What the pork looked like after the soak
After 2 hours, the pork chops looked a little paler on the surface and slightly plumper than when they went in. The milk itself looked cloudy and had a faint pink tint from the raw pork juices, which is completely expected. There was no dramatic transformation, no miracle-cooking-show moment, just a subtle visible change.
What I noticed most was how the surface felt. The chops were moist and a little slick, which turned out to be helpful when it came time for dredging. That light tackiness helped the flour mixture cling better than it sometimes does on plain, dry chops.
5. The breading I used after soaking
I lifted the chops out of the milk and let the excess drip off for a few seconds. I did not rinse them. I also did not pat them completely dry. I wanted a thin film of milk left on the outside to help the coating stick.
For the breading, I used 1 1/2 cups all-purpose flour, 1 teaspoon kosher salt, 1 teaspoon seasoned salt, 3/4 teaspoon black pepper, 1 teaspoon garlic powder, 1 teaspoon onion powder, and 1/2 teaspoon paprika. That blend gave me a savory, family-friendly crust with enough flavor to keep the pork interesting but not so much spice that the kids at the table started negotiating.
If your family likes a little more crunch, you can mix in 1/2 cup fine cracker crumbs or 1/2 cup plain breadcrumbs with the flour. For picky eaters, I’d keep the seasoning simple with just salt, pepper, and maybe a pinch of garlic powder.
6. How I fried them in the skillet
I used a large 12-inch cast-iron skillet and poured in enough neutral oil to come up about 1/4 inch in the pan, roughly 3/4 to 1 cup. I heated the oil over medium to medium-high heat until a pinch of flour sizzled right away, which was around 350°F on my thermometer.
I fried the pork chops 2 at a time so I wouldn’t crowd the pan. Each chop cooked for about 4 to 5 minutes per side. Since mine were 3/4 inch thick, the total cooking time was about 9 minutes per batch. I pulled them when the internal temperature hit 145°F in the thickest part, then let them rest on a wire rack for 3 minutes.
If you don’t have a thermometer, I really recommend getting one. Pork chops can go from juicy to dry in a hurry, and hitting 145°F instead of cooking by guesswork makes a huge difference.
7. The biggest difference I noticed right away
The first thing I saw was the color. The crust browned evenly, with fewer pale spots and fewer overly dark patches than I sometimes get with dry-dredged pork chops. The milk seemed to encourage a more even golden finish, probably because of the milk solids helping with browning.
The second thing was how well the breading stayed put. Usually, I lose at least a few little flakes of coating in the skillet, especially around the curved edges near the bone. This time the crust held on better, and the finished chops looked more complete and tidy on the serving platter.
8. How the texture changed after frying
This was the real payoff. The pork chops were noticeably more tender than my usual quick-season-and-fry method. Not falling-apart tender, because pork chops are still pork chops, but the bites were softer and juicier, especially near the center.
Normally, with a fried chop this thickness, I expect at least one piece in the batch to lean a little dry, usually whichever one stayed in the pan 60 seconds too long while I was helping somebody with homework or draining green beans. With the milk-soaked chops, I had more forgiveness. Even the chop that likely got an extra minute still ate well.
9. What the milk soak did to the flavor
The flavor was cleaner and a little milder. The pork still tasted like pork, but the stronger edge was softened. That made the seasoning in the crust come through more clearly. My family described it as “more like diner fried pork chops,” which in our house is a compliment.
It didn’t taste milky. That’s important to mention because I know that’s what many people worry about. After breading and frying, there was no glass-of-milk flavor at all. What I got was a more balanced chop with a nice savory crust and a gentle, juicy interior.
10. Was 2 hours the right amount of time?
For me, yes. Two hours was long enough to make a difference, but not so long that dinner became an all-day project. It fit nicely into a real-life schedule. I started the soak around 4:00 in the afternoon, made side dishes around 5:30, and had the chops on the table a little after 6:00.
If you’re in a hurry, even 30 minutes to 1 hour may help. If you want to prep earlier, I’d still keep it reasonable. Around 2 to 4 hours sounds practical to me for plain milk. Much longer than that, and I think you’re better off switching to a more intentional brine or buttermilk marinade with seasonings.
11. A few mistakes to avoid
The biggest mistake would be soaking at room temperature. Raw pork should stay refrigerated during the entire soak. Another mistake is under-seasoning the flour. The milk helps tenderness, but it does not replace salt and seasoning, and a bland crust can make the whole chop feel flat.
I’d also avoid frying straight from a dripping-wet soak. You want the pork moist, not drenched. Let the excess milk drip off so the coating can form a proper layer instead of turning pasty. And don’t crowd the skillet. If the pan gets too full, the oil temperature drops fast and the crust can turn greasy instead of crisp.
12. How this compares to buttermilk
Buttermilk is still wonderful, especially if you want a slightly tangier flavor and an even more classic Southern-style fried coating. But plain milk is easier for many families because it’s already in the refrigerator. On a Tuesday night in a Midwestern house, “use what you have” matters.
I found milk gave a gentler result than buttermilk. The pork stayed natural-tasting, and the texture improved without becoming too soft on the surface. If I were frying chicken, I might reach for buttermilk first. For pork chops, plain milk did a lovely job.
13. The side dishes that worked best with these chops
Because the pork came out rich and crisp, I liked serving it with simple, comforting sides. That night I made mashed potatoes with 2 pounds of Yukon Golds, about 4 tablespoons butter, and enough warm milk to make them fluffy. I also set out green beans and applesauce, which is one of those old-school pairings that still works for a reason.
Other good choices would be skillet corn, baked macaroni and cheese, cucumber salad, buttered noodles, or roasted carrots. For little ones or picky eaters, cutting the pork into strips after frying can make it feel more familiar, almost like homemade pork fingers.
14. Who should try this method
If you often find pork chops dry, this method is worth trying. If you buy value packs when they’re on sale and need a reliable way to make them feel a little more special, it’s worth trying. If your family likes classic comfort food and you want one small trick that improves the final plate without adding a lot of cost, it’s absolutely worth trying.
Milk is inexpensive compared with specialty marinades, and for 4 pork chops I only used about 2 1/2 cups. That makes this one of those budget-friendly kitchen habits that quietly improves supper without making more work than necessary.
15. My final verdict after 2 hours in milk
Two hours later, what happened was this: the pork chops fried up more tender, more juicy, and more evenly browned than usual. The crust adhered better, the flavor was milder and cleaner, and the whole meal felt just a little more dependable. It wasn’t magic, but it was definitely noticeable.
I’ll be keeping this trick in my regular dinner rotation, especially for bone-in chops headed for the skillet. In a busy family kitchen, the best cooking tips are the ones that are simple, affordable, and repeatable. This one checked all three boxes for me, and I’d happily do it again.