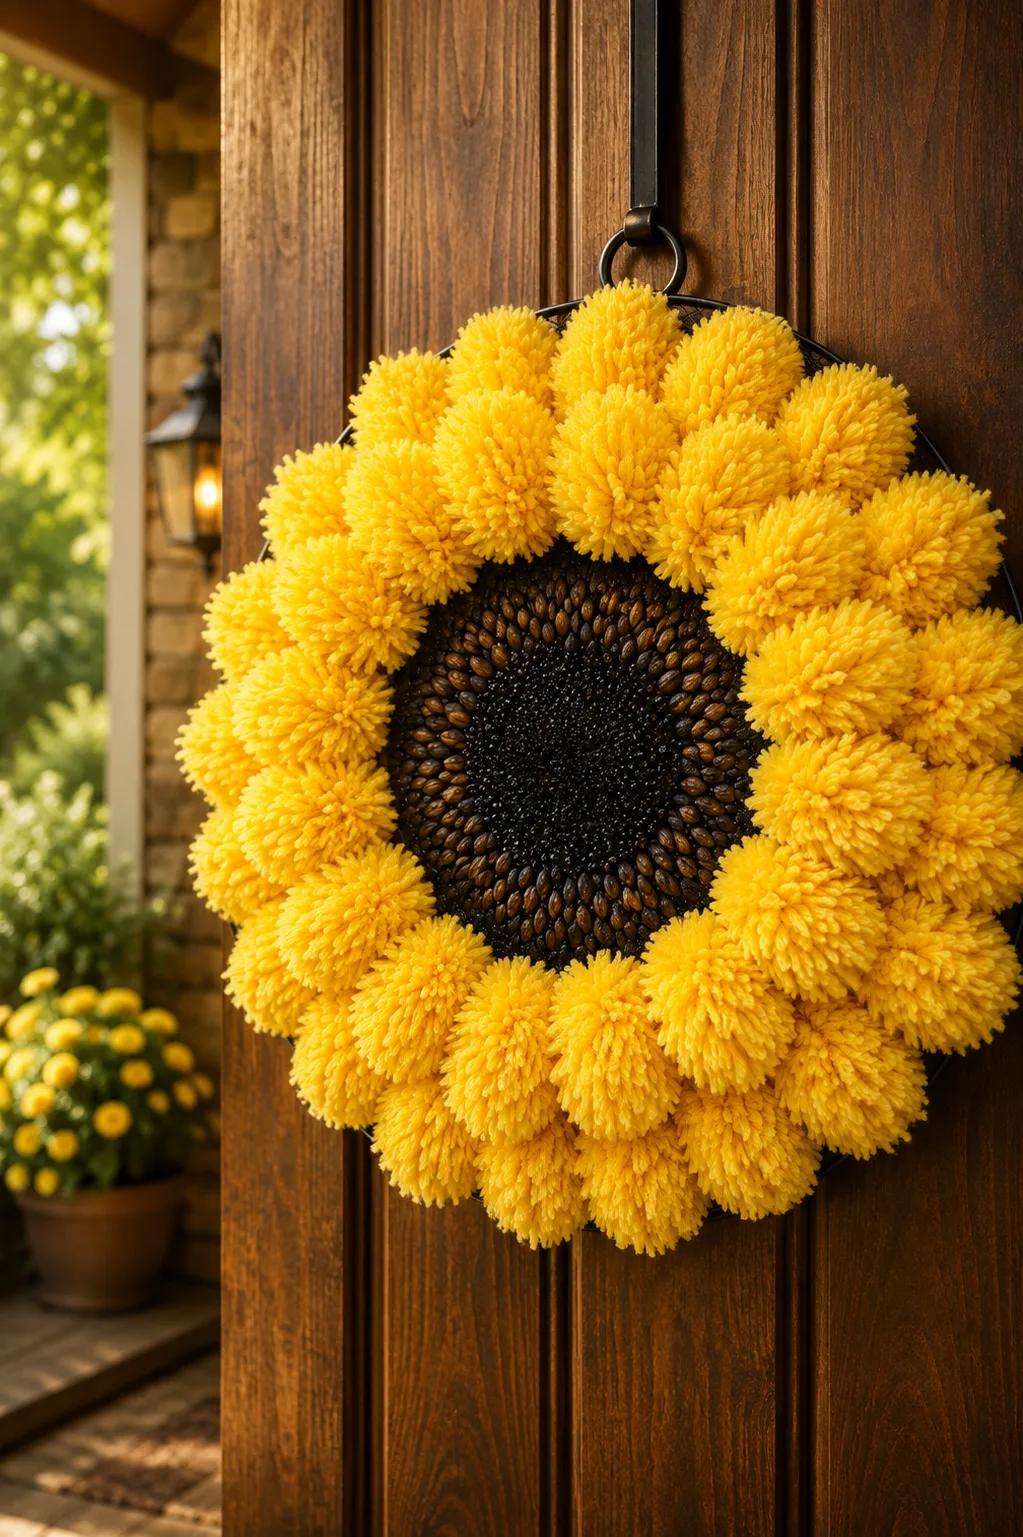
Okay, I have a weakness for DIY projects that start with something completely ordinary and end with guests asking, “Wait—you MADE that?”
This DIY sunflower wreath definitely falls into that category.
The petals aren’t expensive artificial flowers. They’re fluffy yellow microfiber dusters. And the round base? You can use a simple black metal grease splatter screen from the kitchen aisle.
I know. It sounds a little nuts.
But once those bright yellow pieces are layered around the dark center, the whole thing starts looking like one enormous sunflower. From several feet away, you’d never guess the petals started life as cleaning supplies.
I especially like this project for summer and early fall because the yellow makes a front door feel cheerful without requiring complicated craft skills. There’s no sewing, no fancy flower-making technique, and no need to perfectly measure every petal.
Basically, if you’re comfortable with a hot glue gun and can eyeball a circle, you’re in business.
Here’s how I’d make a yellow duster sunflower wreath, plus several ways to change the colors, improve the center, make it sturdier, and give it a farmhouse or fall look.
Why This DIY Sunflower Wreath Works So Well
The magic is really in the texture.
Microfiber dusters have hundreds of soft, narrow strands. Once the handles are removed and the fluffy portions are arranged around a circle, those strands resemble the loose texture of oversized flower petals.
Then you have the black splatter screen.
Instead of hiding it completely, you can leave part of the dark center visible. That creates the contrast that makes the yellow material suddenly read as a sunflower.
Yellow petals.
Dark center.
Round shape.
Your eyes fill in the rest.
And because the dusters are lightweight, you can create a surprisingly large decoration without ending up with a wreath that feels like you’re hanging a bowling ball from your front door.
Materials You’ll Need
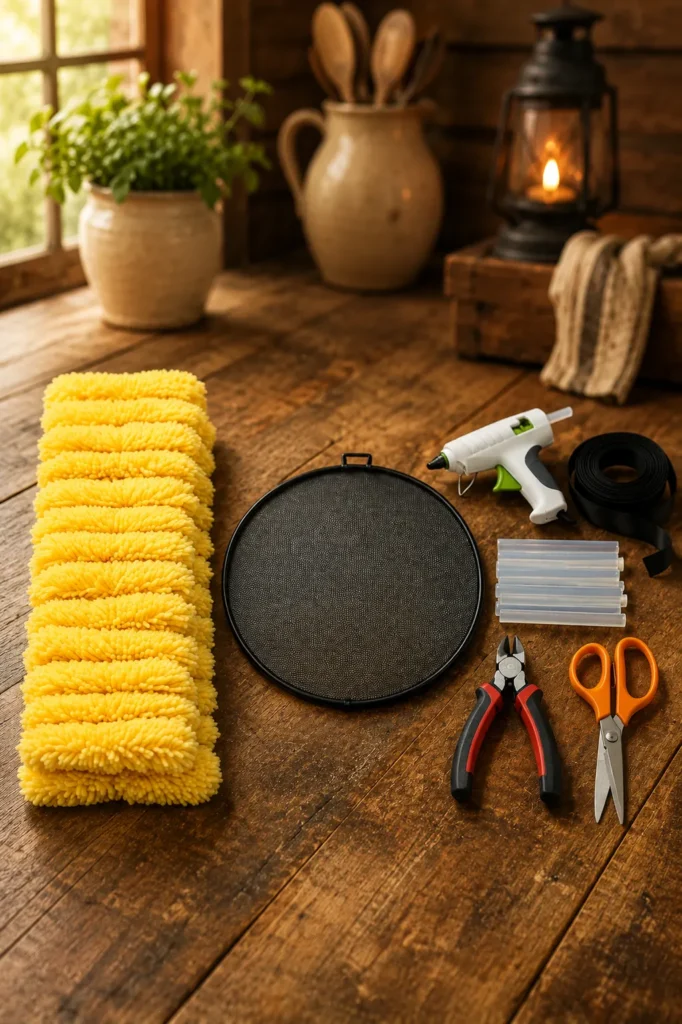
For one large DIY sunflower wreath, gather:
- About 40 to 50 fluffy yellow microfiber dusters
- 1 round black metal grease splatter screen, about 12 to 14 inches
- High-temperature hot glue gun
- Plenty of hot glue sticks
- Heavy-duty scissors or craft snips
- Wire cutters if the handles contain wire
- Black ribbon for hanging
- Floral wire or pipe cleaners
- Optional dark brown or black felt
- Optional brown mesh or burlap
- Optional small faux leaves
- Optional jute ribbon
- Optional protective clear craft coating suitable for your materials
You don’t necessarily need exactly 50 dusters.
The number depends on their size, the diameter of your screen, and how full you want your sunflower.
I’d rather buy a few extras than get 90% finished and realize my sunflower has one sad bald spot.
That’s the kind of crafting drama nobody needs.
Choosing the Right Yellow Dusters
Look for dusters with soft, dense microfiber heads.
Bright sunflower yellow gives you the classic summer look, while mustard or golden yellow can create a warmer fall-style wreath.
Try to buy dusters that are reasonably similar in:
- Length
- Thickness
- Shade of yellow
- Fiber texture
They don’t need to match perfectly.
Actually, slight variations can make the finished petals look more natural.
However, avoid mixing dramatically different yellows unless you’re intentionally creating a multicolor flower.
Before buying a huge pile, check how the fluffy section attaches to the handle.
The easier it is to separate, the faster this project becomes.
Choosing Your Splatter Screen
A black round grease splatter screen makes a clever base because it’s lightweight, inexpensive, and already has the shape you need.
Around 13 inches is a handy starting size.
Want a huge statement wreath?
Go larger.
A 15- or 16-inch screen can produce a seriously dramatic sunflower, although you’ll need more petal material.
Check that the screen feels reasonably sturdy.
A super-flimsy one may bend under the combined weight of dozens of duster pieces and glue.
Also inspect the handle.
Depending on the design, you may need to remove it with appropriate tools or position the wreath so the handle is hidden.
Wear eye protection when cutting metal components, and don’t wrestle with a piece that isn’t designed to come apart easily.
No front-door wreath is worth launching a chunk of metal across the kitchen.
Step 1: Prepare Your Work Area
Clear a large table.
And I mean large.
This sunflower grows quickly once the petals start spreading outward.
Cover the surface with cardboard, kraft paper, or another protective layer because hot glue has an almost supernatural ability to find your nicest table.
Plug in your glue gun and let it heat fully.
Place your splatter screen flat.
Before gluing anything, decide which side will face forward.
I also like to place a temporary marker at the top so I know where the hanging loop will eventually go.
Step 2: Remove the Duster Handles
Now comes the repetitive part.
Separate the fluffy yellow portion from each handle.
Depending on how your dusters are constructed, you may be able to slide the microfiber section off. Others may require careful cutting.
Work close to the base while keeping as much fluffy material intact as possible.
Don’t trim deeply into the microfiber.
You want each section to remain full because that’s what creates those oversized sunflower petals.
Place the finished pieces into a pile.
Yes, you’ll temporarily have what looks like an enormous pile of yellow fuzz on your table.
Trust the process.
Step 3: Sort Your Petals Before Gluing
This little step makes a bigger difference than you’d expect.
Spread the yellow pieces out and compare them.
Put the longest and fullest pieces together.
Set slightly shorter or thinner pieces in another group.
I like using the biggest pieces for the outer layer because they establish the overall size of the flower.
The smaller ones work nicely toward the center.
You can also trim a few pieces slightly if necessary.
Don’t obsess over perfect matching.
Real flowers aren’t geometrically perfect either.
That’s our excuse, and I’m sticking with it.
Step 4: Lay Out the First Petal Layer
Don’t grab the glue gun immediately.
First, dry-fit several petals around the outer edge.
Position their bases near the metal screen while pointing the fluffy ends outward.
Continue around the circle.
You’re looking for consistent spacing rather than mathematical perfection.
Once you’re happy with the arrangement, start attaching them one at a time.
Apply hot glue to a secure contact area and carefully press the petal base into position.
Watch your fingers.
Hot glue and microfiber aren’t a fun combination when your thumb gets involved.
Step 5: Complete the Outer Ring
Continue around the entire circumference.
Slightly overlap the bases of neighboring petals so you don’t leave obvious gaps.
Every few pieces, stop and look at the wreath from above.
Better yet, step several feet away.
A wreath can look perfectly balanced when your face is eight inches from it and hilariously lopsided from across the room.
Rotate the screen as you work.
That keeps your hand position comfortable and makes uneven areas easier to notice.
Once the first layer is finished, you’ll finally start seeing the sunflower shape.
And this is usually the moment when I go, “Ohhh, okay. This might actually work.”
Step 6: Add the Second Layer
The second ring creates fullness.
Place these petals slightly closer to the center.
Instead of lining each new petal directly over one from the outer ring, stagger them.
Think about roof shingles.
Each inner petal should roughly fill the visual gap between two outer petals.
This simple arrangement prevents the wreath from looking like a yellow wheel with perfectly straight spokes.
Continue around the entire circle.
Keep checking the shape.
If one section looks heavier, adjust your spacing before the glue sets completely.
Step 7: Build the Inner Petal Layer
Now add another layer toward the middle.
You can use slightly shorter or less fluffy pieces here.
Keep the dark center visible.
That’s important.
If you cover absolutely everything with yellow microfiber, the wreath may lose some of its sunflower identity.
The dark center creates visual contrast.
How large should the center be?
There’s no strict measurement.
Stand back and look at the flower.
If your eye immediately reads “sunflower,” you’re probably in the right zone.
Step 8: Make the Center Look More Like a Sunflower
You have several choices here.
The simplest option is leaving the black splatter screen visible.
That can work surprisingly well, especially from the street.
For more texture, cut a circle of dark brown or black felt and attach it over the center.
Another option is brown decorative mesh.
You could also use:
- Dark burlap
- Brown yarn
- Faux seed-like beads
- Small faux pinecones
- Textured brown fabric
- Black microfiber
- Brown pom-poms
Personally, I’d choose something dark brown with texture.
The contrast against the bright yellow petals gives the wreath that classic sunflower look without making the center overly complicated.
Step 9: Fill Any Thin Areas
Now hold the wreath upright.
This changes everything.
Gravity can make petals sit differently than they did on your table.
Look for obvious gaps.
If one area appears thin, add another yellow piece behind or between the existing petals.
Don’t automatically add more everywhere.
Too many petals can make the wreath bulky and hide the center.
You’re going for fluffy.
Not yellow explosion.
Although, honestly, yellow explosion isn’t the worst decorating style I’ve ever seen.
Step 10: Reinforce the Back
Once the front looks good, turn the wreath over carefully.
Check every major attachment point.
Add extra hot glue where necessary.
For an indoor decoration, glue may be enough depending on the materials.
For a covered front porch, I prefer extra mechanical support.
Thread small pieces of floral wire through the metal mesh and around selected petal bases.
Twist securely at the back and trim excess wire.
Fold sharp wire ends inward so they can’t scratch your door or your hands.
This gives you backup support if summer heat softens the glue.
Step 11: Add the Hanging Loop
Cut a strong piece of ribbon.
Black ribbon practically disappears against the dark center, while burlap gives the wreath more farmhouse character.
Thread the ribbon through a strong section of the metal base.
Tie it securely.
You can also reinforce the hanging point with floral wire.
Before hanging the wreath outside, test the loop indoors.
Hold the wreath slightly above a soft surface and make sure nothing shifts.
Because finding 47 yellow dusters scattered across your porch five minutes later?
Not the grand finale we’re looking for.
Step 12: Fluff the Sunflower
This is the fun part.
Hang your wreath and use your fingers to fluff the microfiber.
Separate compressed fibers.
Gently reposition petals.
Rotate any pieces that look awkward.
Step back several feet.
Look again.
Then make tiny adjustments rather than constantly adding more material.
Once everything is fluffy and evenly distributed, you’re done.
And yep—cleaning supplies just became front-door decor.
How to Make a Farmhouse Sunflower Wreath
Want that cozy farmhouse look?
Use warm golden-yellow petals rather than neon yellow.
Choose a textured brown center.
Then add a simple burlap bow.
A few muted faux eucalyptus leaves can soften the edge, although I’d keep greenery limited.
The sunflower itself should remain the star.
You could also attach a small wooden sign across the center with a simple word such as:
“Welcome”
“Hello”
“Home”
“Fall”
Keep the lettering simple.
Too many decorative pieces can turn a bold sunflower into visual clutter pretty quickly.
Make It Rustic for Fall
This craft transitions beautifully into early fall.
Start with mustard-yellow or golden petals.
Use a deep brown center.
Then add small touches of:
- Rust-colored ribbon
- Burlap
- Raffia
- Faux wheat
- Tiny faux berries
- Muted greenery
I wouldn’t add every item on that list.
Pick one or two.
The huge flower already makes a statement.
For September decorating, I’d probably choose a brown center, a little burlap, and a few rust-colored accents.
Done.
Pumpkin spice energy without actually gluing a pumpkin to anything.
Make a Giant Daisy Instead
Here’s where the idea gets really fun.
Change the color of the dusters and you’ve got an entirely different flower.
Use fluffy white material around a yellow center for a giant daisy.
That version would look adorable on a spring porch.
For something playful, try pink petals.
Red can create a bold summer flower.
Orange works beautifully for fall.
You could even alternate two similar shades for more dimension.
The basic construction stays exactly the same.
Try a Black-Eyed Susan Version
For a late-summer look, use rich golden-yellow petals and a raised dark brown center.
Make the center slightly larger than you would for a traditional sunflower.
A textured fabric or tightly packed brown pom-poms can give it more depth.
Add a few simple green leaves behind the petals.
This version looks especially good against a white, cream, navy, or dark green front door.
Best Front Door Colors for a Yellow Sunflower Wreath
Yellow is surprisingly flexible.
On a black door, it looks dramatic.
On navy, yellow pops beautifully.
Against white, the look feels bright and clean.
On dark green, it gives you a natural garden vibe.
A red door can work too, although I’d choose a warmer golden yellow rather than a super-bright lemon shade.
If your door already has lots of decorative glass or hardware, keep the wreath simple.
If the door is plain, go big.
Sometimes the front door needs a little drama.
The good kind.
How to Make the Wreath Look More Expensive
There are a few little tricks.
First, use enough petals.
Sparse wreaths often look cheaper because the base shows through in unintended places.
Second, stagger your layers.
Third, keep the overall shape round.
Fourth, choose a convincing center.
And finally, limit extra decorations.
I know the craft aisle is whispering:
“Add the glitter berries.”
“Add three bows.”
“Put a tiny scarecrow on it.”
Stay strong.
A giant sunflower already has plenty going on.
How to Protect It Outdoors
Microfiber isn’t my first choice for an uncovered door exposed to heavy rain.
If you’re using this wreath outdoors, a covered porch is ideal.
Keep it protected from prolonged moisture.
Rain can flatten or clump fluffy fibers, and repeated dampness isn’t something I’d invite.
Heat is another consideration.
Hot glue can soften under high temperatures, particularly on a door that gets strong afternoon sun.
That’s why floral-wire reinforcement can be useful.
Also check that any protective spray you consider is compatible with microfiber, glue, metal, and decorative materials. Test it on leftover material first.
Don’t soak the finished wreath with random coatings.
Sometimes the easiest weatherproofing method is simply hanging it somewhere sheltered.
Budget Tips
This project can get surprisingly expensive if you buy 50 dusters at regular retail prices.
So shop strategically.
Look for multipacks.
Check discount stores.
Watch seasonal clearance sections.
Compare the price of microfiber refills without handles.
You may even find bulk yellow microfiber pieces that create the same look for less money.
And don’t assume you actually need 50.
A smaller splatter screen with tighter layering may use considerably fewer pieces.
Do a quick dry layout before buying another armload.
Your cashier already has questions.
No need to make things weird.
Common Mistakes to Avoid
Using Too Little Material
A thin sunflower can reveal too much of the metal base.
Use overlapping layers to create fullness.
Gluing Everything Before Checking the Shape
Work gradually.
Stand back every few minutes.
Correcting an uneven section early is much easier than ripping apart cooled hot glue.
Making Every Petal Identical
A little variation makes the flower look softer and more natural.
Covering the Entire Center
Leave enough dark space to visually establish the sunflower center.
Using Only Glue on a Very Hot Door
Heat can affect some adhesives.
Add wire support when needed and keep the wreath sheltered when practical.
Making the Center Too Small
A tiny center surrounded by giant petals can look more like a generic flower than a sunflower.
Experiment before permanently attaching the center material.
Adding Too Many Decorations
Sunflowers are bold.
Let the flower do most of the work.
Ignoring the Back
Sharp wire or rough metal can scratch a painted door.
Check the back before hanging and cover or bend anything that could cause damage.
How to Store Your DIY Sunflower Wreath
Don’t crush it into a plastic storage bin beneath the Christmas decorations.
Give those fluffy petals some room.
Ideally, hang the wreath inside a large wreath-storage bag or container.
Keep it somewhere dry.
Avoid placing heavy items on top.
When you pull it out next season, fluff each petal gently with your fingers.
If everything was stored properly, the flower should spring back surprisingly well.
That’s another thing I like about this project.
You can bring it back year after year instead of treating it as disposable seasonal decor.
Frequently Asked Questions
What is the best base for a DIY duster sunflower wreath?
A round metal grease splatter screen works well because it’s lightweight, inexpensive, dark in the center, and provides plenty of attachment points.
How many yellow dusters do I need for a sunflower wreath?
A large, very full wreath may use around 40 to 50 duster heads. Smaller wreaths can require fewer. The exact amount depends on the duster size, base diameter, and desired fullness.
Can I use microfiber mop refills instead?
Potentially. If the fibers have a similar fluffy texture and can be cut or separated cleanly, they can create a comparable effect. Test one before buying a large quantity.
Can this sunflower wreath go outside?
I’d place it on a covered porch or another protected location. Repeated rain can affect microfiber, while strong heat can weaken certain adhesives.
Can I make this without hot glue?
You can rely more heavily on floral wire, zip ties, or another attachment method compatible with your particular materials. Make sure all connections are secure and that nothing sharp touches the door.
What can I use for the sunflower center?
Try the existing black screen, brown felt, burlap, decorative mesh, yarn, pom-poms, textured fabric, or another lightweight dark material.
How can I make the sunflower look fuller?
Create multiple staggered petal layers and place additional pieces only where you see gaps.
Can I make a smaller version?
Absolutely. Choose a smaller circular base and use fewer duster pieces. A smaller flower can work nicely on an apartment door, kitchen wall, or garden shed.
Can I make other flowers with this method?
Yes. White petals with a yellow center can resemble a daisy, while pink, orange, red, or cream materials can create completely different seasonal flowers.
What style works best with this wreath?
Farmhouse, rustic, cottage, summer, country, and early-fall decor all pair naturally with a giant sunflower wreath.
Final Thoughts
This DIY sunflower wreath is exactly the kind of project I love: ordinary materials, simple construction, and a finished result that looks completely different from where it started.
A pile of fluffy yellow dusters doesn’t exactly scream “beautiful front-door decoration.”
Add a round dark base, though, and suddenly those same fibers become oversized sunflower petals.
I’d keep the design simple.
Layer the yellow pieces generously, stagger the petals, create a strong dark center, reinforce the back, and finish with a basic hanging ribbon.
Then put it on the door and wait.
Because somebody is absolutely going to ask where you bought that giant sunflower.
You don’t have to tell them it started in the cleaning aisle right away.
Let ’em wonder for a minute.