Every August, my garage turns into what feels like a giant toaster oven.
By the middle of the afternoon, the air gets heavy, the concrete floor feels warm through my shoes, and pretty much every appliance out there has to work harder than usual. My chest freezer has survived plenty of hot summers, but I’ve always wondered if sitting directly on a scorching concrete slab was making its job harder.
So, this August, I finally tested something I had heard homeowners talk about for years: putting a chest freezer on concrete pavers instead of letting it sit directly on the garage floor.
I wasn’t expecting some crazy drop in my electric bill. I just wanted to know whether lifting the freezer a couple of inches could make a noticeable difference in temperature, compressor activity, moisture, noise, or overall performance.
For two weeks, I tracked what happened.
And, honestly, the results surprised me a little.
Why I Put My Chest Freezer on Concrete Pavers
The idea started with one simple observation.
My garage floor gets hot.
Really hot.
During warm August afternoons, I measured the concrete around my freezer at roughly 88°F to 94°F. Once that slab heats up, it stays warm for hours.
My freezer normally sits directly on the concrete.
That got me thinking.
A chest freezer already has to deal with hot garage air, limited airflow, and repeated temperature swings every time the garage door opens. Could direct contact with a warm slab add just a little more heat stress?
The freezer I tested is a 14.8-cubic-foot chest freezer positioned along the back wall of my attached garage. It sits about 9 inches away from the wall and roughly 18 inches from a metal storage rack.
It has always worked reliably, but during the hottest part of summer I often notice longer compressor runs in the late afternoon.
That’s what made me curious.
I knew two concrete pavers probably weren’t going to turn my garage into a climate-controlled kitchen.
Still, I figured, why not test it?
My Chest Freezer Setup
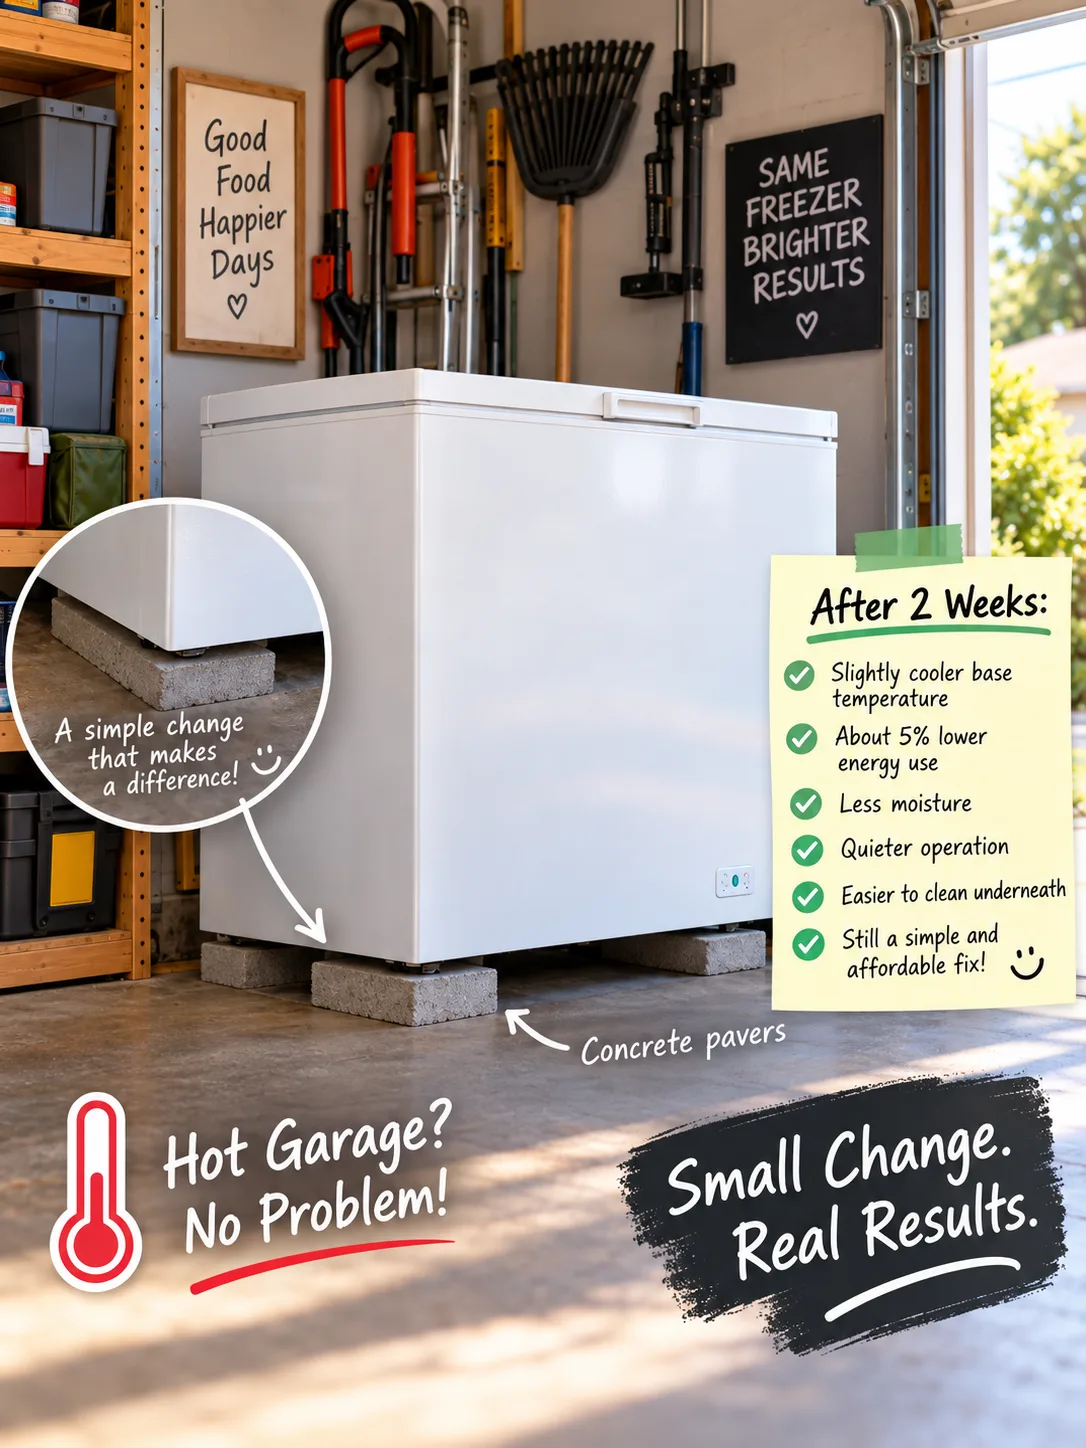
I used two concrete pavers that were already sitting in my yard.
Each paver measured:
- 16 inches wide
- 16 inches long
- 2 inches thick
- About 32 to 35 pounds
I placed the pavers underneath the freezer’s metal support rails.
That part is important.
I didn’t just stick two blocks under random parts of the freezer. I wanted the weight distributed across the same structural points that normally rest on the floor.
My freezer weighs around 125 pounds empty.
During the experiment, it was roughly half full, so I estimated the loaded weight at around 210 to 240 pounds.
That’s a lot of weight.
Because of that, I made sure both pavers sat completely flat against the garage floor.
One corner was slightly uneven, so I added a thin composite shim measuring about 1/8 inch.
Tiny adjustment.
Big difference.
Before adding that shim, the freezer had a slight wobble when I opened the lid. After leveling it, the freezer felt rock solid.
Garage Conditions During the Test
I ran the test for two weeks in August.
This wasn’t some lab experiment with controlled temperatures and perfect conditions.
This was my actual garage.
Outdoor daytime temperatures ranged from about 86°F to 97°F.
Overnight temperatures stayed between roughly 68°F and 75°F.
Inside the garage, morning temperatures usually hovered between 76°F and 80°F.
By late afternoon, they often climbed to 89°F to 93°F.
Humidity ranged from approximately 52% to 71%, depending on the weather.
My garage gets west-facing heat later in the day, especially after 2 p.m. The garage door is insulated, but there’s no air conditioning or dedicated cooling system in there.
The main door opens several times a day.
The side door opens, too.
Basically, it behaves like a normal garage.
And that’s exactly why I wanted to test the pavers in real-life conditions.
How I Measured the Results
I didn’t want to rely only on, “Well, I think the freezer sounds better.”
So I tracked several things during the two-week experiment.
I used:
- A plug-in electricity monitor
- An internal freezer thermometer
- An infrared thermometer
- A simple notebook
- Regular temperature checks
Most days, I checked readings around:
- 7 a.m.
- 3 p.m.
- 9 p.m.
I measured the concrete floor temperature, the paver temperature, the freezer’s lower exterior edge, and the temperature inside the freezer.
I also paid attention to compressor cycling.
I wasn’t using professional logging equipment, so the compressor observations were based on what I heard and recorded manually.
Still, after owning the freezer for years, I know its normal rhythm pretty well.
I also tracked how often my family opened the freezer.
Most days, the lid opened between two and five times, usually for less than 30 seconds.
And, yes, I resisted the urge to do a giant grocery run halfway through the test.
That would’ve totally messed up my numbers.
Moving the Freezer Was the Hardest Part
Putting a partly loaded chest freezer onto concrete pavers sounds simple until you actually try it.
Chest freezers are heavy.
They’re awkward.
And once they’re loaded with frozen food, they really do not want to move.
I unplugged the freezer for about 11 minutes while repositioning it.
The internal temperature barely changed during that time.
I used furniture sliders to shift one side slightly, then carefully lifted the base using a pry bar and a wood block.
I slid one paver into position at a time.
Here’s one lesson I learned right away:
Measure the freezer’s support rails before moving anything.
At first, I almost centered the pavers based on how the freezer looked from the outside.
Bad idea.
The actual support points were narrower than I expected.
Once I lined everything up correctly, the freezer sat much more securely.
The Concrete Floor Was Noticeably Hotter Than the Pavers
This was the first result that really caught my attention.
On several hot afternoons, the exposed garage floor beside the freezer measured between 90°F and 94°F.
The upper surface of the pavers underneath the freezer usually measured around 84°F to 88°F.
That means the paver surface was often about 4°F to 6°F cooler than the surrounding slab.
Now, that’s not some massive temperature drop.
But it happened consistently.
And consistency matters.
The lower metal edge of the freezer also appeared slightly cooler during peak afternoon heat.
Before putting the freezer on pavers, I typically saw lower cabinet temperatures around 91°F to 93°F during hot afternoons.
After raising it, readings were more often around 87°F to 90°F.
Infrared thermometers aren’t perfect on every type of material, so I wouldn’t treat those numbers like laboratory-grade readings.
Still, the pattern showed up again and again.
My Freezer Compressor Seemed to Run Less Aggressively
This part was more subjective.
I didn’t install a dedicated compressor cycle recorder.
But I paid close attention to when the freezer kicked on, how long it ran, and how frequently I noticed it cycling.
During the hottest window of the day, roughly 3 p.m. to 7 p.m., the compressor seemed to run slightly shorter cycles.
Before the paver test, I was used to hearing long compressor runs during peak garage heat.
After raising the freezer, those runs often seemed a little shorter, with slightly longer gaps between cycles.
Based on my notes, I’d estimate the hottest afternoon cycles were perhaps 5% to 10% shorter.
Again, that’s an observation, not a lab measurement.
Still, the freezer sounded less busy during the roughest part of the day.
In the morning?
Almost no difference.
Late at night?
Same story.
The biggest change appeared when the garage itself was at its hottest.
Electricity Use Dropped About 5%
Here’s where things got more interesting.
During the two weeks with the freezer on concrete pavers, average power consumption was about:
0.94 kWh per day
During the two weeks immediately before the experiment, it had averaged roughly:
0.99 kWh per day
That works out to a reduction of around 0.05 kWh per day.
In percentage terms, that’s roughly a 5% drop.
Sounds great, right?
Well… don’t start planning what you’ll buy with the savings just yet.
At an electricity rate of $0.16 per kWh, saving 0.05 kWh a day amounts to less than one cent per day.
Over a full year, that would be somewhere around $2.90, assuming the same difference continued year-round.
And it probably wouldn’t.
Winter conditions would be completely different.
So, no, putting a chest freezer on pavers is not some secret electricity-bill trick.
The savings were small.
But I was more interested in reducing heat stress on the appliance than saving three bucks.
The Inside Temperature Stayed More Stable
My freezer normally stays somewhere between about -2°F and 4°F, depending on where I position the thermometer and how often the lid gets opened.
During the test, the average temperature wasn’t dramatically lower.
What changed was the consistency.
Before the experiment, late-afternoon temperatures would occasionally drift toward 3°F or 4°F after several hours of garage heat.
With the freezer on pavers, I more often saw afternoon readings around 0°F to 2°F.
That difference is pretty small.
Both ranges are normal for a working freezer.
Still, the temperature seemed less likely to creep toward the warmer edge of its normal range during peak heat.
That matched what I noticed with the compressor.
The freezer didn’t seem to be fighting quite as hard during hot afternoons.
Moisture Around the Freezer Base Improved
This was probably my favorite everyday benefit.
My garage gets humid during August.
On especially muggy days, I sometimes notice a slightly damp or clammy feeling around cold appliances.
Nothing dramatic.
No puddles.
Just that faint moisture film you get when warm, humid air meets cooler surfaces.
After raising the freezer about 2 inches, the area around the base seemed noticeably drier.
I think airflow probably played a role.
The gap created more room for air to circulate around the lower edges of the freezer.
The pavers also kept the freezer base from sitting flat against the slab.
By evening, I noticed less moisture along the concrete near the unit.
Was the difference life-changing?
Nope.
Was it nice?
Absolutely.
Anything that helps keep moisture away from a garage appliance gets a thumbs-up from me.
Noise Changed Slightly
I expected the concrete pavers to make vibration louder.
Concrete is dense, after all.
I figured the freezer might buzz or hum more once it was sitting on two solid blocks.
That didn’t really happen.
The compressor startup sounded slightly sharper, but overall volume seemed about the same.
What mattered much more was leveling.
Before I added the little shim under one corner, I heard a faint ticking or rattling sound when the compressor started.
Once I leveled the freezer, the noise disappeared.
So if you put a chest freezer on concrete pavers and suddenly hear extra rattling, check the support points before blaming the pavers.
A tiny wobble can make a surprising amount of noise.
Cleaning Under the Freezer Became Easier
This benefit had nothing to do with power usage.
But man, I appreciated it.
Garages collect everything.
Dust.
Leaves.
Spiderwebs.
Tiny bits of cardboard.
Random mystery dirt that somehow appears even when nobody remembers tracking it inside.
Once the freezer sat 2 inches higher, I could reach underneath the edges with a long microfiber duster.
I could also see more of the floor.
That made it easier to check for:
- Moisture
- Bugs
- Dust buildup
- Debris
- Small leaks
- Rust-prone areas
That little bit of extra access made routine cleaning much easier.
And, honestly, anything that makes garage cleaning less annoying is a win in my book.
There Are Some Downsides
The paver setup worked well for me, but it isn’t perfect.
The Freezer Sits Higher
Two inches doesn’t sound like much.
You’ll notice it.
I’m 5’8″, and reaching the bottom of my chest freezer became slightly more awkward.
If you already struggle to reach items buried at the bottom, adding height may make that problem worse.
The Freezer Has to Be Completely Stable
This is the big one.
A loaded freezer can weigh hundreds of pounds.
You do not want that weight sitting on cracked, decorative, uneven, or unstable blocks.
I used thick concrete pavers on a solid garage slab.
I also made sure the freezer’s support rails rested firmly on them.
I would not stack pavers.
Seriously.
One layer was plenty.
Stacking them would add height and create another point where the freezer could shift.
No frozen pizza is worth turning your garage freezer into a balancing act.
You Still Need Good Ventilation
Raising the freezer doesn’t fix poor airflow.
If the manufacturer says your freezer needs clearance around the sides or back, that clearance still matters.
Pavers won’t compensate for a freezer jammed tightly between storage boxes and a garage wall.
Air circulation around the appliance still plays a major role in cooling performance.
Should a Chest Freezer Sit Directly on Concrete?
It can.
Many chest freezers spend years sitting directly on concrete garage floors without a problem.
The real question is whether raising yours would be useful in your particular garage.
If your slab stays relatively cool and dry, you may notice almost no difference.
If your garage floor becomes extremely hot during summer, adding a small amount of separation may reduce some of that direct heat exposure.
The bigger practical benefit may actually be airflow and moisture control around the base.
That was definitely the case for me.
Are Concrete Pavers Safe Under a Chest Freezer?
They can be, as long as they are strong, flat, properly positioned, and sitting on a solid surface.
I would avoid:
- Cracked pavers
- Thin decorative stepping stones
- Loose bricks
- Uneven stacks
- Soft ground
- Wobbly support points
Check where your freezer actually carries its weight.
Some models use rails.
Others use feet or casters.
Your pavers need to support those points properly.
It’s also worth checking the freezer manufacturer’s installation instructions before changing how the appliance sits.
Would Rubber Mats Work Better?
Maybe, depending on what problem you’re trying to solve.
Rubber pads can help reduce vibration.
Foam insulation may provide more thermal separation.
Plywood can create a flat platform.
But each material comes with its own issues.
Rubber can trap moisture.
Wood can absorb water.
Foam may compress under heavy loads.
That’s one reason I liked concrete pavers.
They’re strong.
They don’t mind moisture.
They’re inexpensive.
And they can handle the weight of a loaded appliance when properly supported.
I also happened to have two sitting around already, which made the decision pretty easy.
My Results After Two Weeks
After two weeks, here’s what changed.
The paver surface generally stayed about 4°F to 6°F cooler than the hottest nearby concrete.
The lower freezer cabinet often measured a few degrees cooler during peak afternoon heat.
Power consumption dropped from about 0.99 kWh per day to 0.94 kWh per day during the comparison period.
Afternoon compressor cycling seemed slightly less aggressive.
Interior temperatures stayed a little more consistent.
Moisture around the base decreased.
Cleaning underneath became easier.
Noise stayed about the same once the freezer was properly leveled.
None of these differences were huge.
Together, though, they made the setup feel worthwhile.
Was Putting My Chest Freezer on Concrete Pavers Worth It?
For me, yes.
Not because the pavers created some dramatic energy-saving breakthrough.
They didn’t.
The difference was modest.
What I liked was the combination of small benefits.
The freezer appeared to experience slightly less heat around the base.
It stayed a little steadier during the hottest afternoon hours.
The floor around it seemed drier.
And cleaning became easier.
Since I already owned the pavers, the project cost me nothing.
Even if I had purchased them, two basic concrete pavers would usually be a fairly inexpensive home-center purchase.
I also like that the change is completely reversible.
If I decide I hate the extra height someday, I can remove the pavers and go right back to the original setup.
Who Might Benefit From This Setup?
Putting a chest freezer on concrete pavers may make sense if your freezer sits in:
- A hot garage
- An unconditioned workshop
- A humid basement
- A utility room with a concrete floor
- An area where moisture collects around the appliance
It may be especially useful if your garage slab regularly reaches the upper 80s or 90s during summer.
I’d probably skip it if the floor is badly uneven or if raising the freezer makes it less stable.
I’d also skip it if the extra height makes reaching into the freezer unsafe or uncomfortable.
Stability comes first.
Always.
Simple Tips Before You Try It
If you want to try the same setup, a little preparation makes the job much easier.
First, measure the freezer’s support points before moving it.
Next, choose thick, solid pavers that can handle the appliance’s weight.
Check the pavers with a level.
Keep the freezer supported evenly.
Don’t stack blocks just to gain extra height.
And don’t forget about ventilation around the sides and back.
One more thing: moving a loaded chest freezer alone is rough.
Ask for help if you need it.
Your back will thank you.
Trust me on that one.
Final Thoughts
After two weeks, I decided to leave my freezer on the concrete pavers.
That probably says more than any measurement.
The change wasn’t dramatic.
My electric bill isn’t suddenly exciting.
The freezer didn’t become silent.
Nothing magical happened.
But the base stayed a little cooler, the internal temperature looked steadier during hot afternoons, moisture around the unit improved, and the freezer seemed slightly less stressed during the hottest part of the day.
Sometimes, home projects don’t need to be huge to be useful.
For my hot August garage, putting my chest freezer on concrete pavers turned out to be one of those small changes that simply made sense.
And yeah, I’m keeping it that way.